NB4A
NekoBox for Android
📚 Table of Contents
Note 1 - Some Subscriptions Not Updating
Regarding NekoBox version 1.4.0
In the latest update, some subscription links are not being added to the client. In my own backup, there are about ten subscription links at the end that do not update, while they work fine in other clients. I still don't know the reason. If this is important to you, do not update to this version. I still recommend using Exclave. Its balancer feature is worth the entire NekoBox charade.
Some of the subscriptions that don't update
https://raw.githubusercontent.com/Rayan-Config/C-Sub/refs/heads/main/configs/proxy.txt
https://raw.githubusercontent.com/Kolandone/v2raycollector/refs/heads/main/ss.txt
It's not a big deal when we have our own repository of various subscription links. If one doesn't work, we'll use another 🤧 😅
Note 2 - Outdated Route Asset Files
As always, the problems revolve around Routing Rules.
If you don't care about ad-blocking rules and bypassing Iranian IPs and websites, don't read the rest of this article.
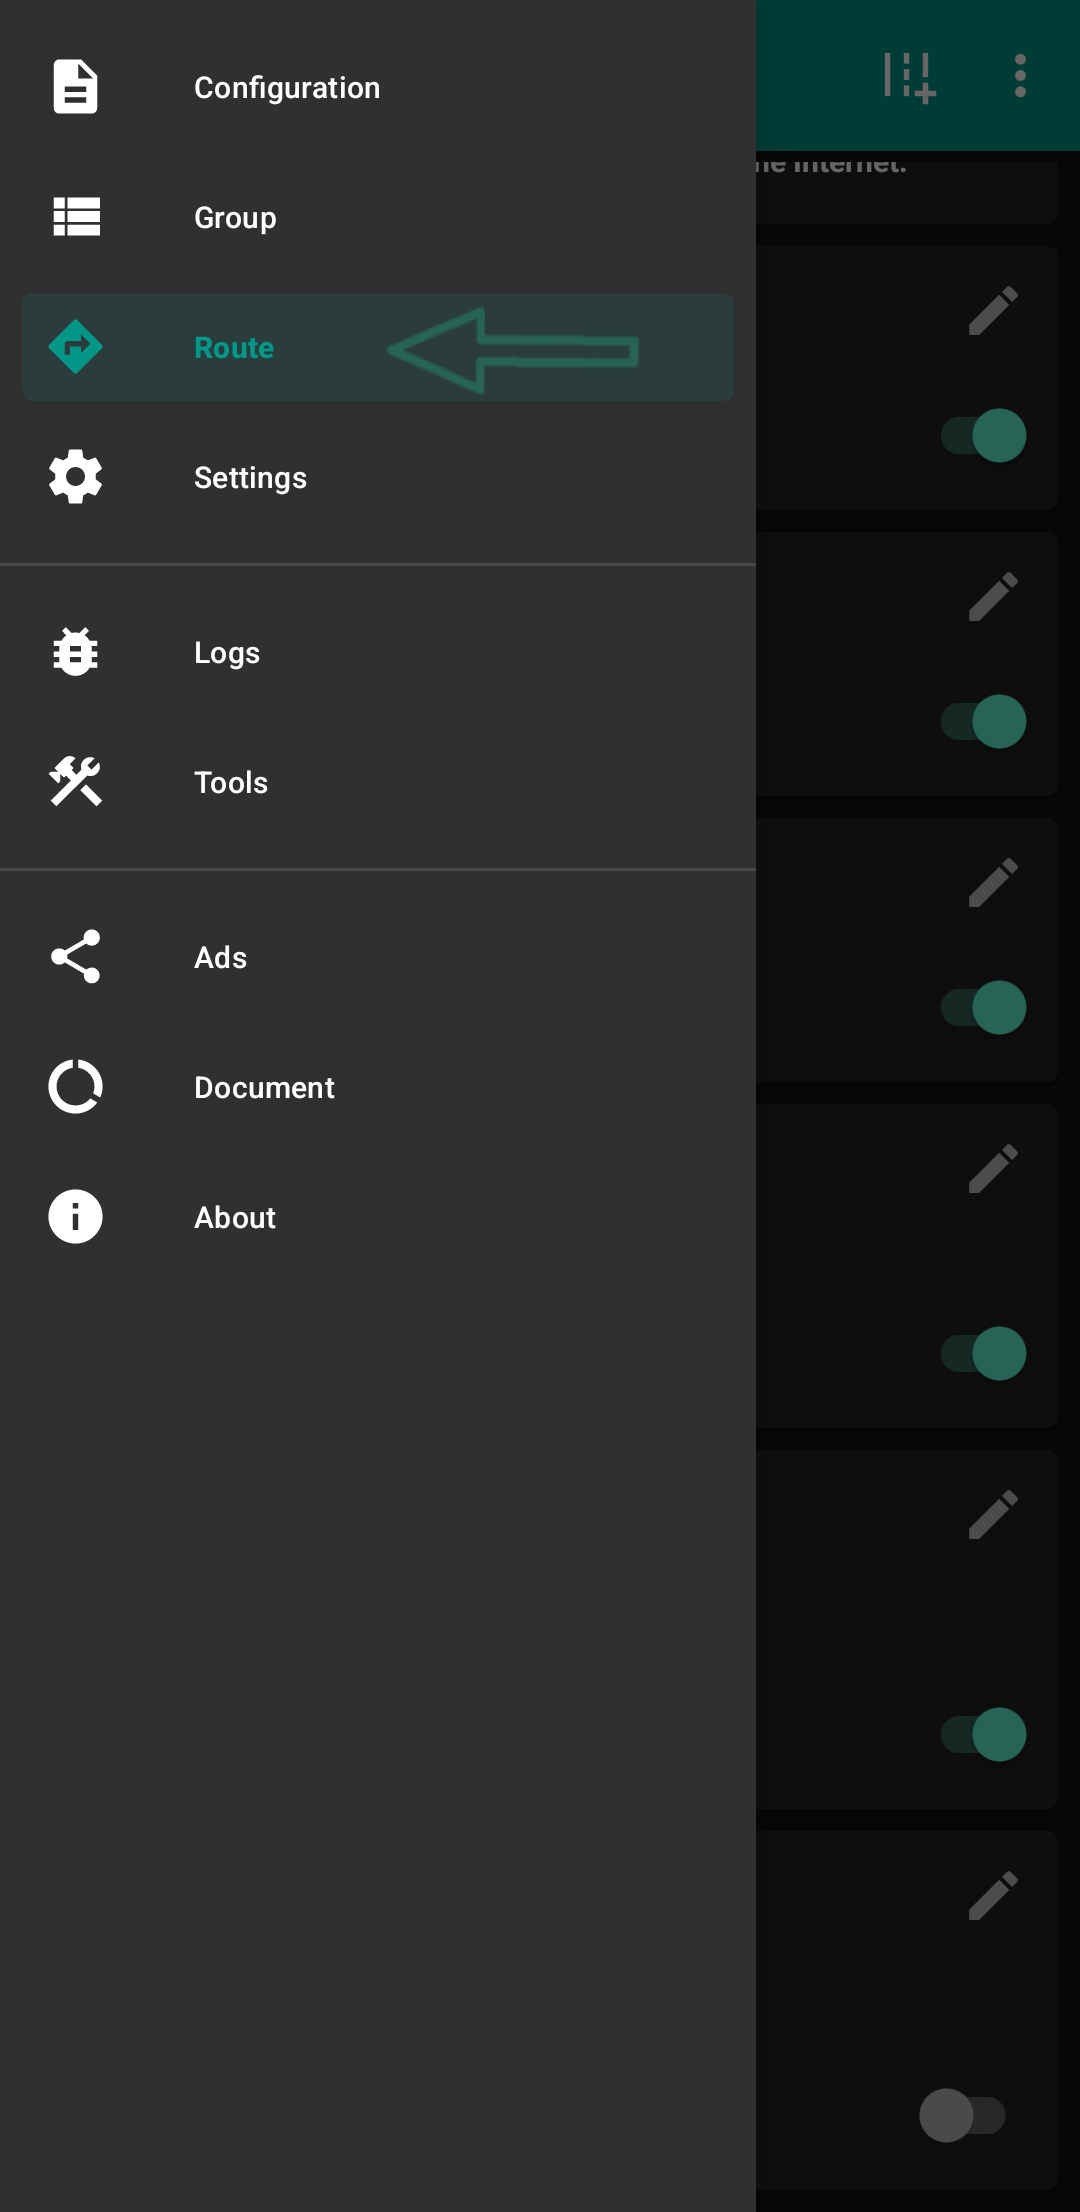
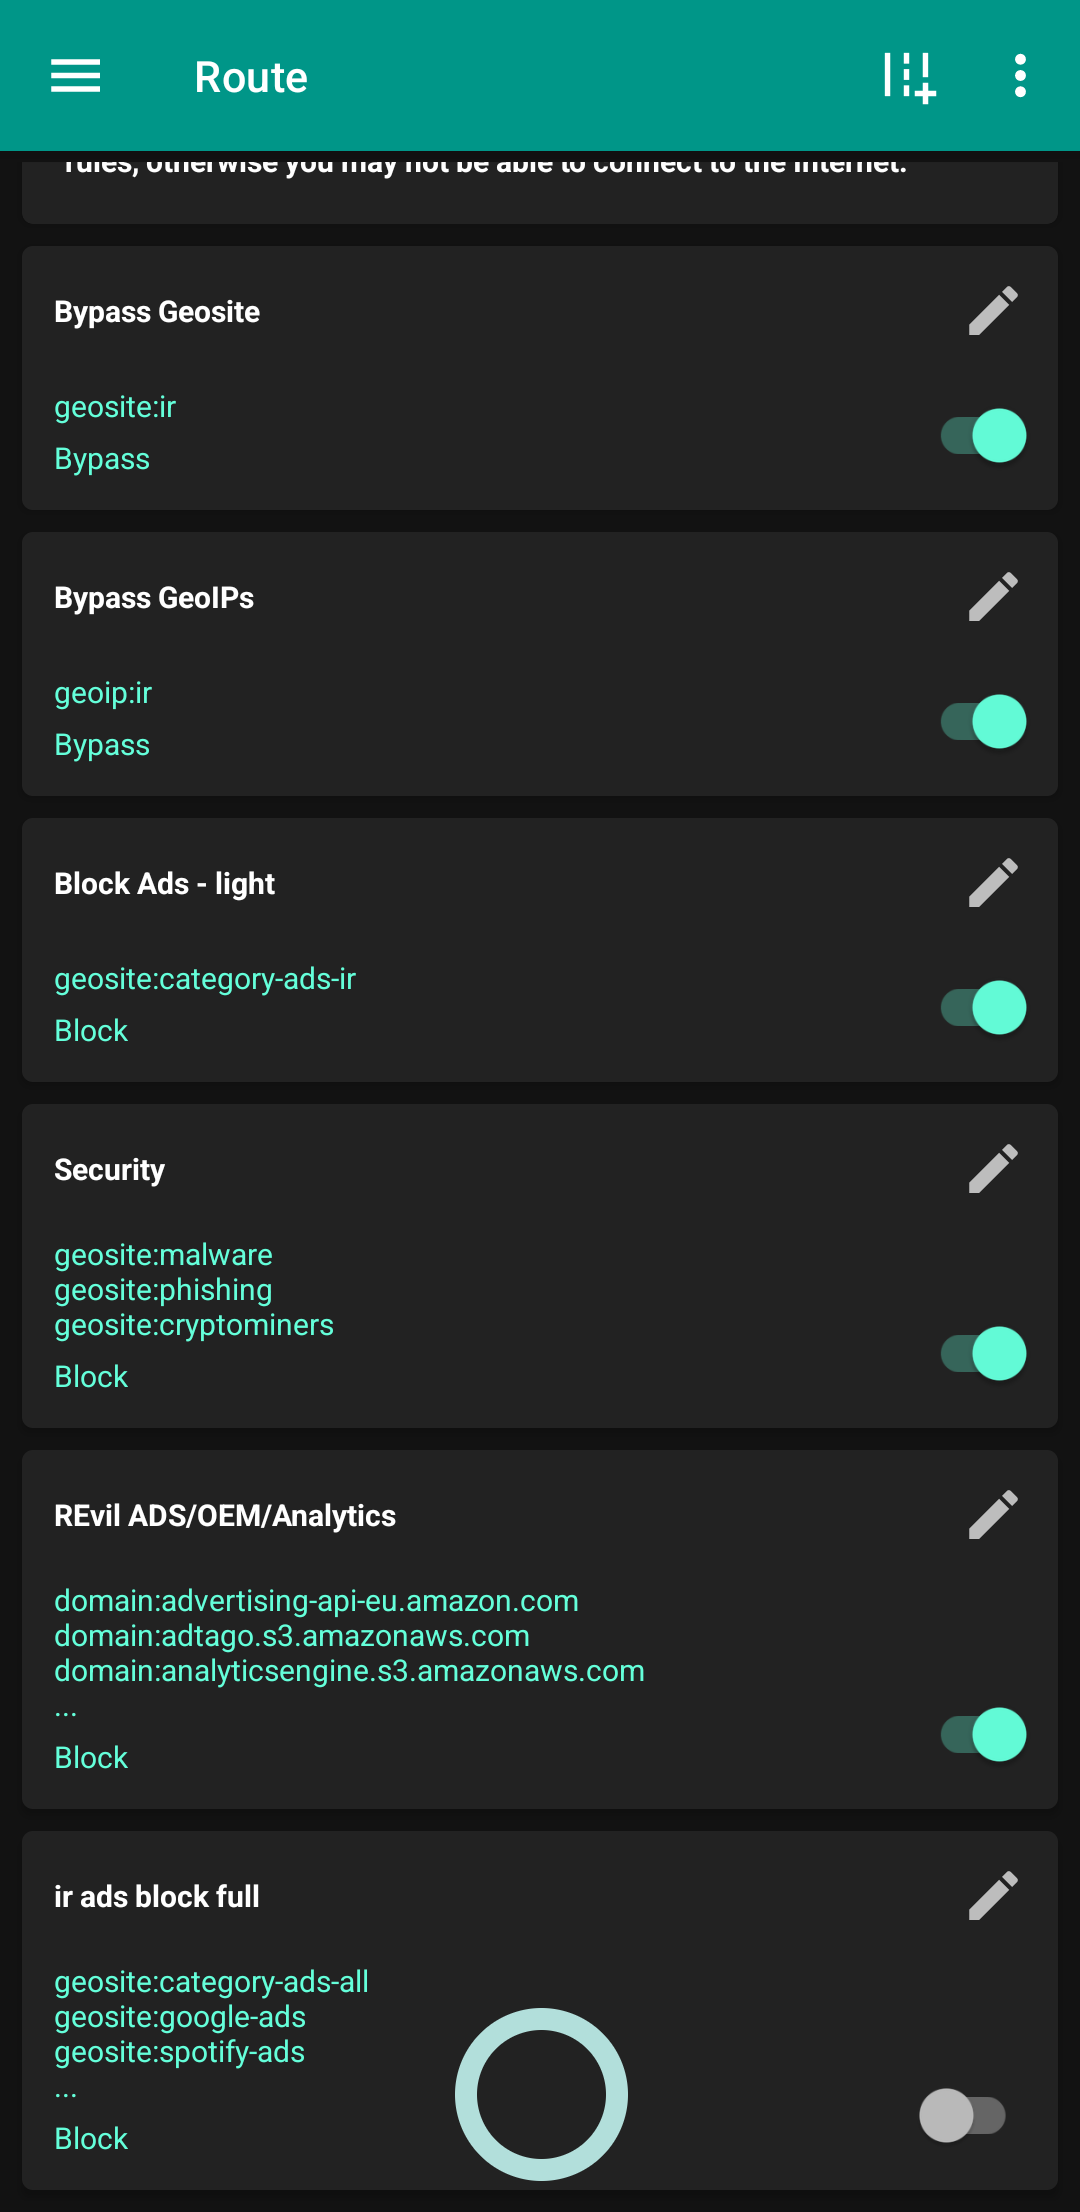
I have disabled the rules in the Route section in both backup files because if the geosite and geoip files were not updated for someone, no config would connect. I disabled it by default, and if it's important for you to be able to visit Iranian websites with the VPN on, and you also want to block some website ads, then first go to the Route section like in this screenshot:
View Screenshot
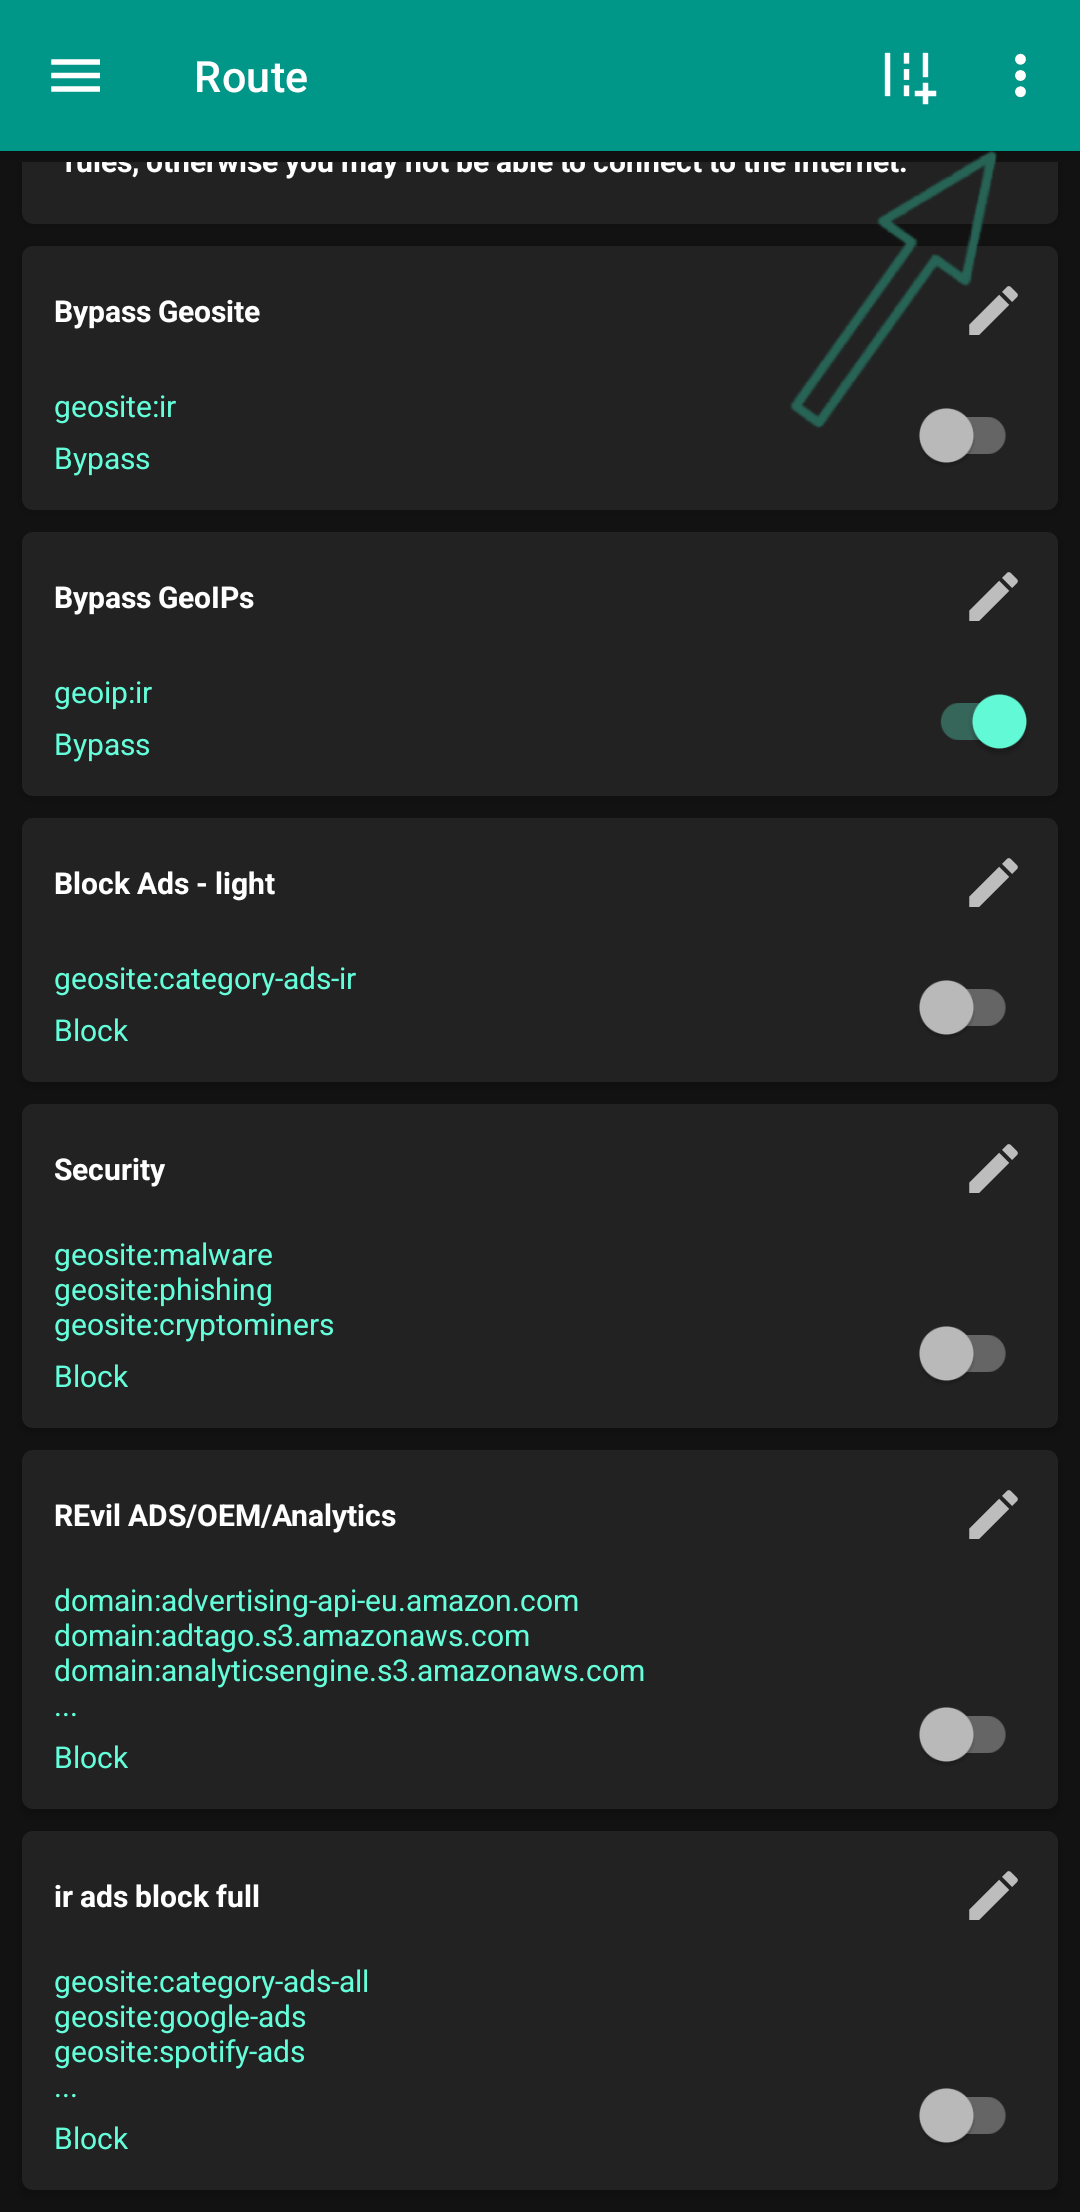
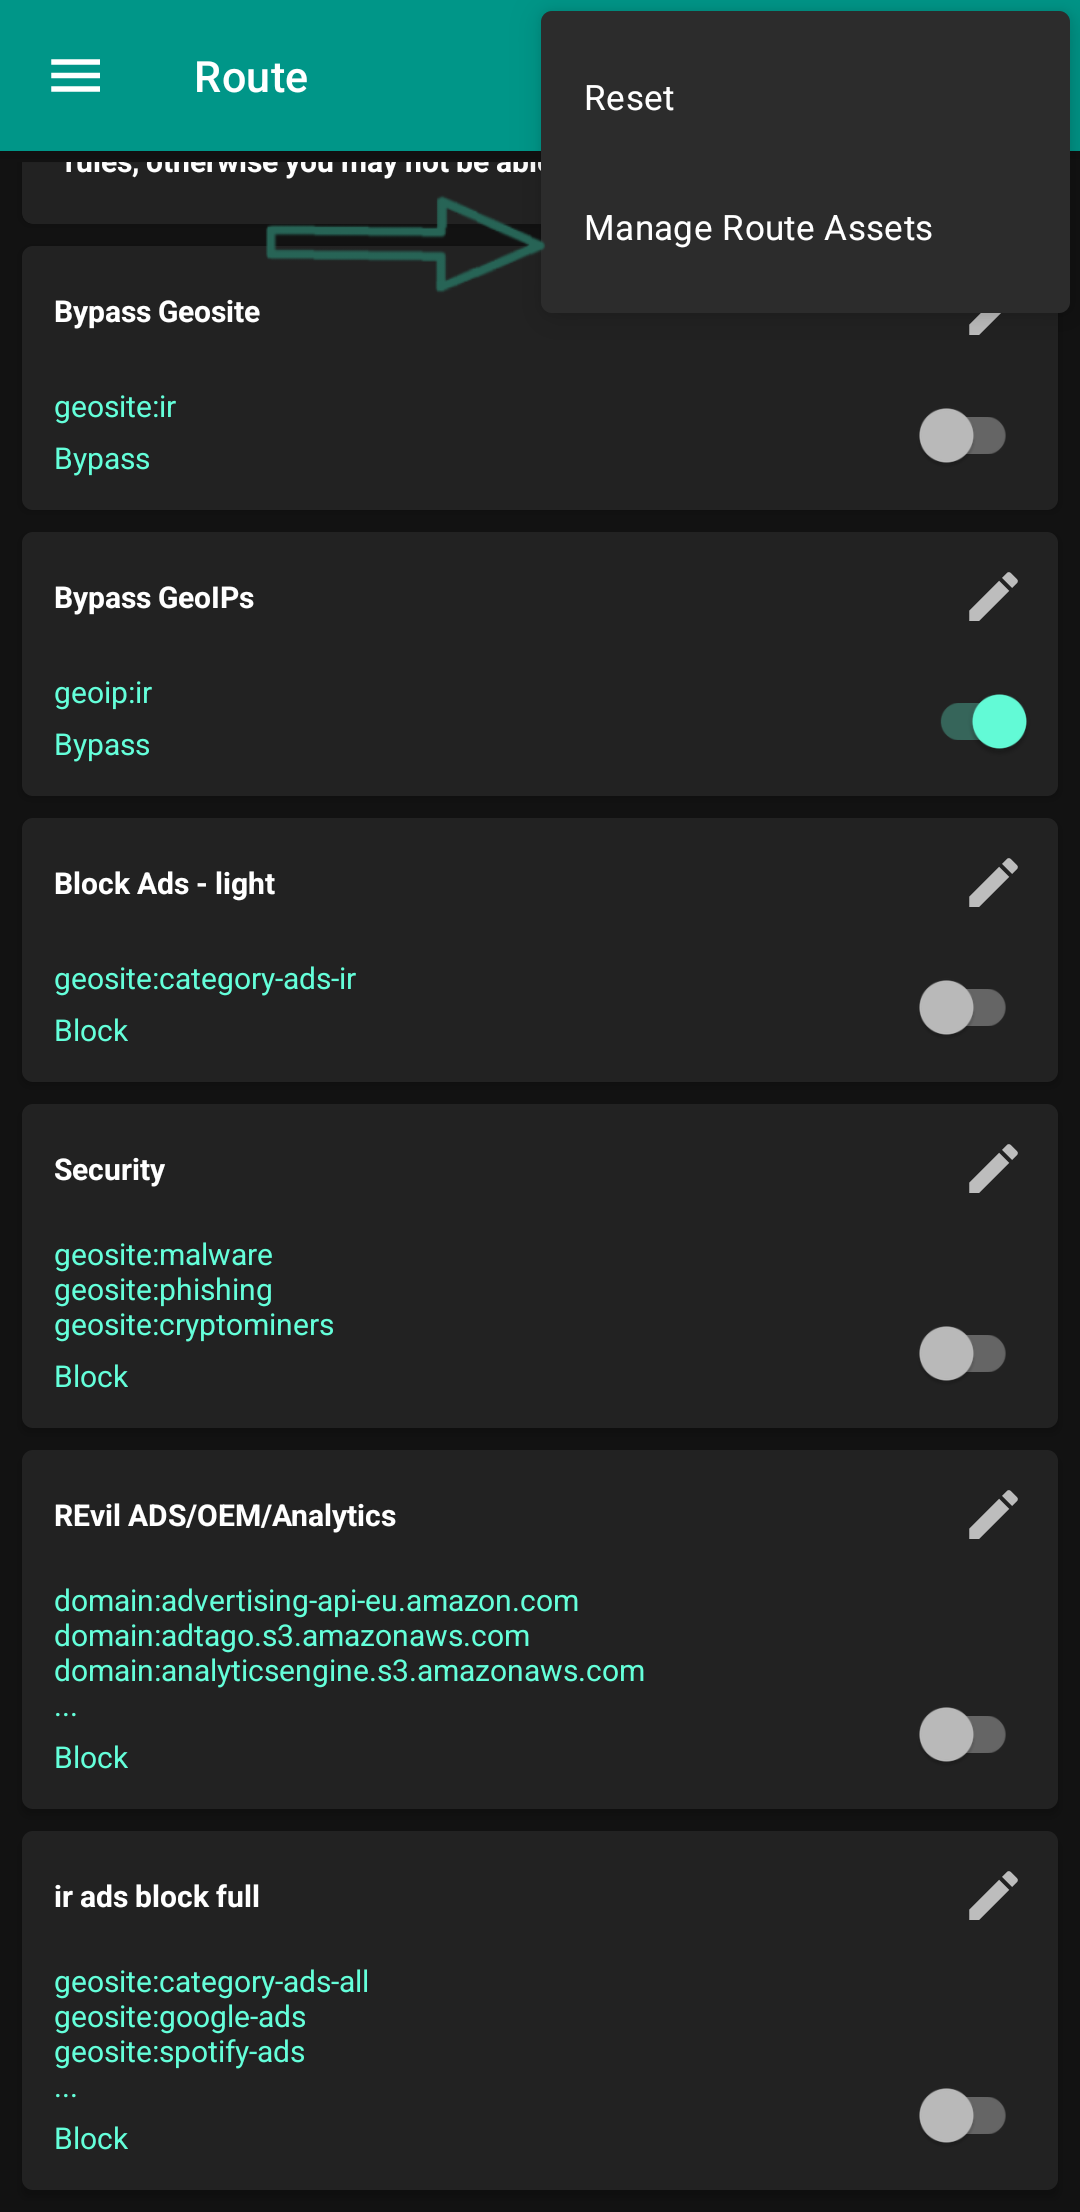
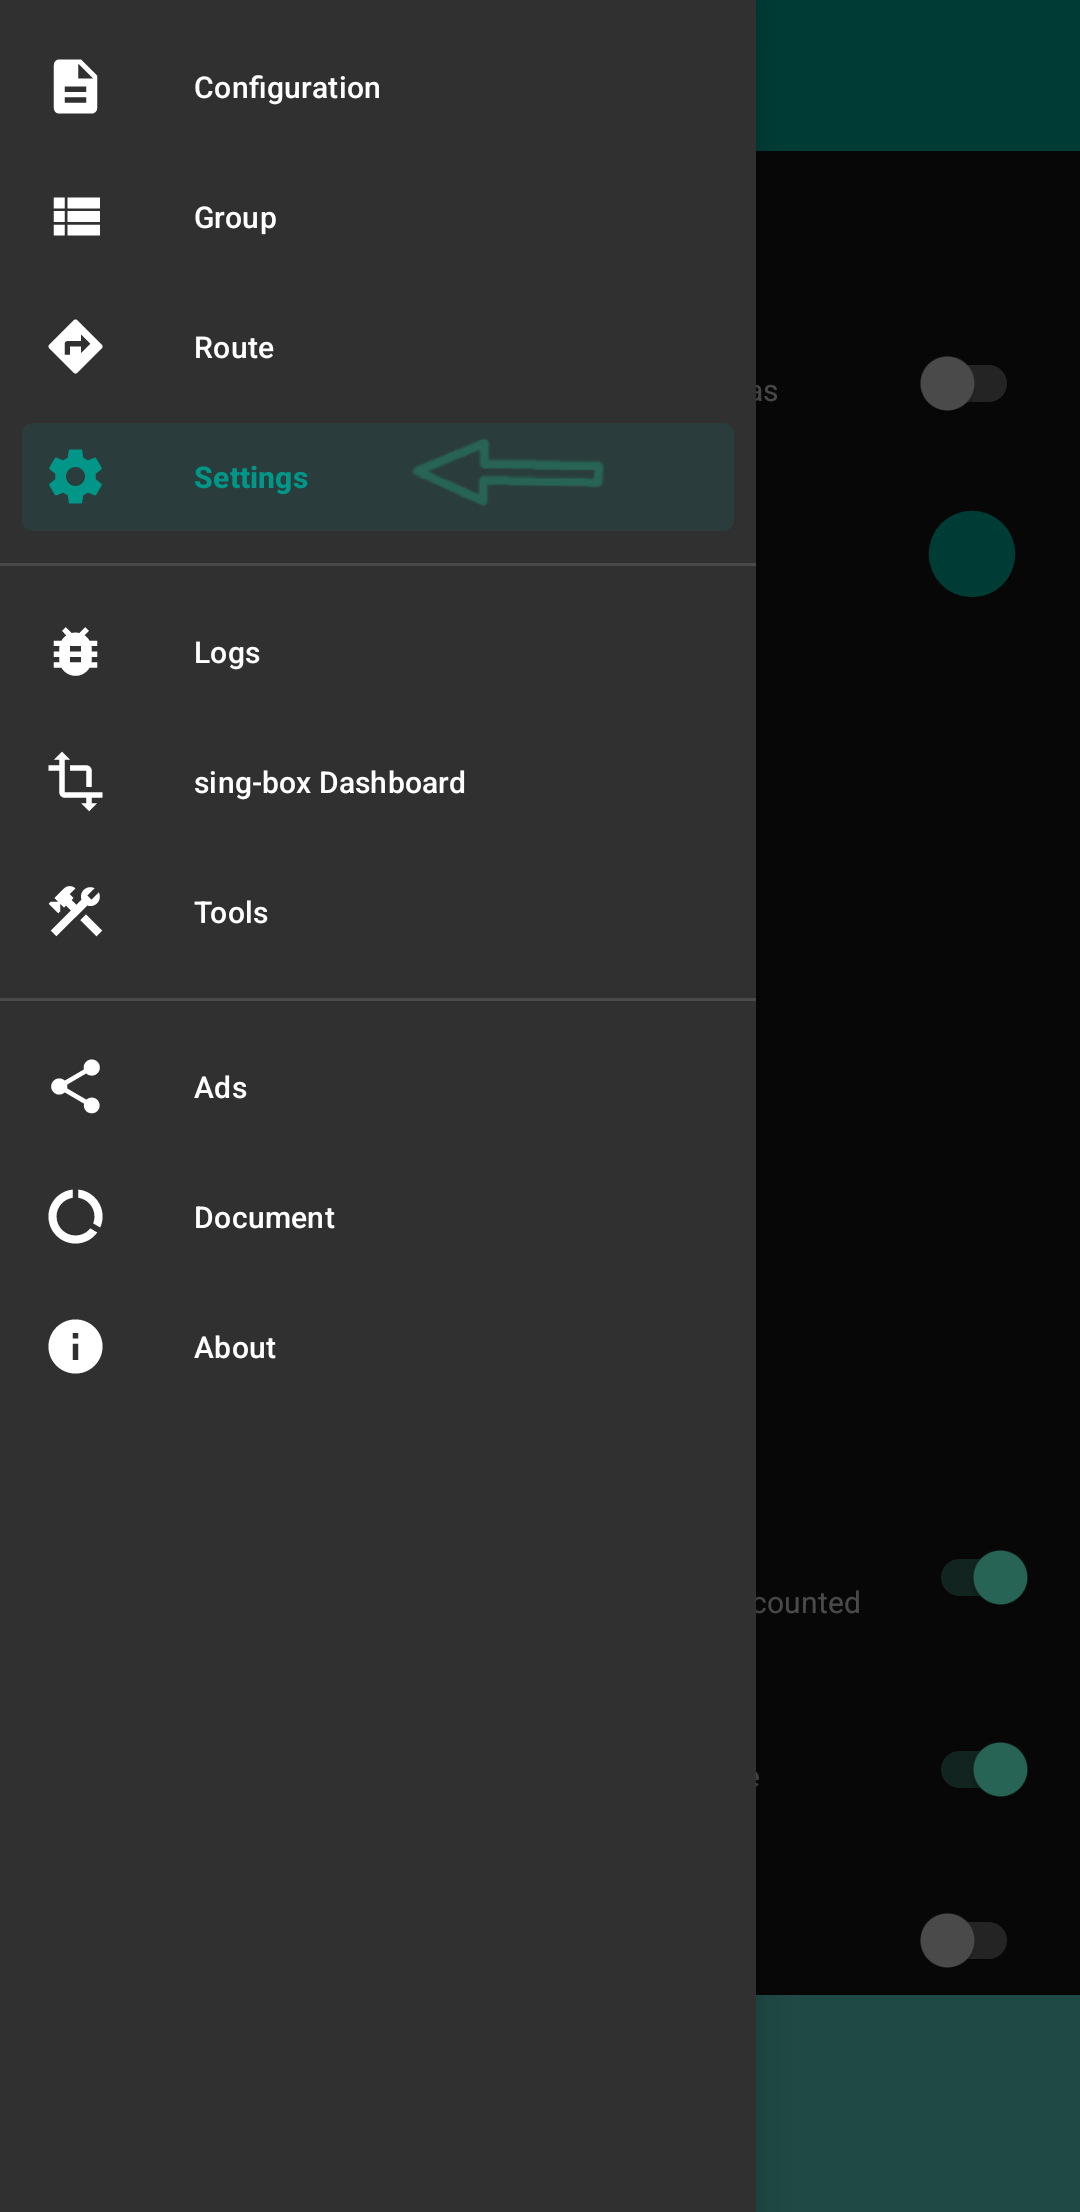
Then go here
View Screenshot
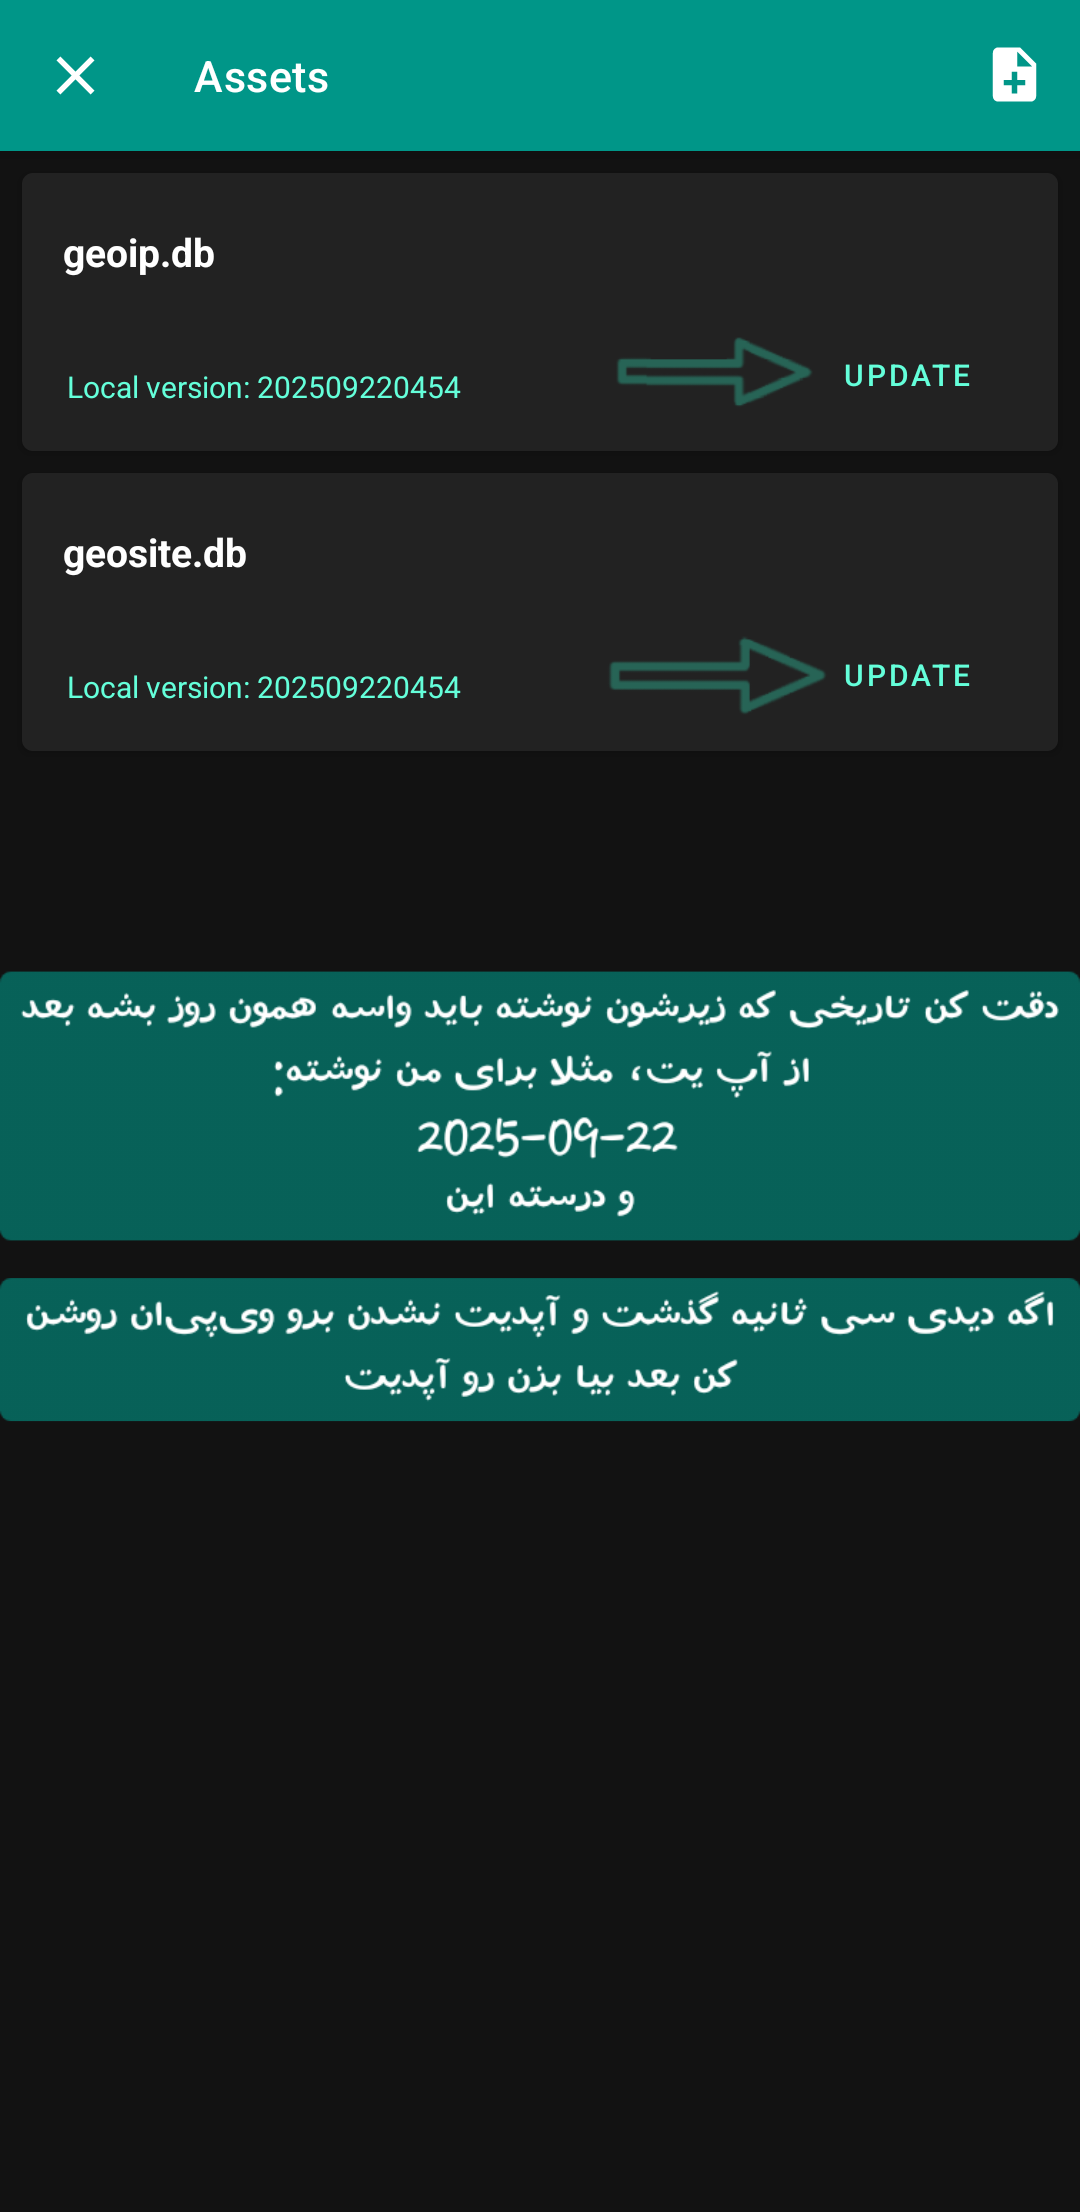
And here you have to click on Update and wait for both geo assets files to be updated. I also wrote in the image that after updating, the updated date should be written below them.
View Screenshot
Now that these are updated, you can go back to the previous page and turn on any rule you want. I suggest turning them all on, all except the last one (Block Ads - Full). The last one is very heavy and overkill. If it's on, it will take one or two seconds to start connecting to any config.
View Screenshot
Allow apps to bypass VPN
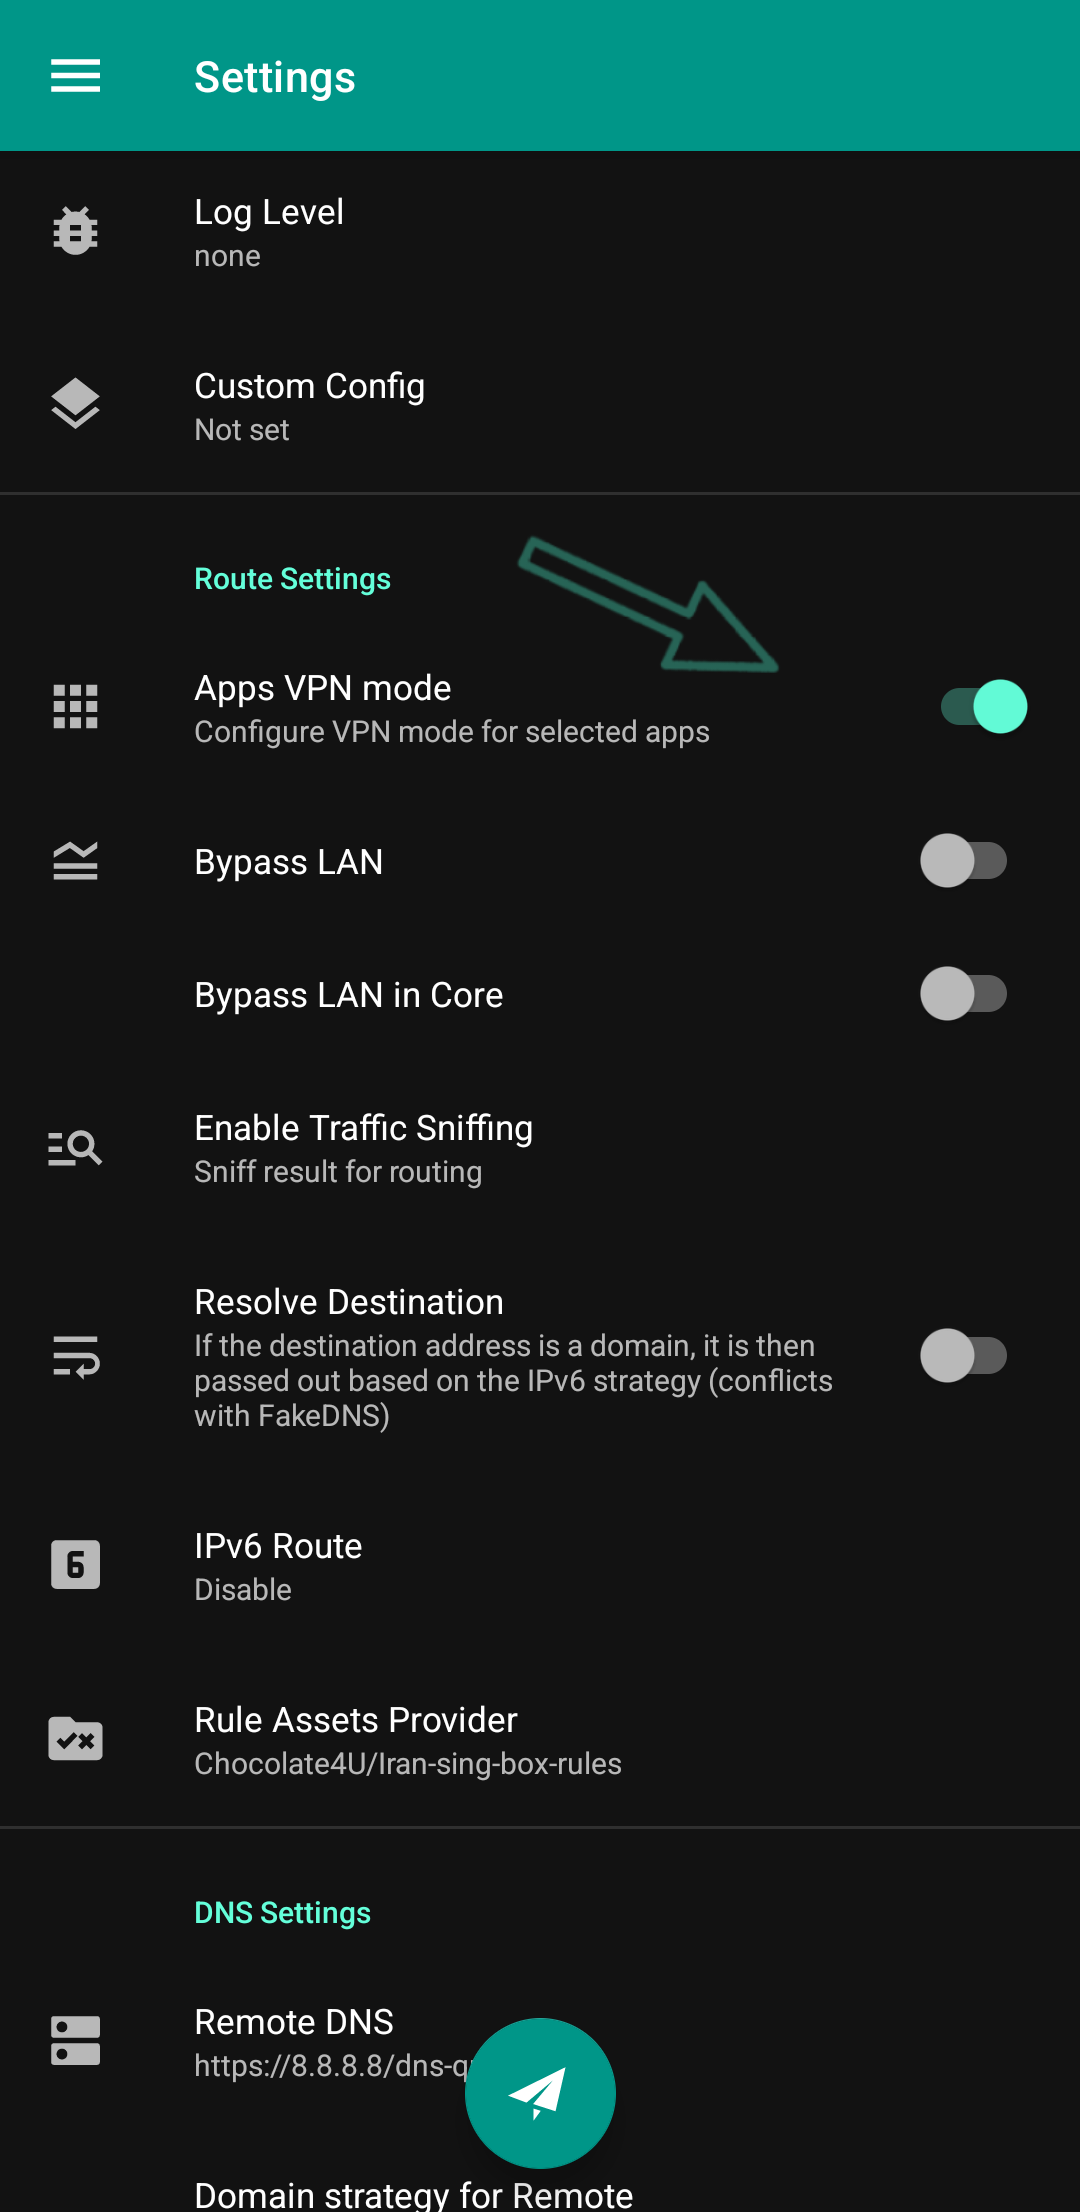
If you want to visit the MyIrancell app while the client is active, it won't open because you have to enter it with an Iranian IP. To avoid having to turn the client on and off every minute, it's better to add Iranian apps to the exceptions list. From where? From this path:
Nekobox settings → Apps VPN Mode → Bypass
View Screenshot
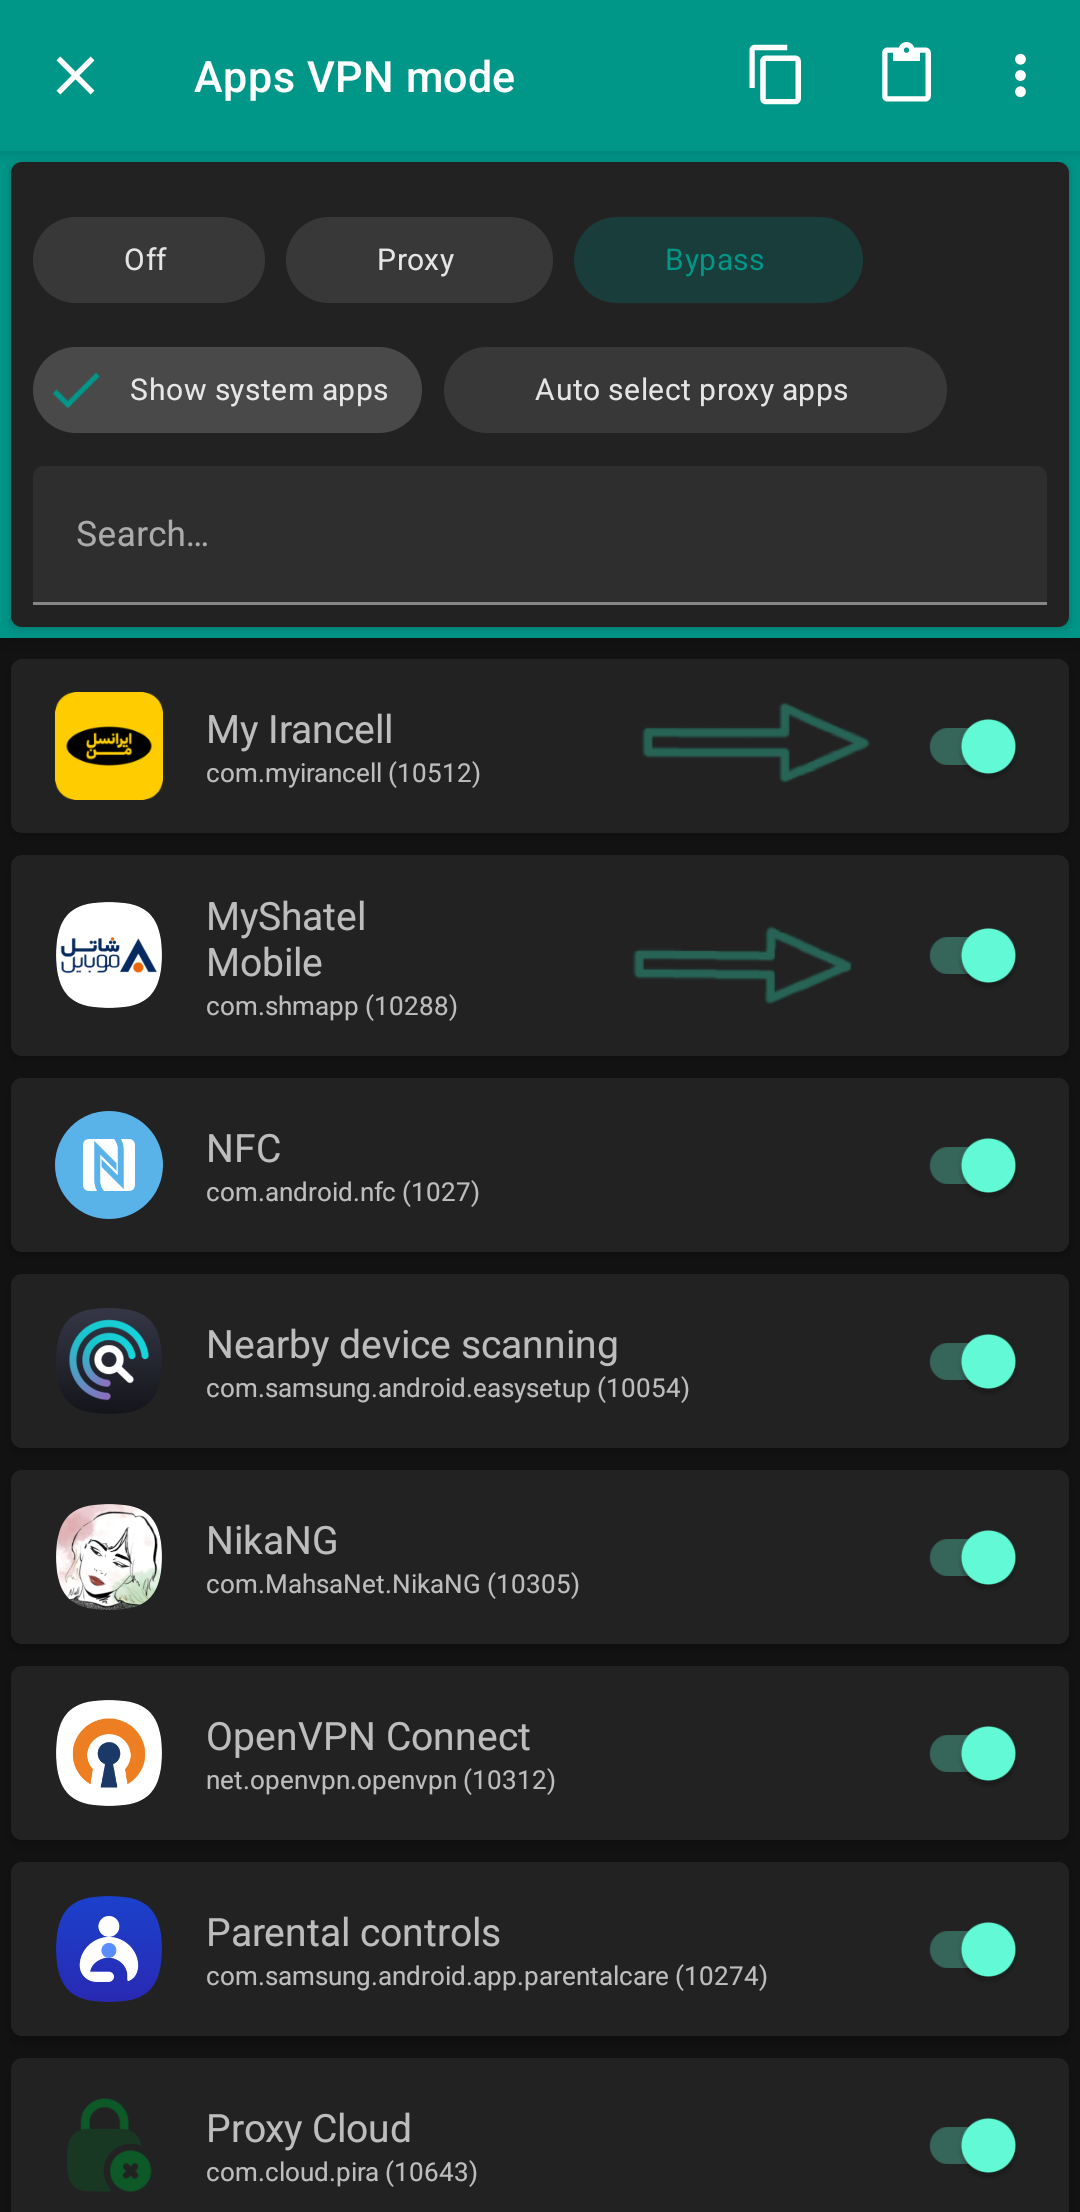
Enable MyIrancell, MyShatel, BarghMan, Shad, Rubika, Eitaa, and other domestic scoundrels so that their traffic no longer passes through the VPN tunnel. In the first part of this article, we bypassed Iranian websites and IPs to continue their activities outside the VPN tunnel, and now we have done the same for the applications installed on our phone. And that's all, folks 😆
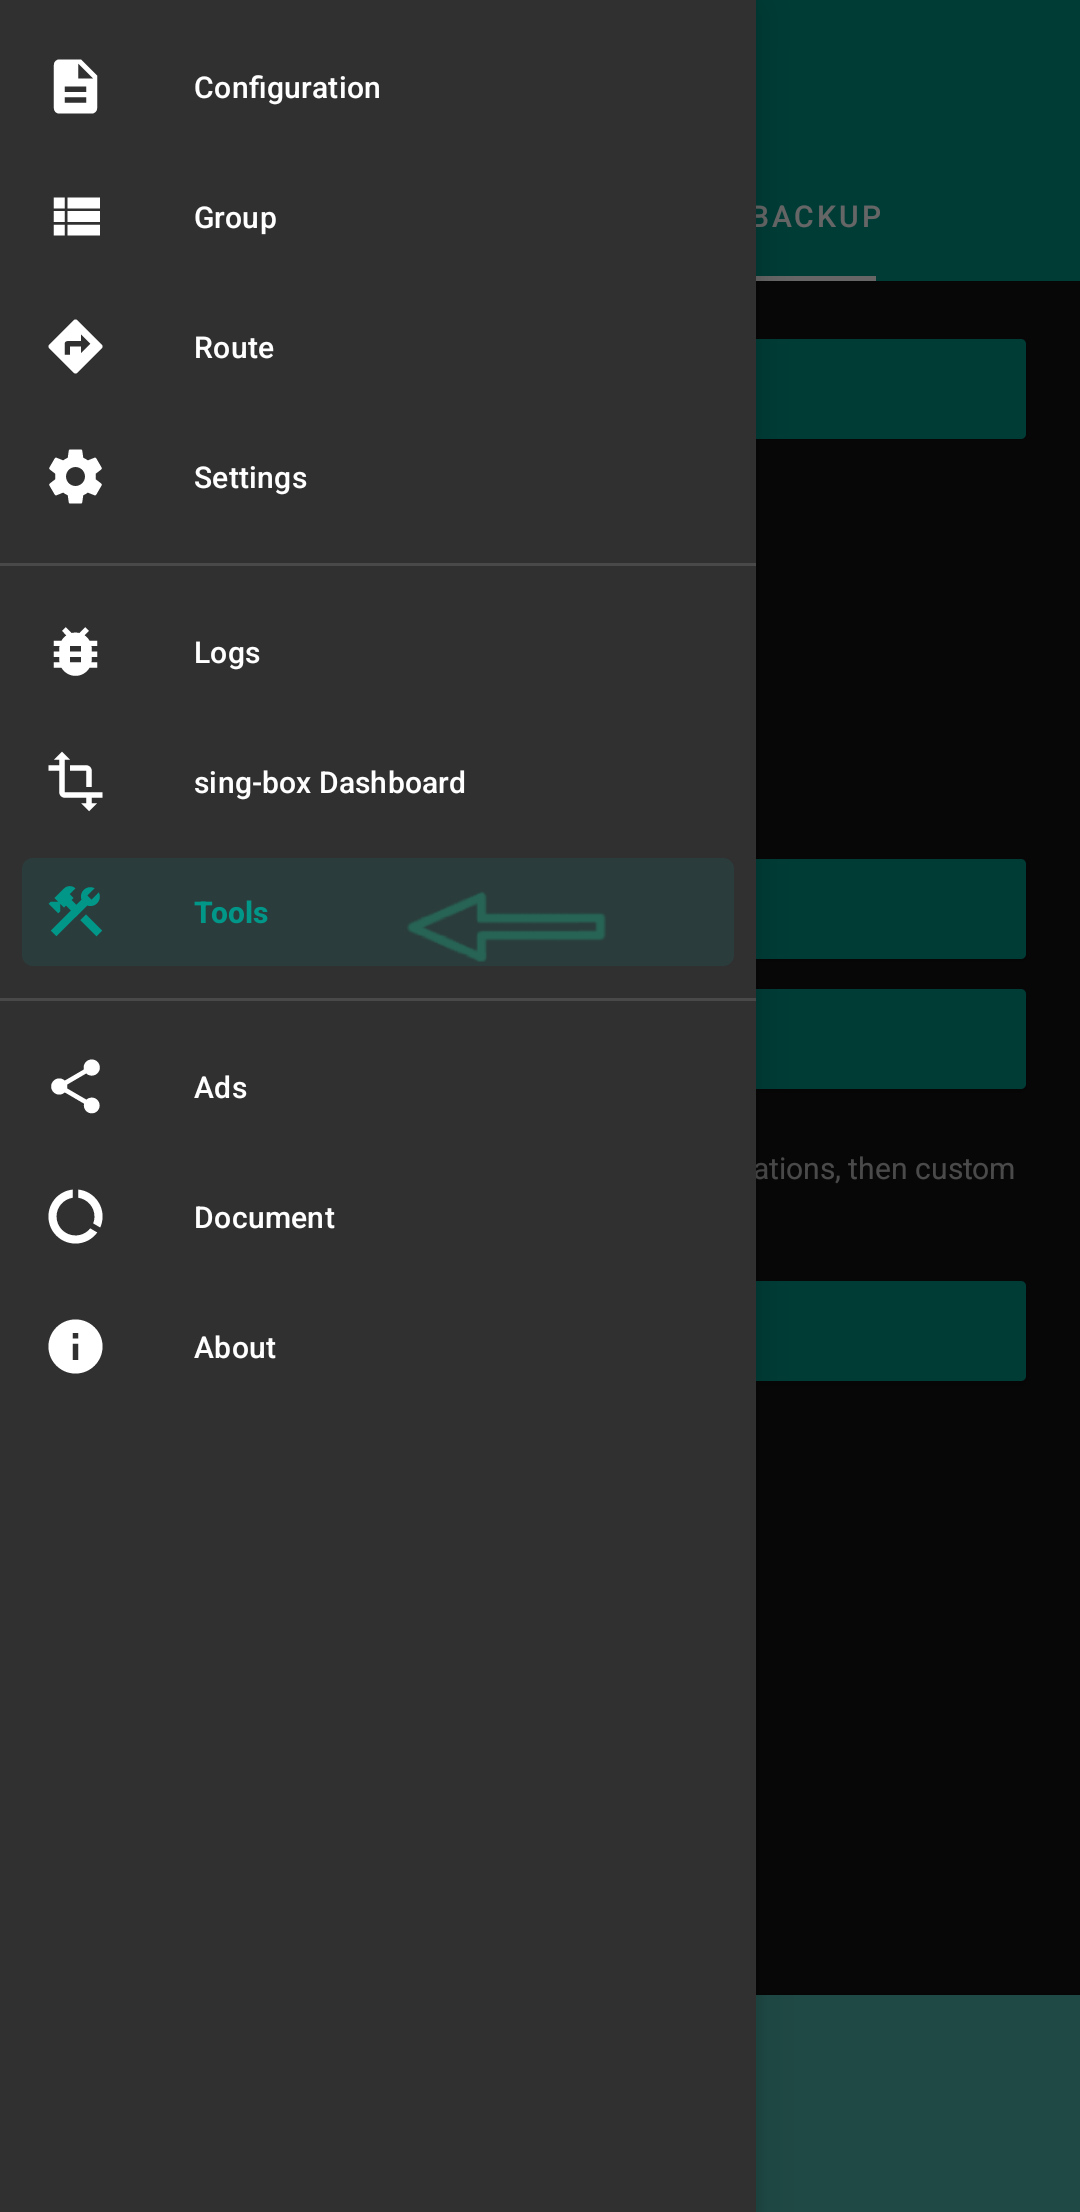
How to Import a Backup File
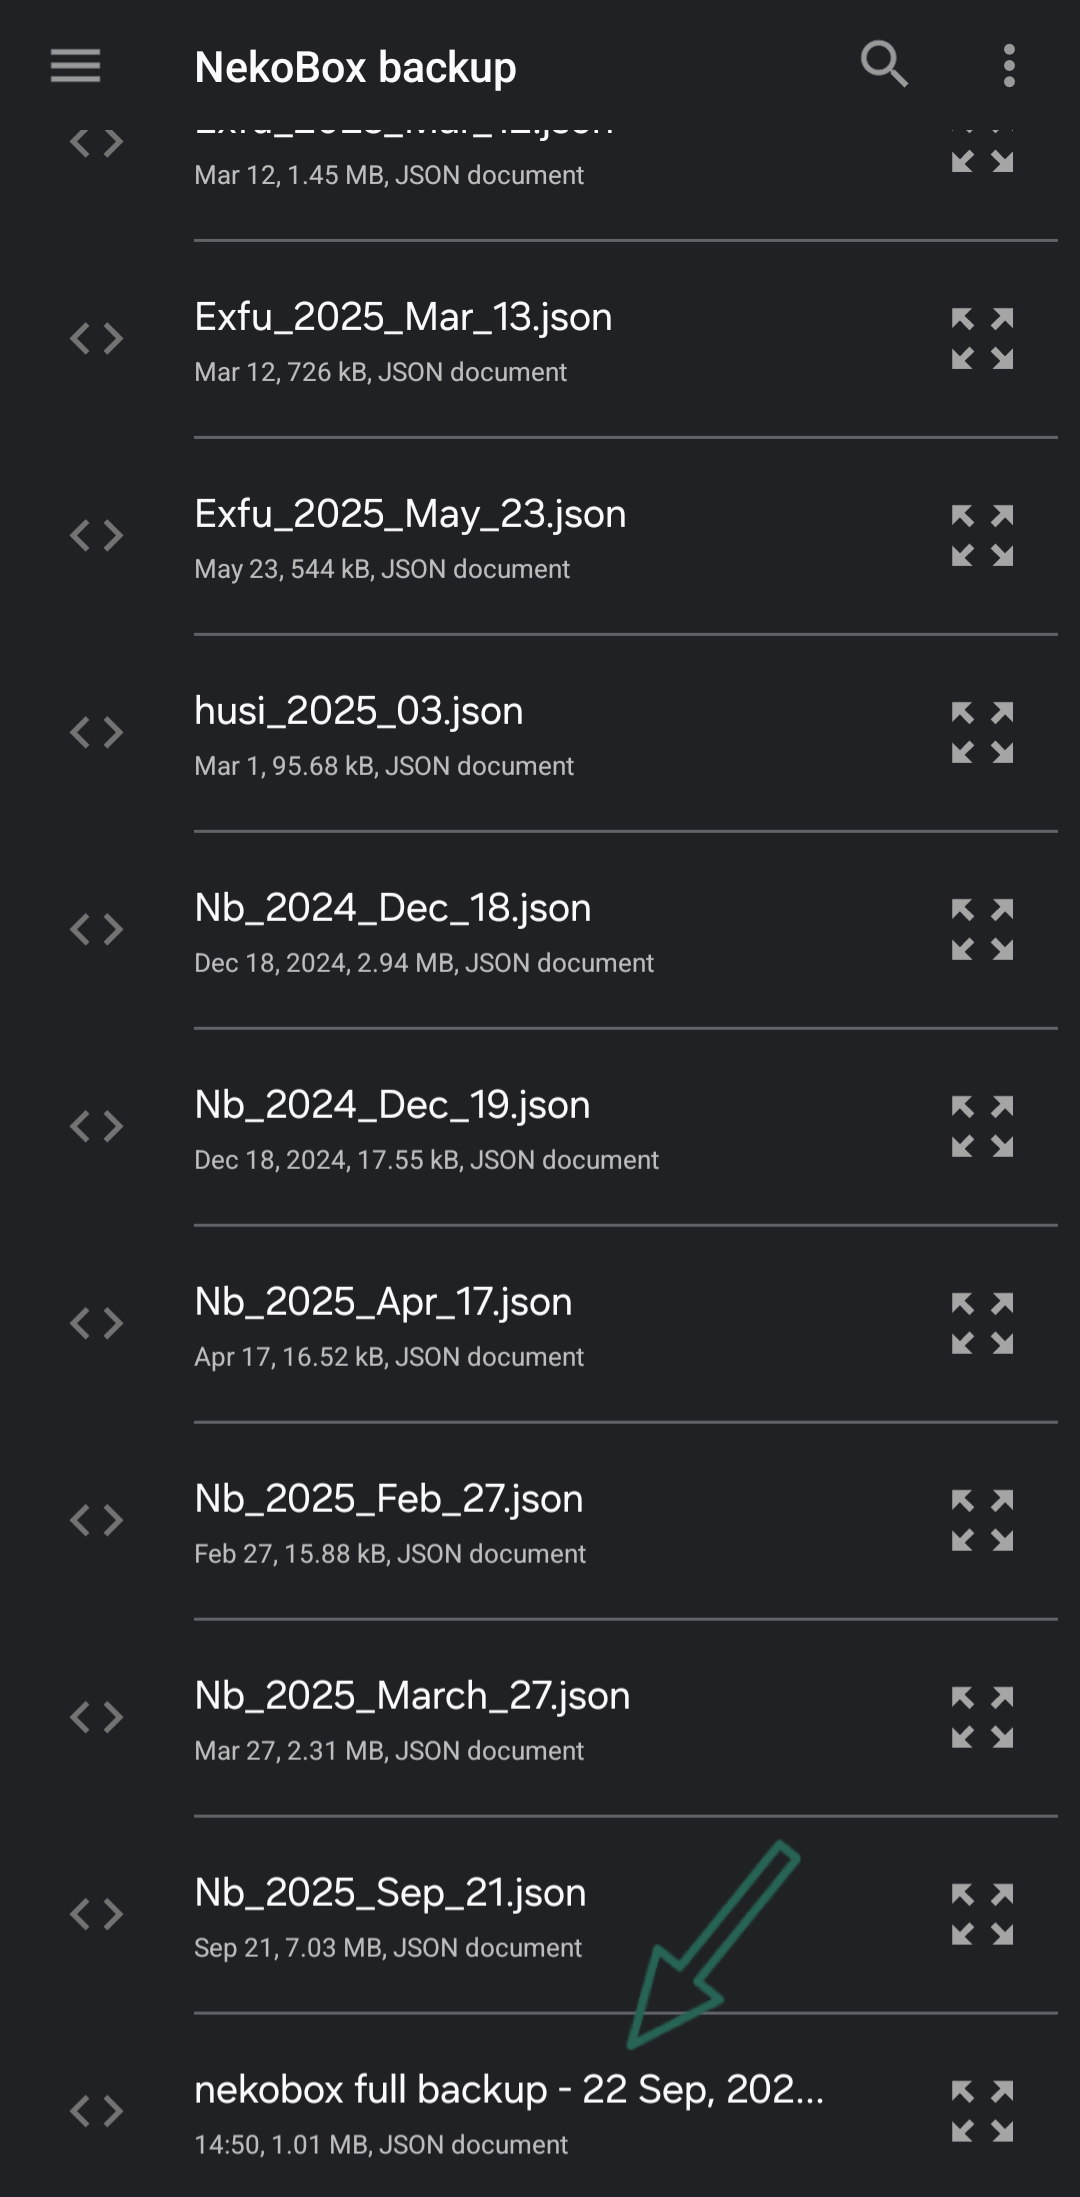
First, download and save my backup file or anyone else's.
View Screenshot
Different Parts of the Backup File
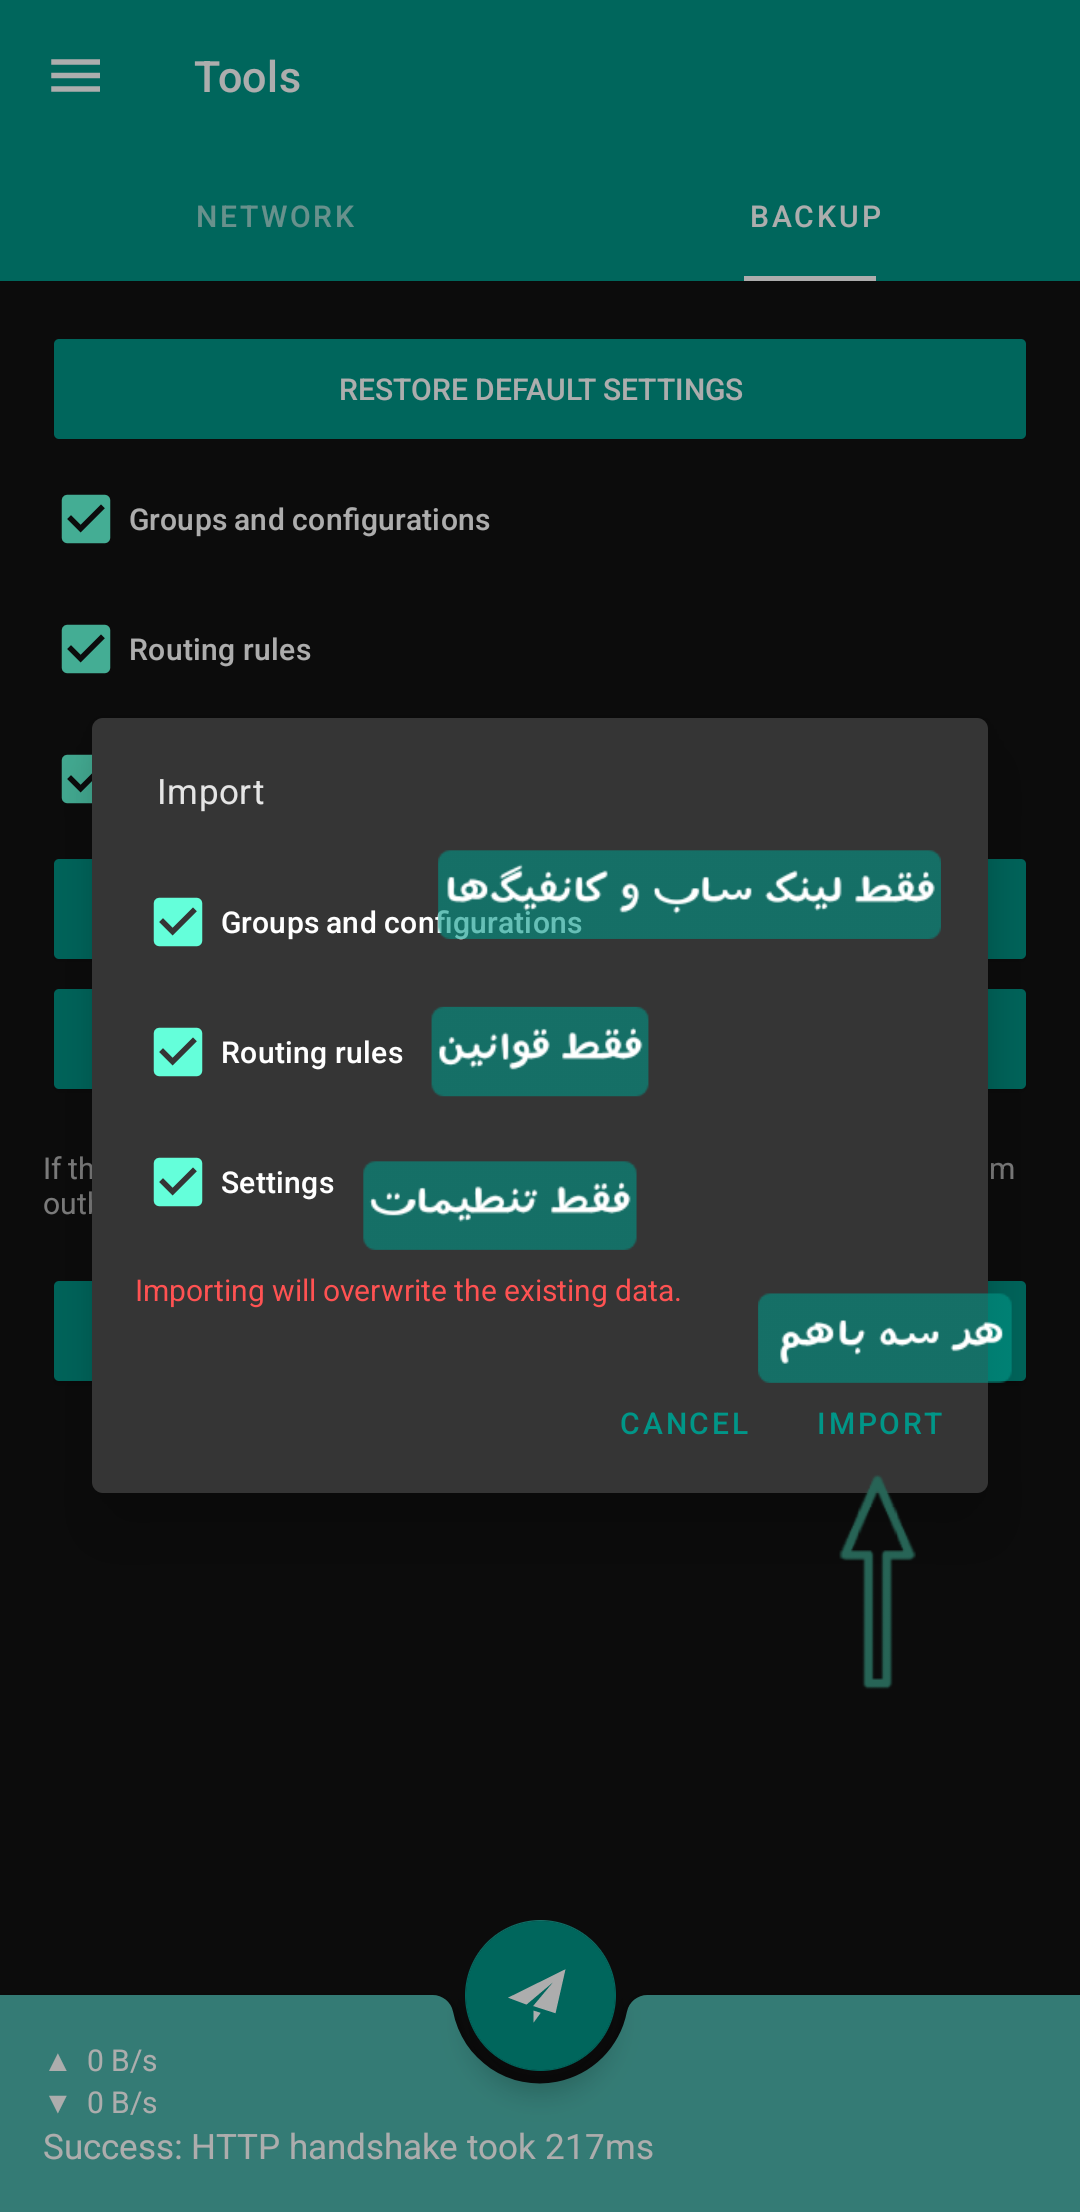
Backup files have three different parts:
- Configs
- Rules
- Client Settings
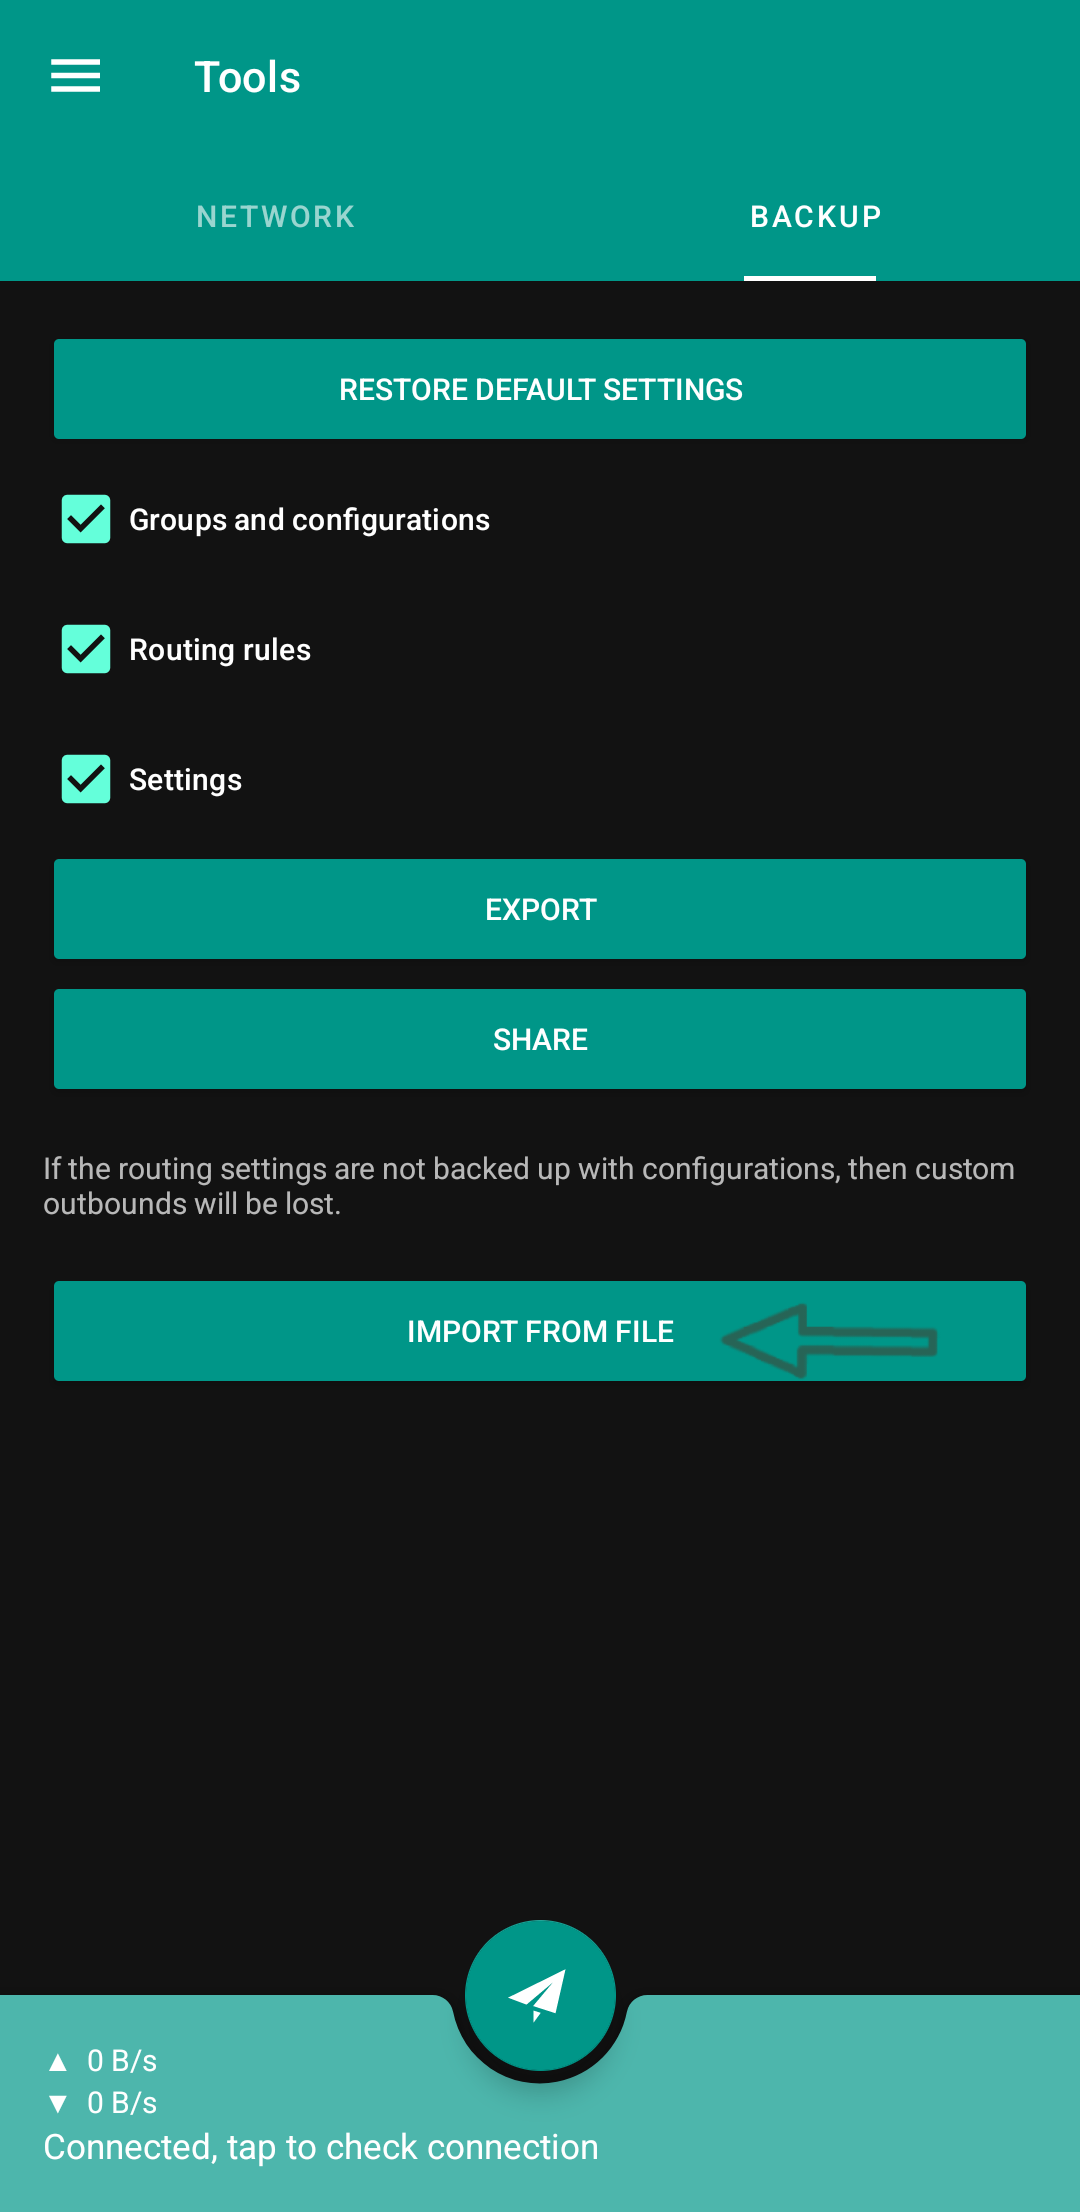
You can always safely check the rules and settings sections and import them into the client, but be careful that if you check the third section, i.e., the configs, they will replace your own configs, and everything you had in the client will be deleted. So it's better to first back up your own configs and settings from the same tools menu that I showed in the screenshot (with the Export option) before importing my backup. If you don't have any special configs or they are not important, then it's okay, ignore it and add any file you see, God bless.
If you didn't understand and need a video tutorial, you can find some old videos here and one or two here.
Update subscription links
You've been with Golabi VPN for a week, now you're back to NekoBox or Exclave or V2ray or whatever. If you use public subscription links, then the configs inside them are now dead. The first thing you should do is:
View Screenshot
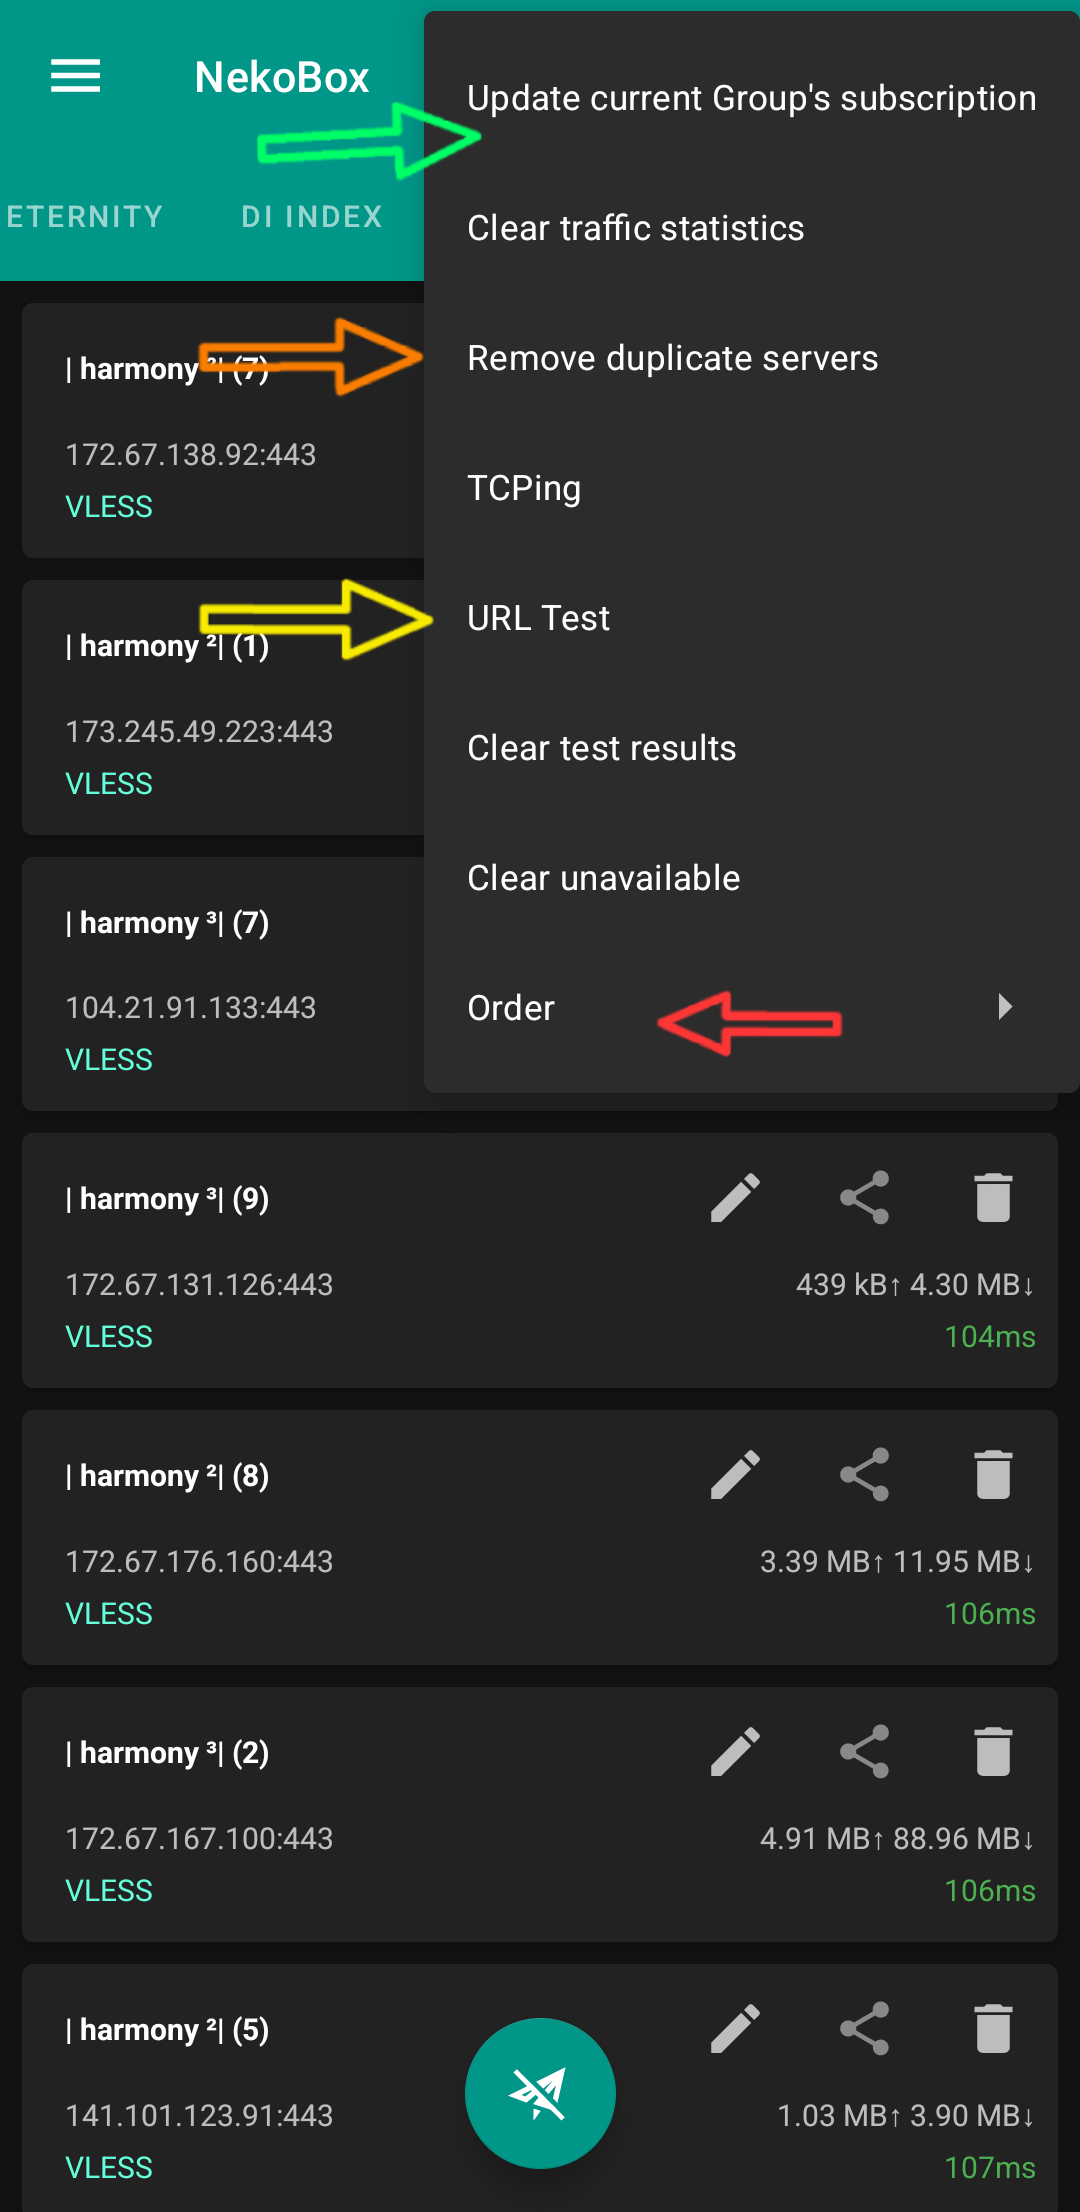
First of all, you enter your desired group and select the option:
🟠 Update current Groups subscription
and wait for it to update.
The second thing you should do is select the option:
🟡 Remove Duplicate servers
so that duplicate configs are deleted and you don't waste time and internet data testing them. If you used my backup, then this option is not needed, it will remove duplicates itself when updating because I turned on the option from within the group itself.
The third thing you should do is press the option:
🟢 URL Test
Be careful that before performing this test, whatever VPN is on must be turned off, otherwise the test results will not be correct.
And the last thing is to press the option:
🔴 Order/By Delay
so that the configs are listed in order of their speed and ping. Pressing this option once is enough.
Now you can connect to one of the configs at the top of the list with a small green number next to it. Those with Timeout written next to them are gone.
Exclave Load balance
One of the best clients with Singbox core for Android
The most important reason I say it's better to use this instead of NekoBox is its Balancer feature.
If you have added one of the backup files that I put in the repository, you have definitely seen that on the first page there are some configs that are not normal and below them it says Balancer. What are these Balancer configs and how were they created?
For example, in NekoBox, if you have a subscription link with, say, a hundred configs in it, as usual, we take a URL Test and connect to the first or second config that has a better ping. If after a few minutes or hours it becomes weak or has interference or a false connection or stops working for any reason... then we have to go back into NekoBox and choose another one, a headache.
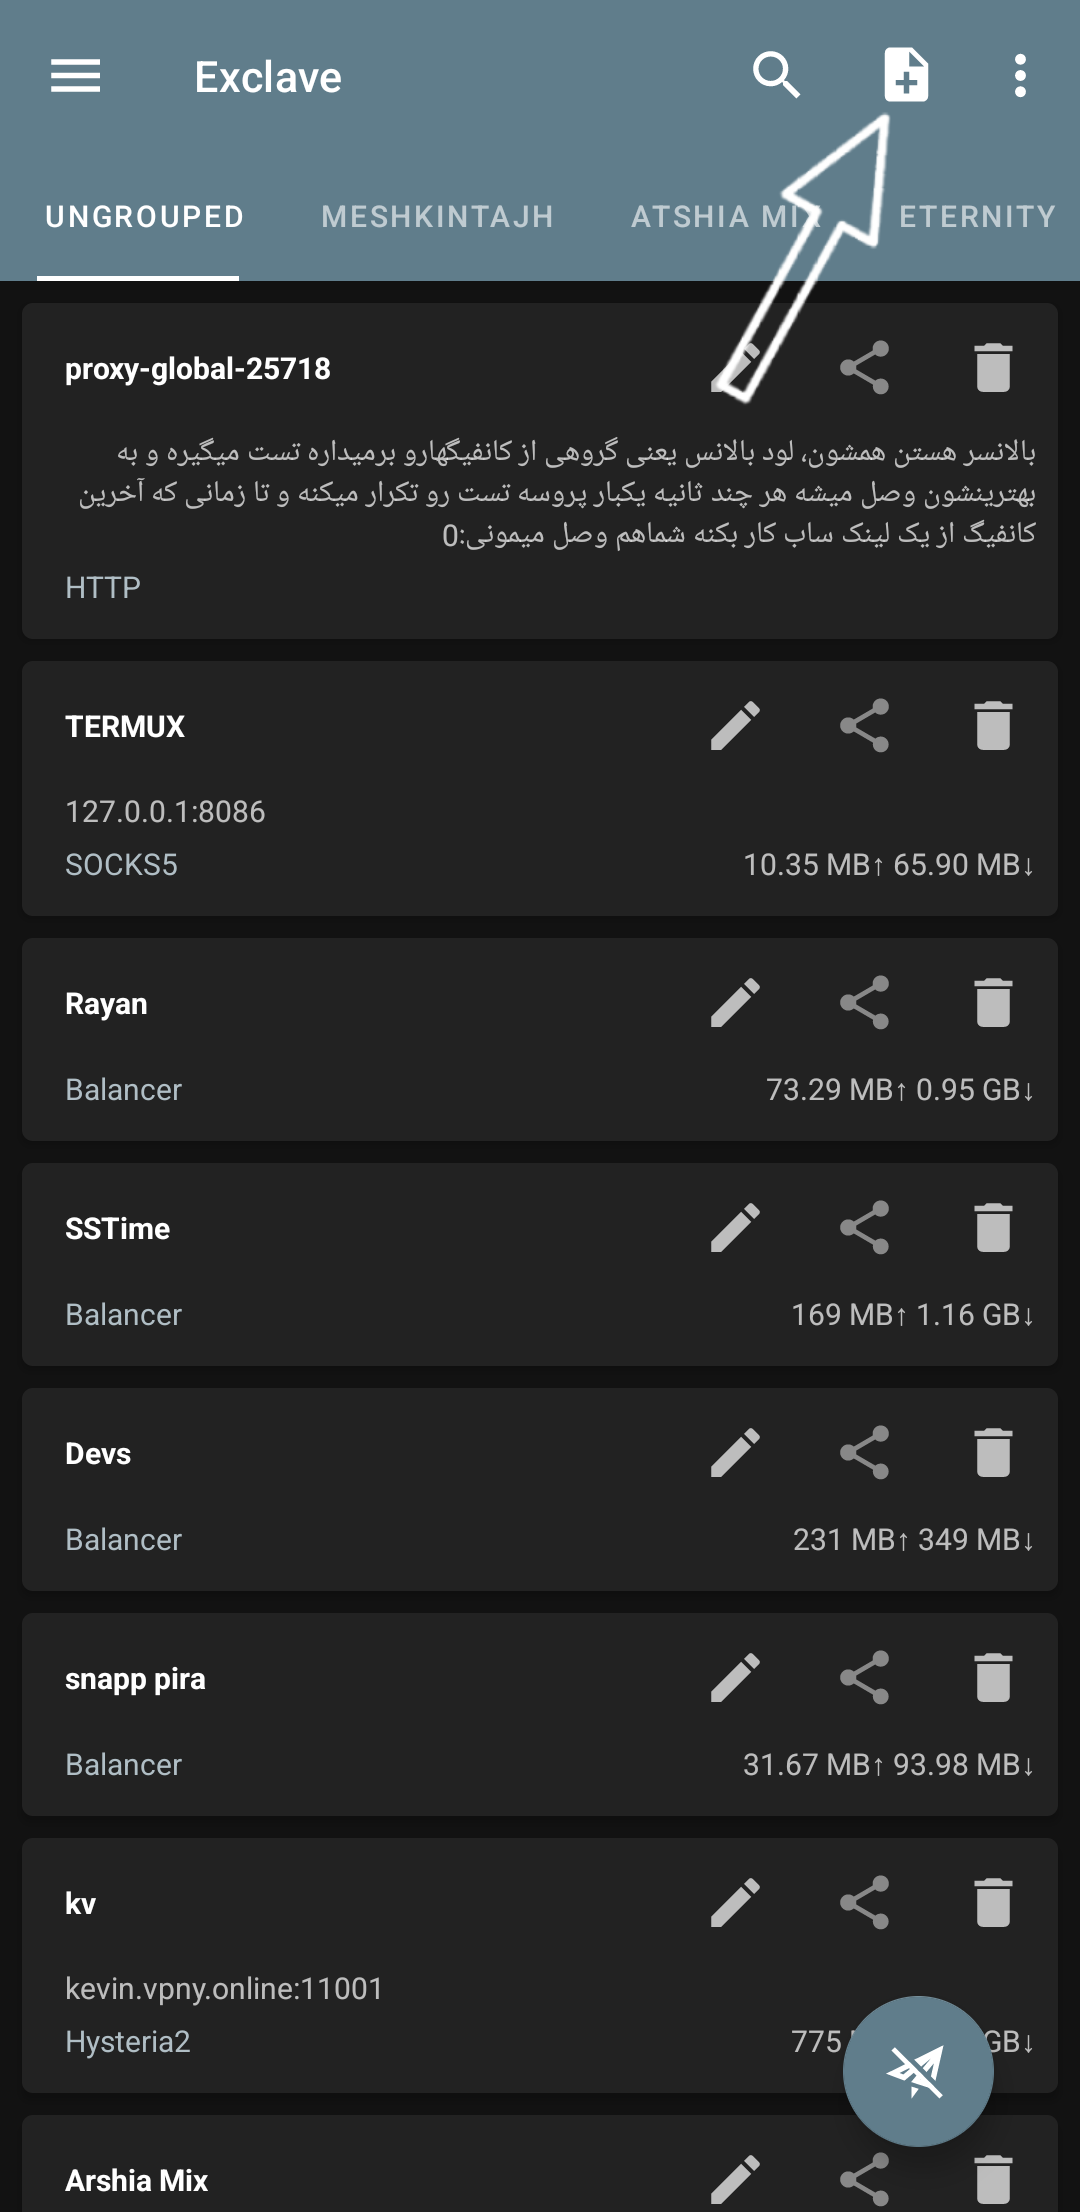
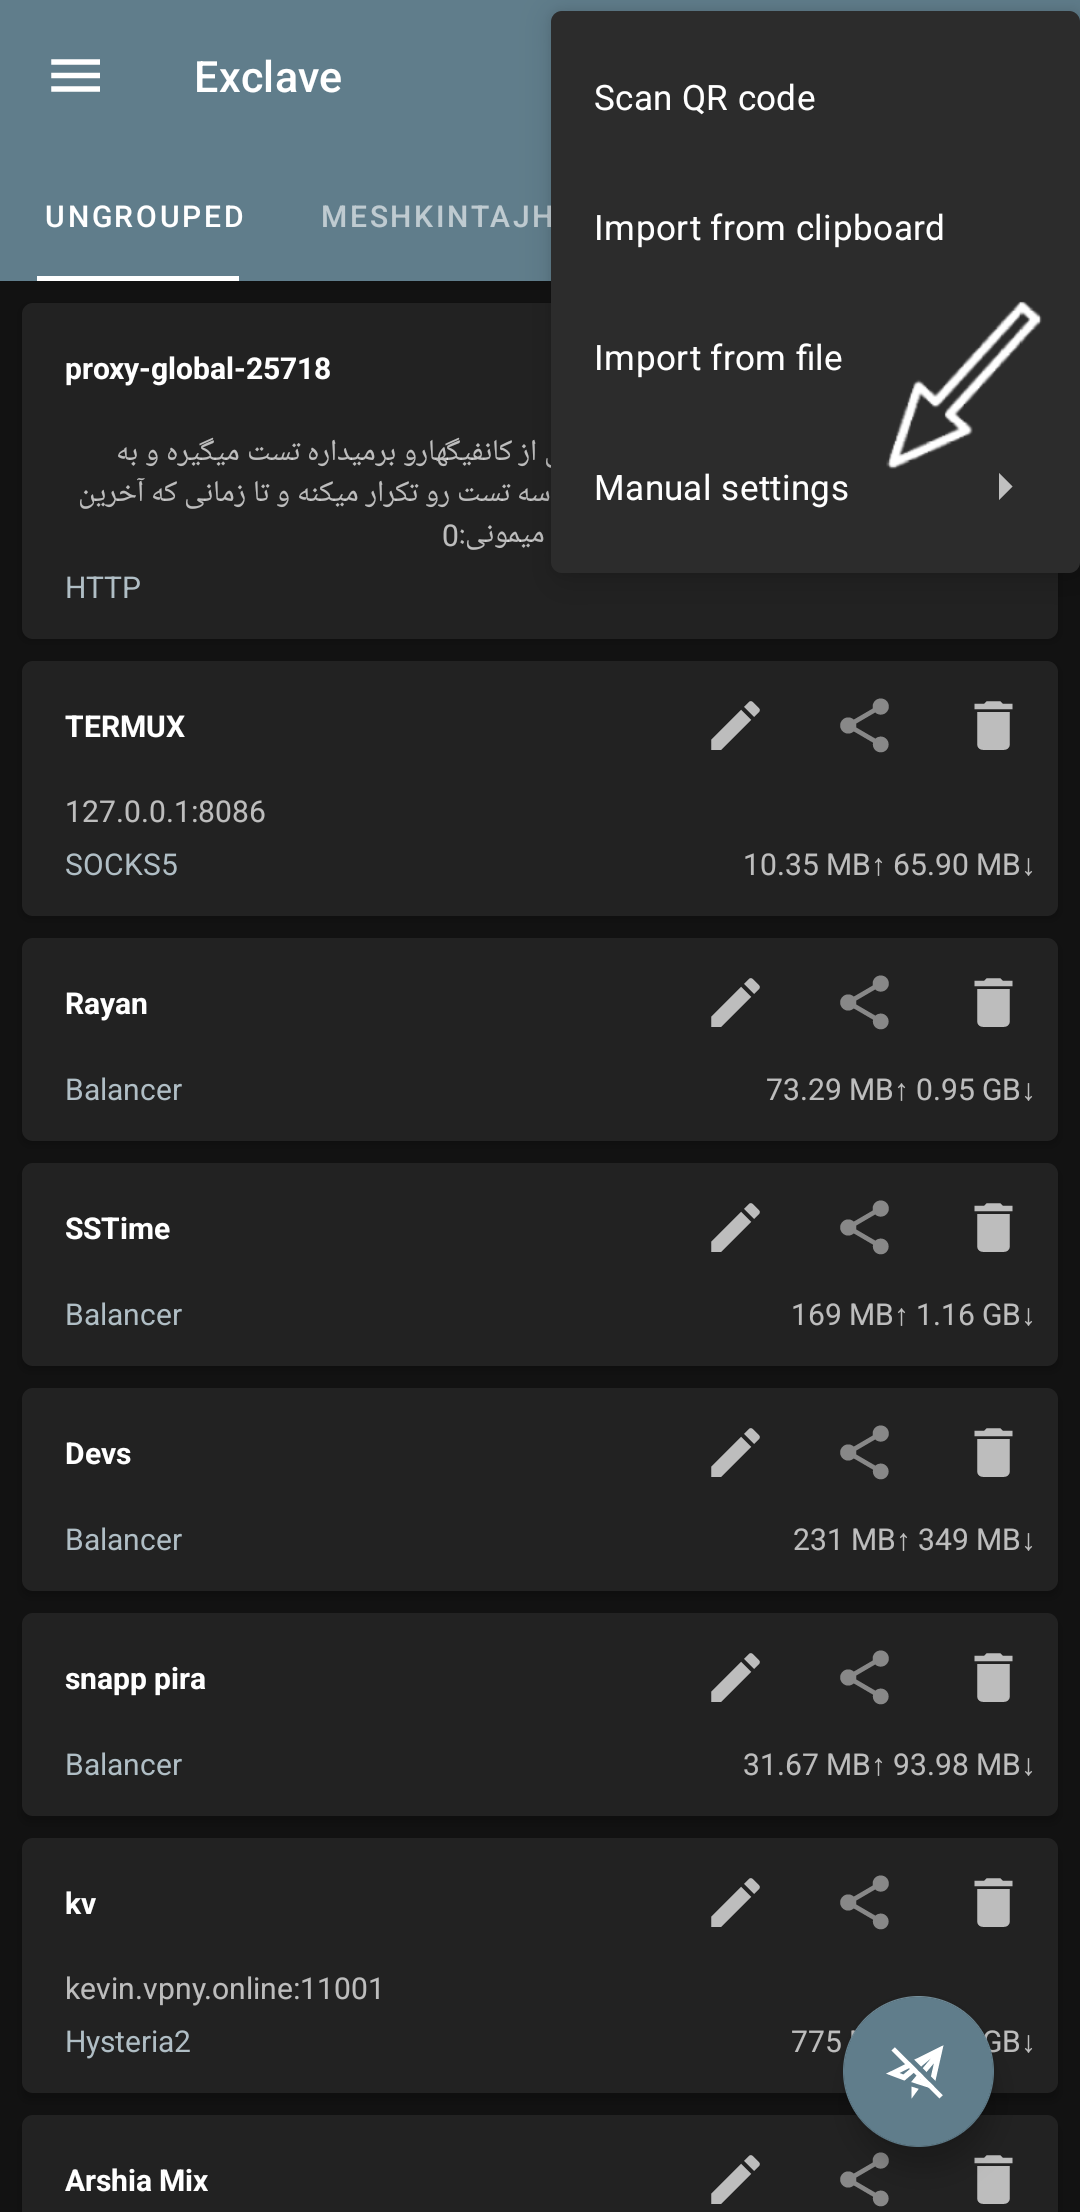
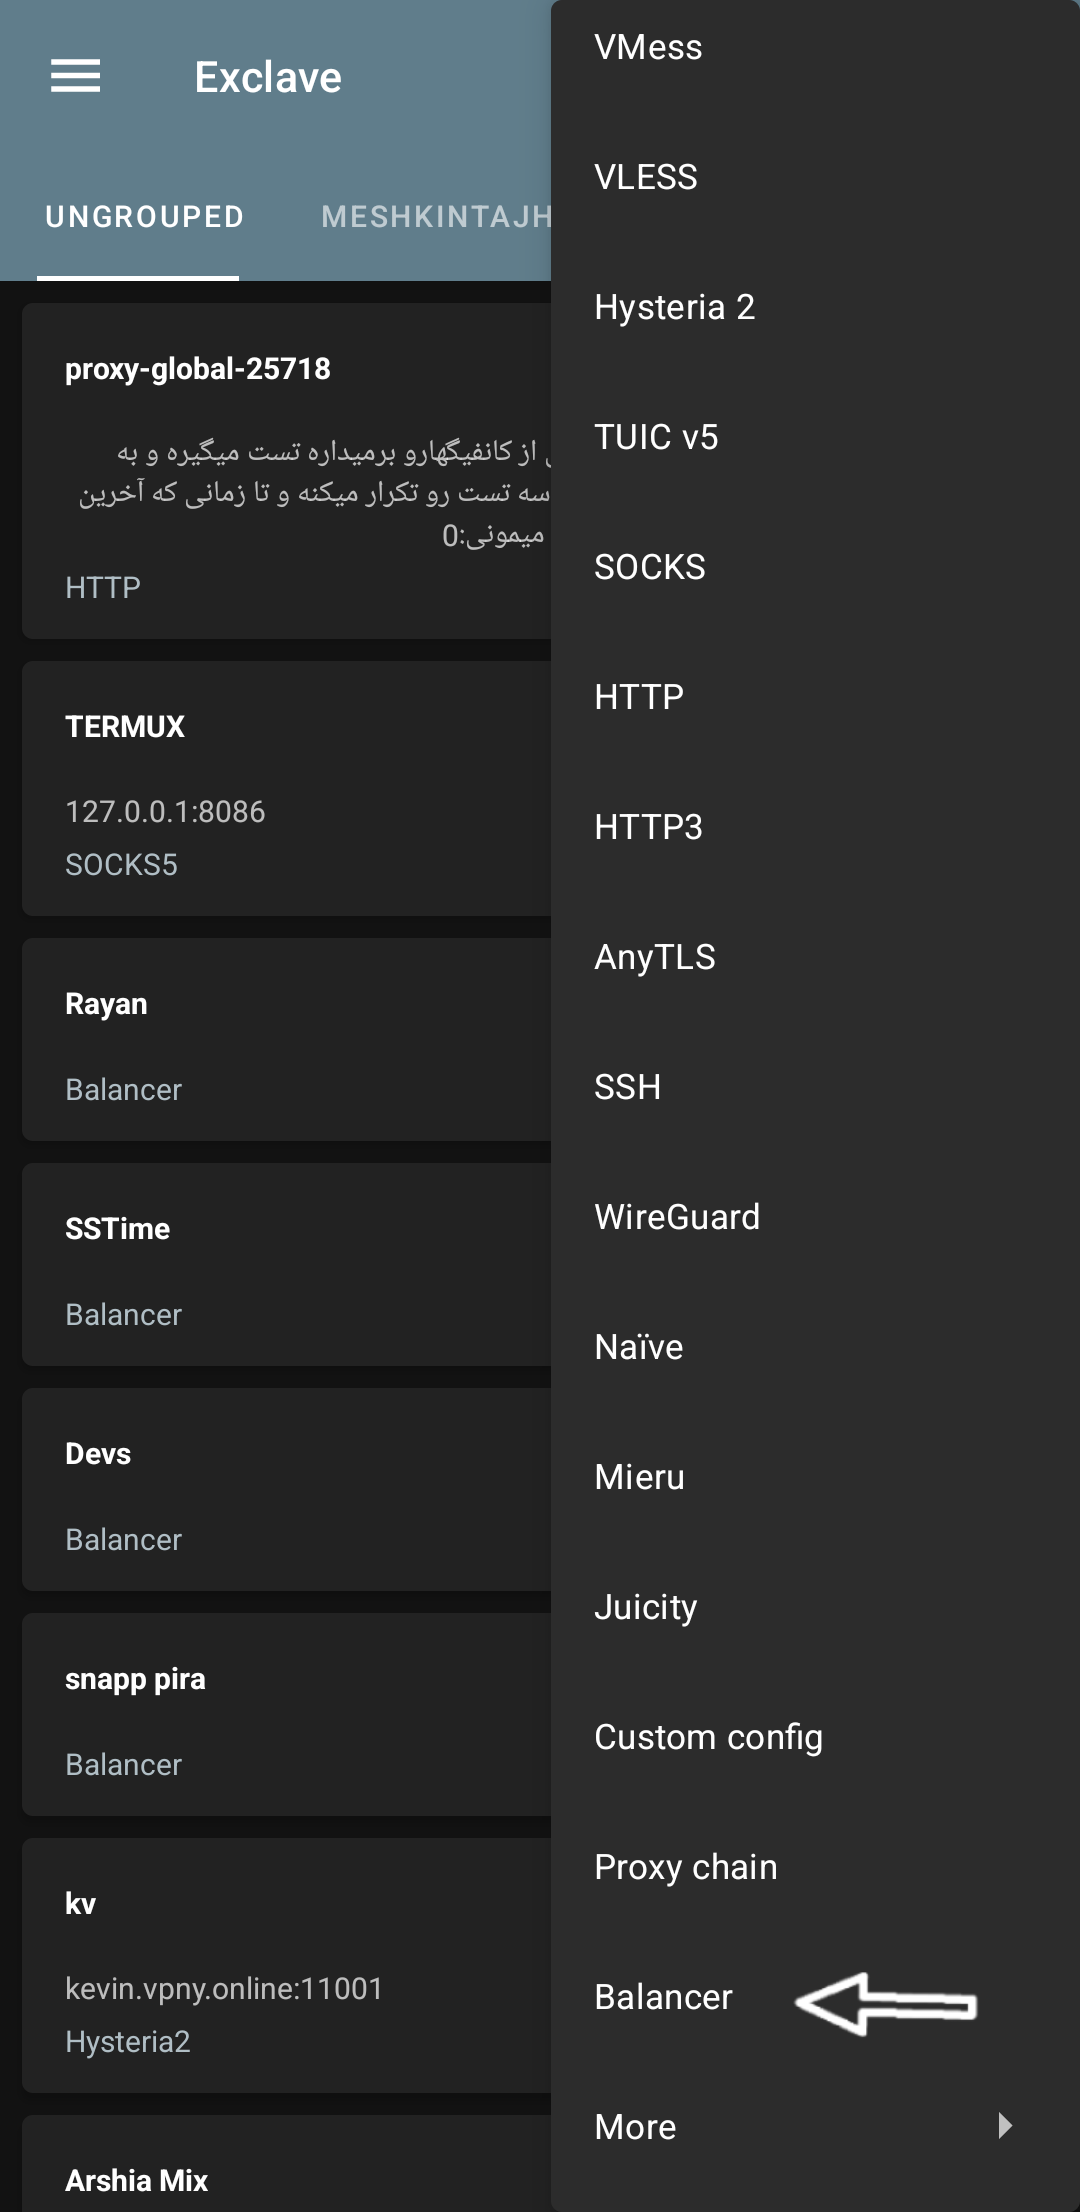
But here in the Exclave client, what do we do? From the top of the page, from the + icon, we open the manual settings menu and from the end of the list, we select the load balance config, like in this screenshot:
View Screenshot
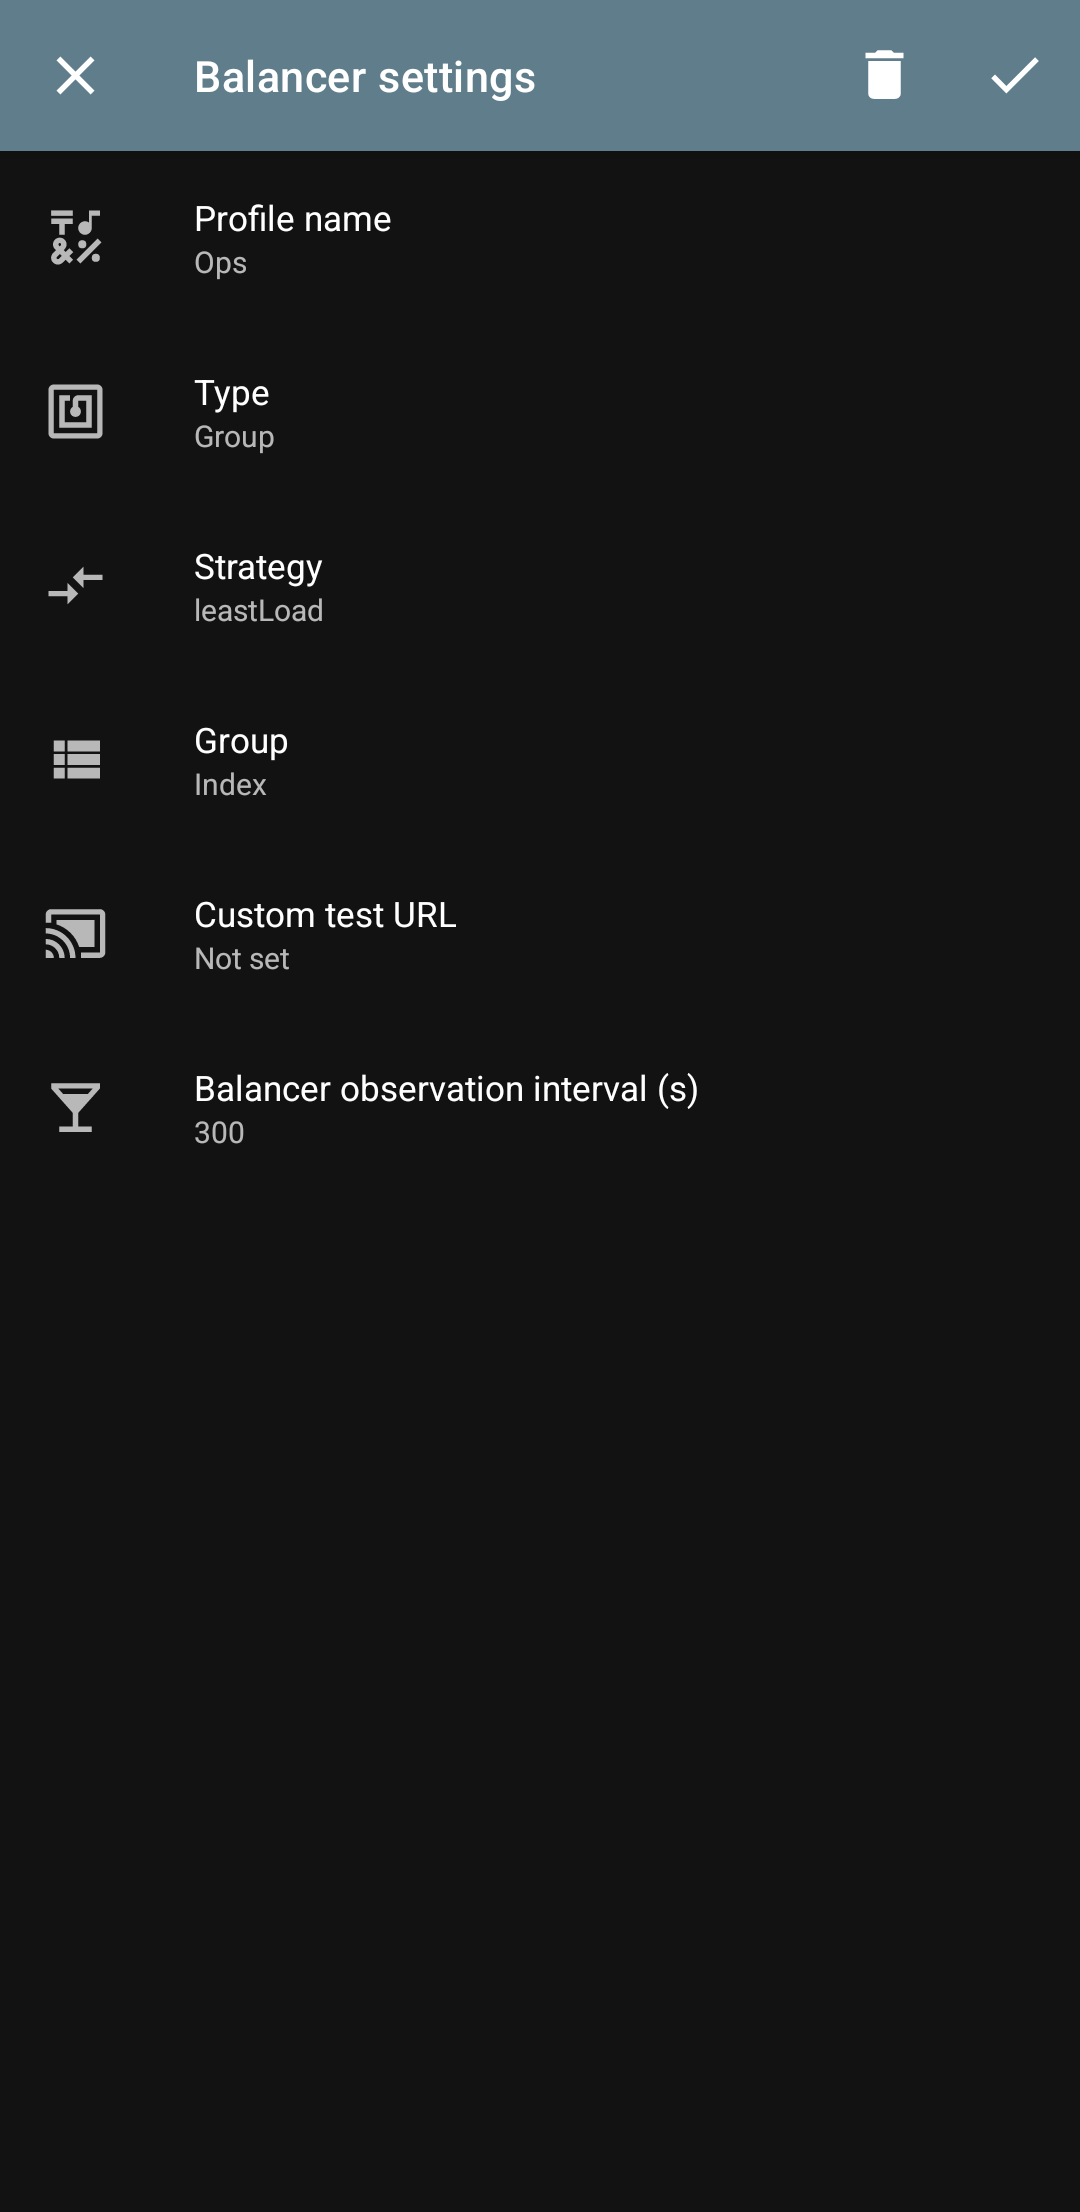
Now we configure the config here:
Profile Name: → a custom name
Type: → Group, select a group as input
Strategy: → leastPing, select the config with the lowest ping
Custom test URL: → leave empty
Balancer observation interval: → 300 is okay
And finally, we save it from the checkmark at the top of the screen.
View Screenshot
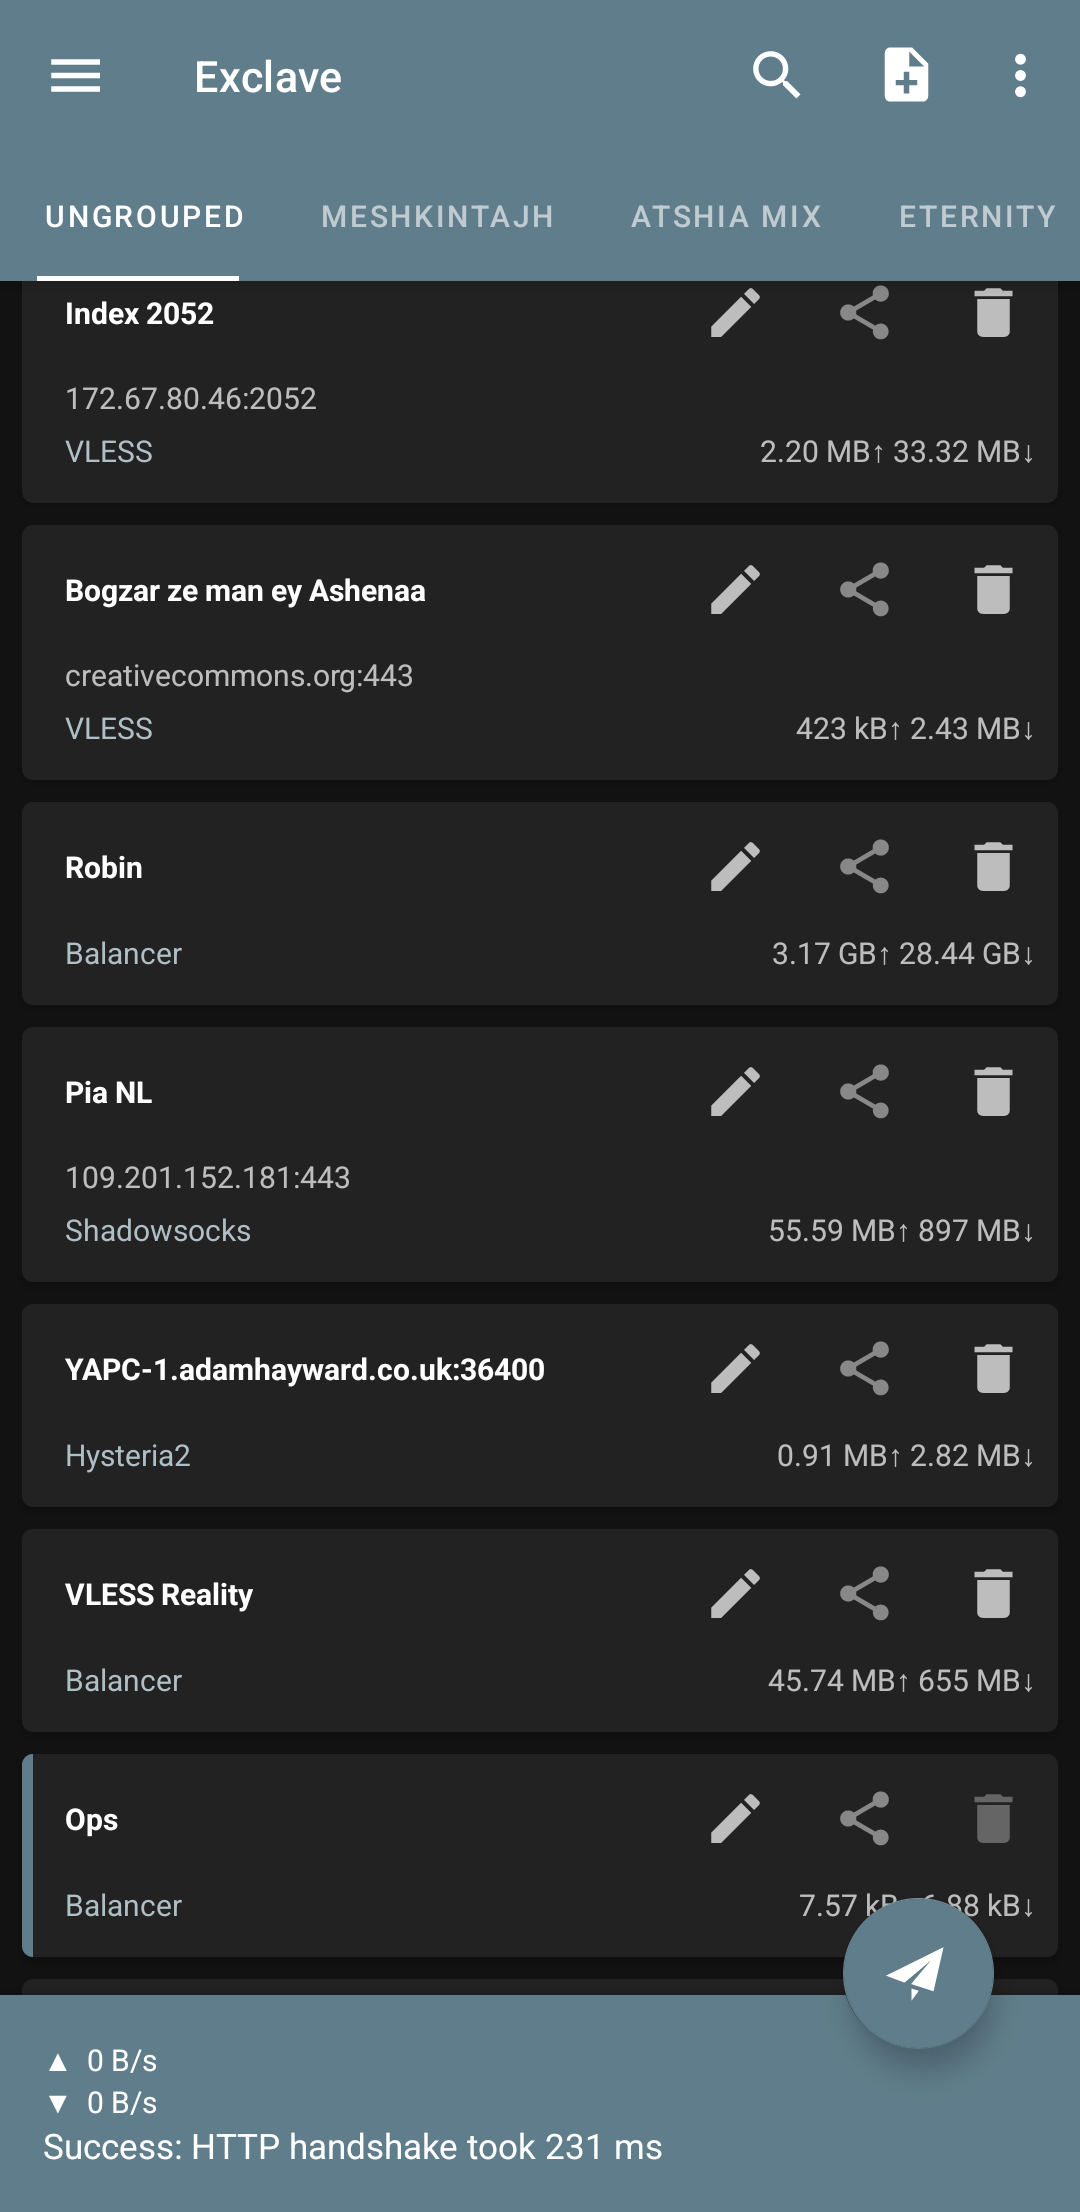
Now a config with the name we chose has been added to the end of the list. If we click on it and press the start button, it should connect.
View Screenshot
So what happened now?
Now we have created a config to which we have given a subscription link as input and specified that it should take a URL test from the configs inside this sub every few seconds and place the ones with better ping at the beginning of the connection list, meaning it will always connect to the best one.
Now, under these conditions, out of, say, a thousand configs, we will remain connected until the moment the last config stops working, because as soon as one stops working, it immediately activates the next one, and the next one, and the next one. We no longer need to go to it and select it manually like in NekoBox.
This is a good idea, its existence is very useful. It can be said that it works like Hiddify or clash and singbox, but at least it is bug-free and doesn't drive you crazy like Hiddify (God forbid 🤧 😅)!
Type: Group or List
We set the second option to Group because we want to create a balancer for our desired subscription link. But if we don't have a subscription link and just have a few configs without a category in the client, then we can select the List option for this section and then from the bottom of the page, we click on add profile and add our desired configs.
Strategy: leastPing or leastLoad
We set the third option, the strategy, to leastPing. As I said, it takes a URL test and activates the config with the best ping for us.
But it also had another strategy called leastload. This is suitable for times when our subscription link is private or on our own server and we know that the ping of all configs is almost equal, so we choose leastLoad so that the load is distributed fairly and the pressure is not on just one config and one IP, or the IP does not get filtered. The next parameter was random, which is completely clear, it chooses randomly between these two modes.
Remote DNS
In all clients, the Remote DNS section is visible in the settings. You can tell if the remote is correct or not when you are browsing the web. It is not specified in the client itself. Even if you write my name instead of a valid server in the client, your config will still connect and give a ping. If you come to Telegram, you still won't know if it's healthy or broken or filtered for you. Telegram doesn't care about the remote at all and comes up in every way. The best way is to go to the browser and open a website. It doesn't matter which site. For the test, we go to this site, for example: dnsleaktest.com
If it comes up and shows an IP, it means that the remote DNS is generally okay. Click the standard test option and wait for it to send a few requests and then display the queries. In the standard test, if all the queries are not for one country (the location of the config or the active VPN) and it shows different countries, it has two states: either your config is not good (90% probability) or the remote DNS is not interesting. I suggest you test with another config as well.
But the worse case is that out of the five or six countries that are displayed for you, one or two of them were your real location, i.e., Iran. This means that the config or VPN you have activated is garbage. I will write down some of a good remote servers below.
NekoBox / Exclave
I don't remember their default remote DNS exactly, I think it was Google's DoH. Well, whatever, it doesn't matter because I remember it wasn't compatible with Iran's net and especially worker & page configs. That's why as soon as you install it, you have to change it to Google's DNS over HTTPS, but not DoH and at the same time DoH 😅
Google DNS:
https://8.8.8.8/dns-queryAdguard DNS:
https://94.140.14.14/dns-querycontrolD DNS:
https://freedns.controld.com/p2Open DNS Cisco:
https://208.67.222.222/dns-queryClean Browsing:
tcp://185.228.168.9Kernel error
https://dns.kernel-error.de/dns-queryCloudflare UDP:
udp://1.1.1.1This last one, Cloudflare, is suitable for warp configs in Hiddify and NekoBox (warp is currently martyred in Iran and China)
View Screenshot
In short, it depends on which one our internet service provider works better with. Based on experience over these three years, Google and Adguard have been suitable for everyone.
Recommendation
READ MORE
I suggest you create a DNS for yourself with a worker. With it, you can use all the DoHs that are filtered in Iran. The name of the service is DNA Azadi. A cool group has worked on it. Here is a tutorial on how to make it in text and video format link to Azadi DNS creation tutorial
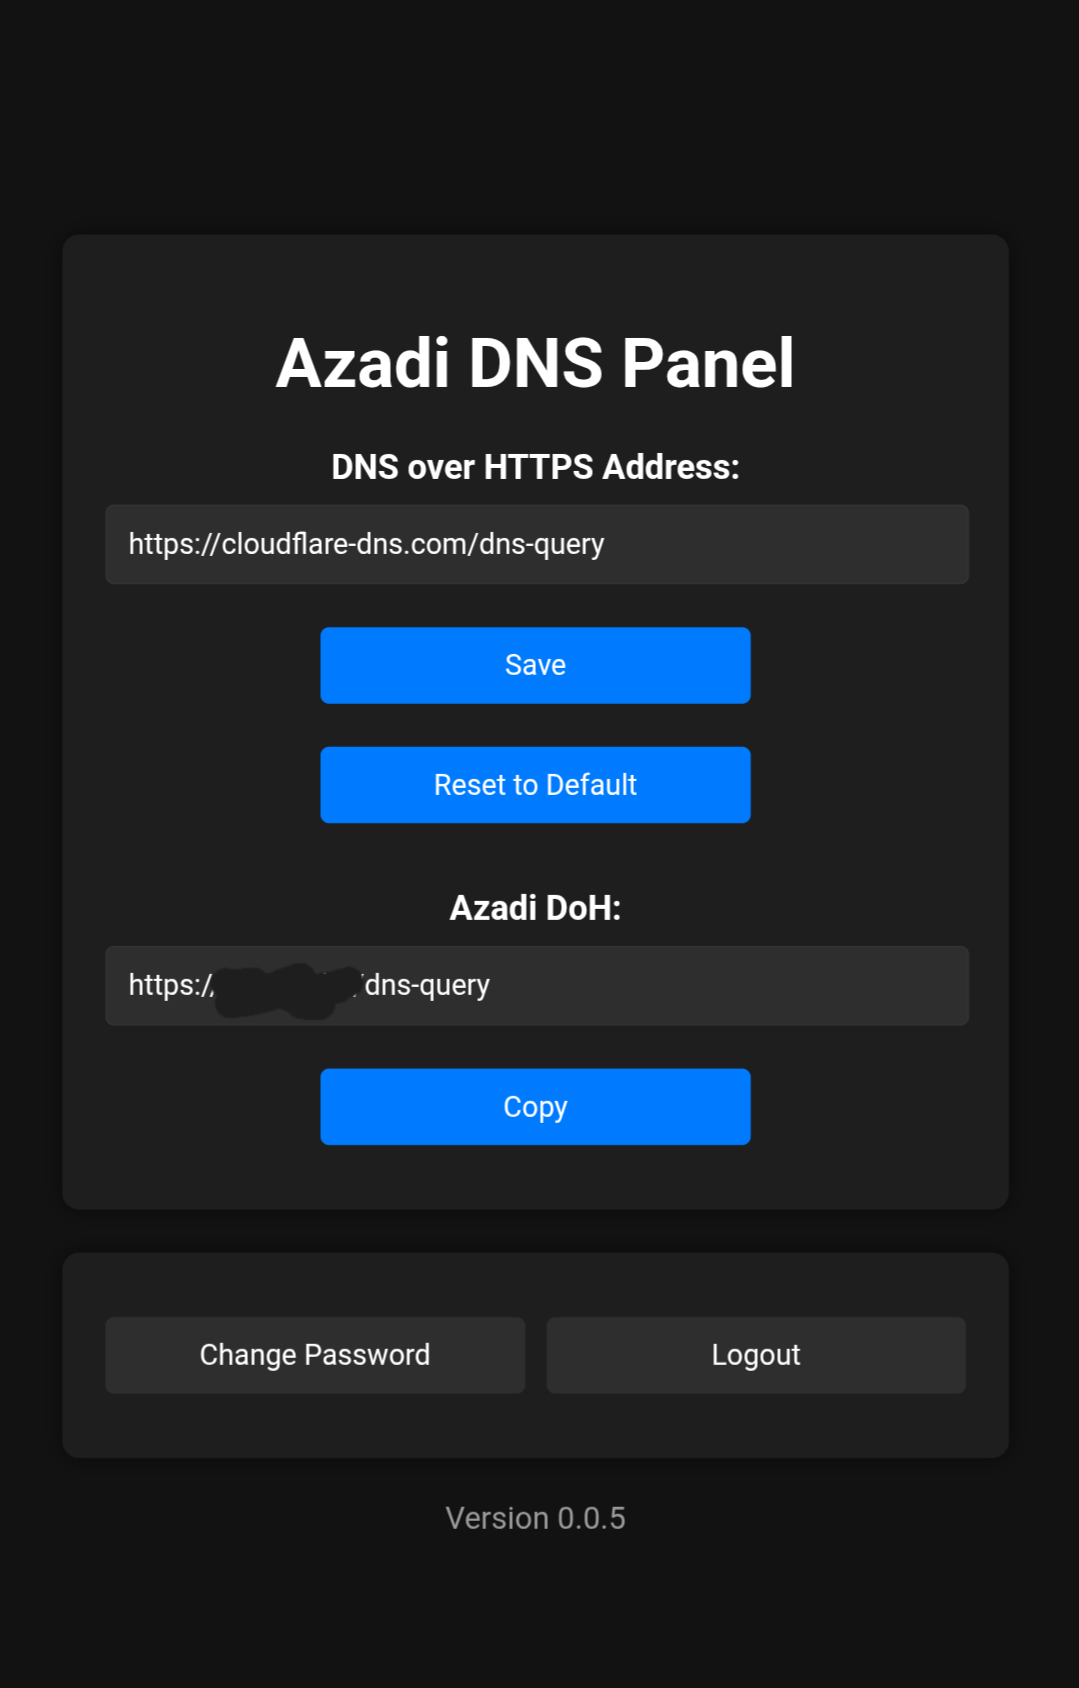
After creating your personal DNS service, come and test it a couple of times with the Darkness DNS Tester with the VPN off to see which service gives a better ping and put the address of that DNS in your Azadi panel 😉
Hiddify / V2ray
It's better to leave Hiddify on default. Its default is this:
udp://1.1.11Only change it when websites don't load, as I explained above. Based on experience, when using configs created with worker or page (both vless and trojan), we have to change the default remote to a DNS over HTTPS type, for example, one of these:
Google DNS:
https://8.8.8.8/dns-queryAdguard DNS:
https://94.140.14.14/dns-queryQuad DNS:
https://9.9.9.9/dns-queryView Screenshot
The v2rayNG client uses Cloudflare's ipv4 DNS by default: 1.1.1.1
It's rare that we need to change it, but if we ever do, we'll quickly put Google in its place: 8.8.8.8
What other client is left? I don't know, whatever else there is is a fork of these few main clients and naturally its settings are the same as these.
Direct DNS / Local DNS
Direct DNS is a DNS server that is used to resolve direct domains (i.e., those that do not pass through the proxy, such as Iranian or LAN sites). Before our proxy config connects, it has another task in addition to that. If the config we have in the client uses a domain in its address section instead of an IP, like most configs, then when we want to connect with that config, the client uses this Direct DNS address to find the IP of the domain. First, it converts the domain of the config to an IP and then starts to perform its task, creating a tunnel, encrypting, tlshello, separating paths, and exchanging traffic, etc.
Default: Usually gets the Android system DNS (like 8.8.8.8 for Google or 1.1.1.1 for Cloudflare).
Why is it important? If your ISP blocks or manipulates DNS, domestic sites won't load.
Recommendation: In Exclave's settings, turn off the "Use system DNS as Direct DNS" option and in the box below it that says "Direct DNS", put
tcp://8.8.8.8to always use Google. In Iran, its ipv4 is not filtered and it is fast, and what more could a blind person want from God?
It's the same for Nekobox, but it doesn't have that option to turn it on or off. In Nekobox, if you write local in the Direct DNS box, just like that in lowercase, it will use the internal Android DNS, and you can leave it as local or, as explained in the previous paragraph, put 8.8.8.8 here as well.
Also, for Direct or Local DNS, you can use a public, neutral, hassle-free, and unfiltered DNS server like Alibaba. In this case, as I said above, you must first turn off the Use system DNS as Direct dns option and then proceed to place your desired server in the box below it. This is Alibaba:
https://223.5.5.5/dns-querytcp://223.5.5.5Customization
If you want to customize, you can use good Iranian DNSs like Shecan or Electro to open domestic sites faster. It's similar in both clients. You can find it at this address:
DNS Settings > Direct DNS
Shekan DNS
178.22.122.100Electro DNS
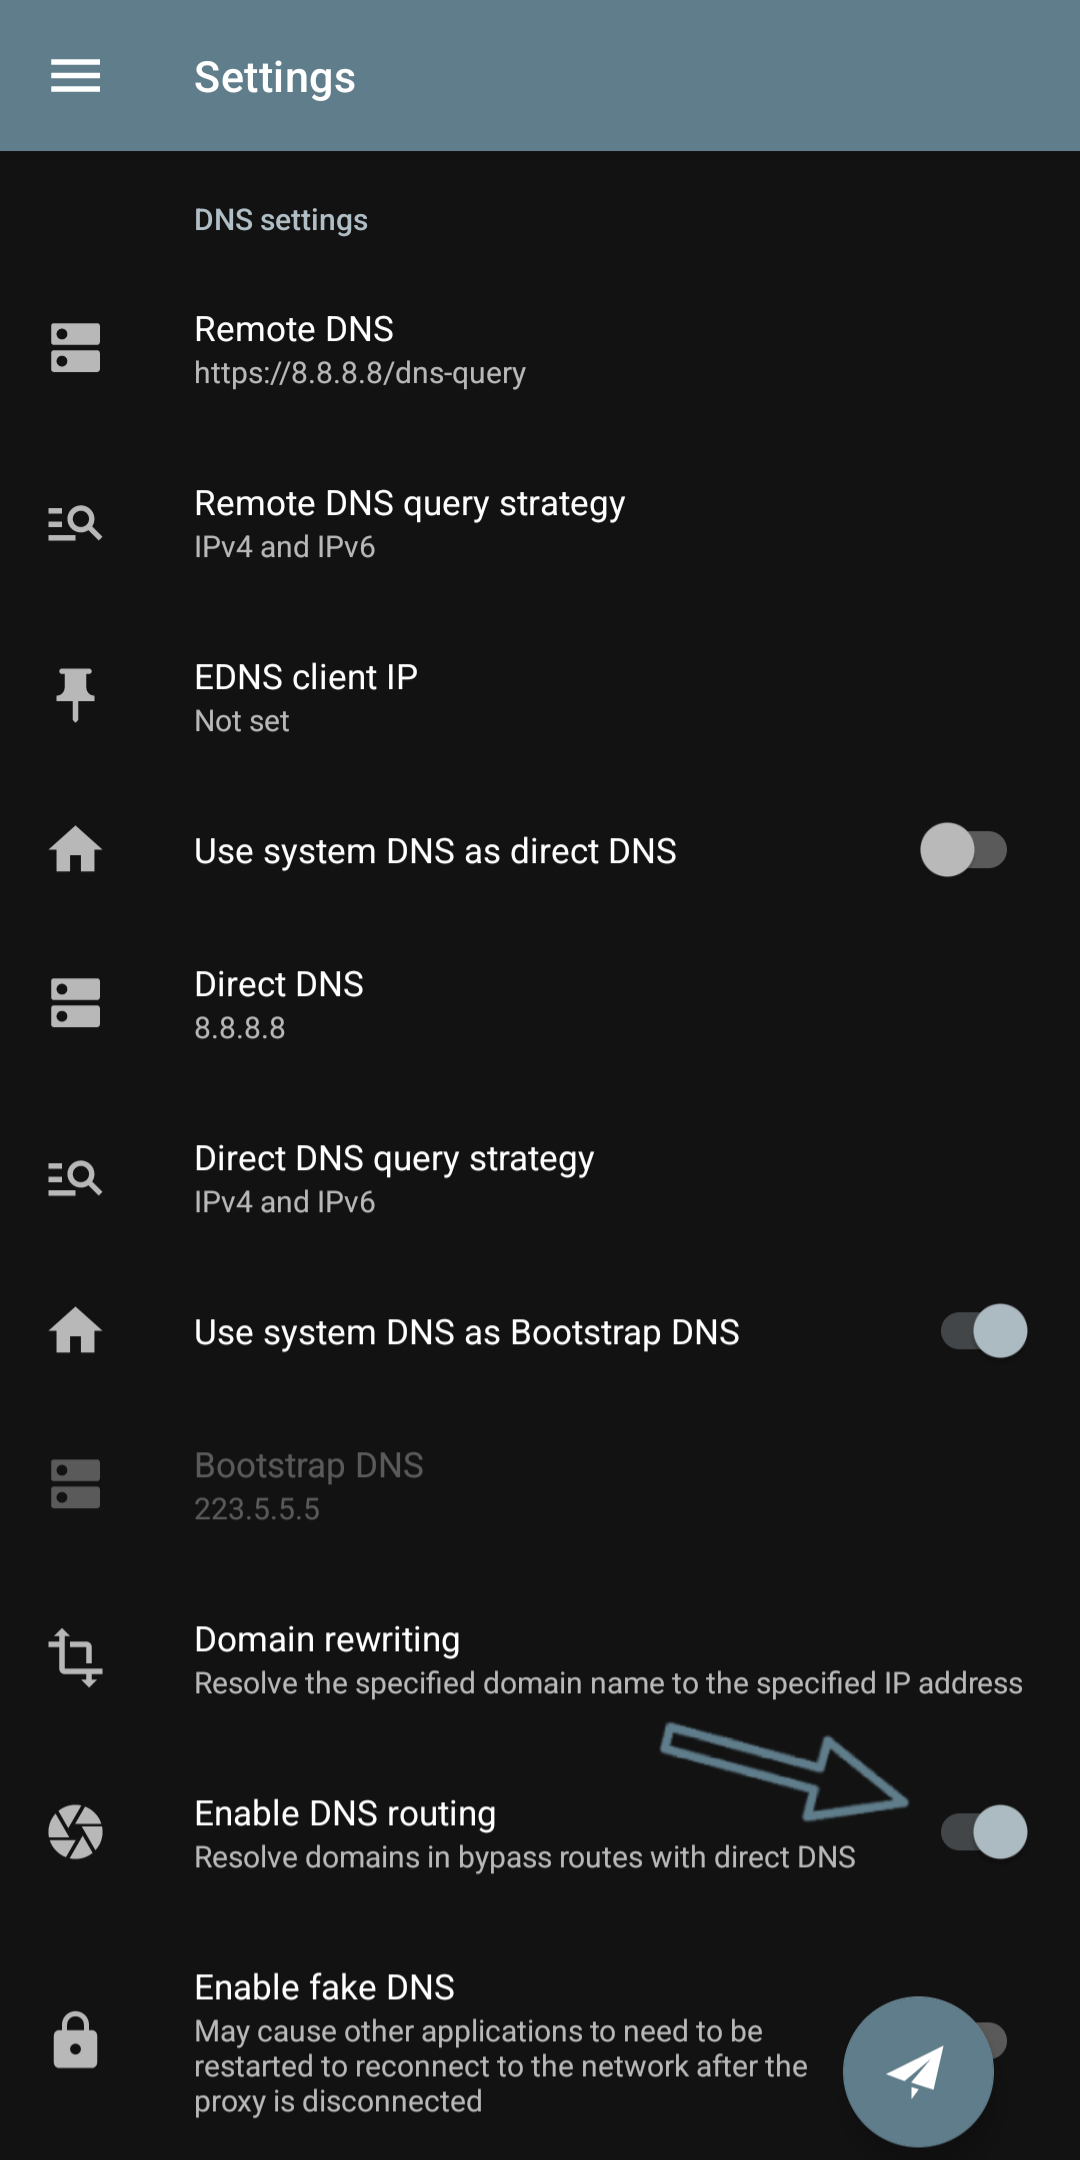
78.157.42.100Enable DNS Routing
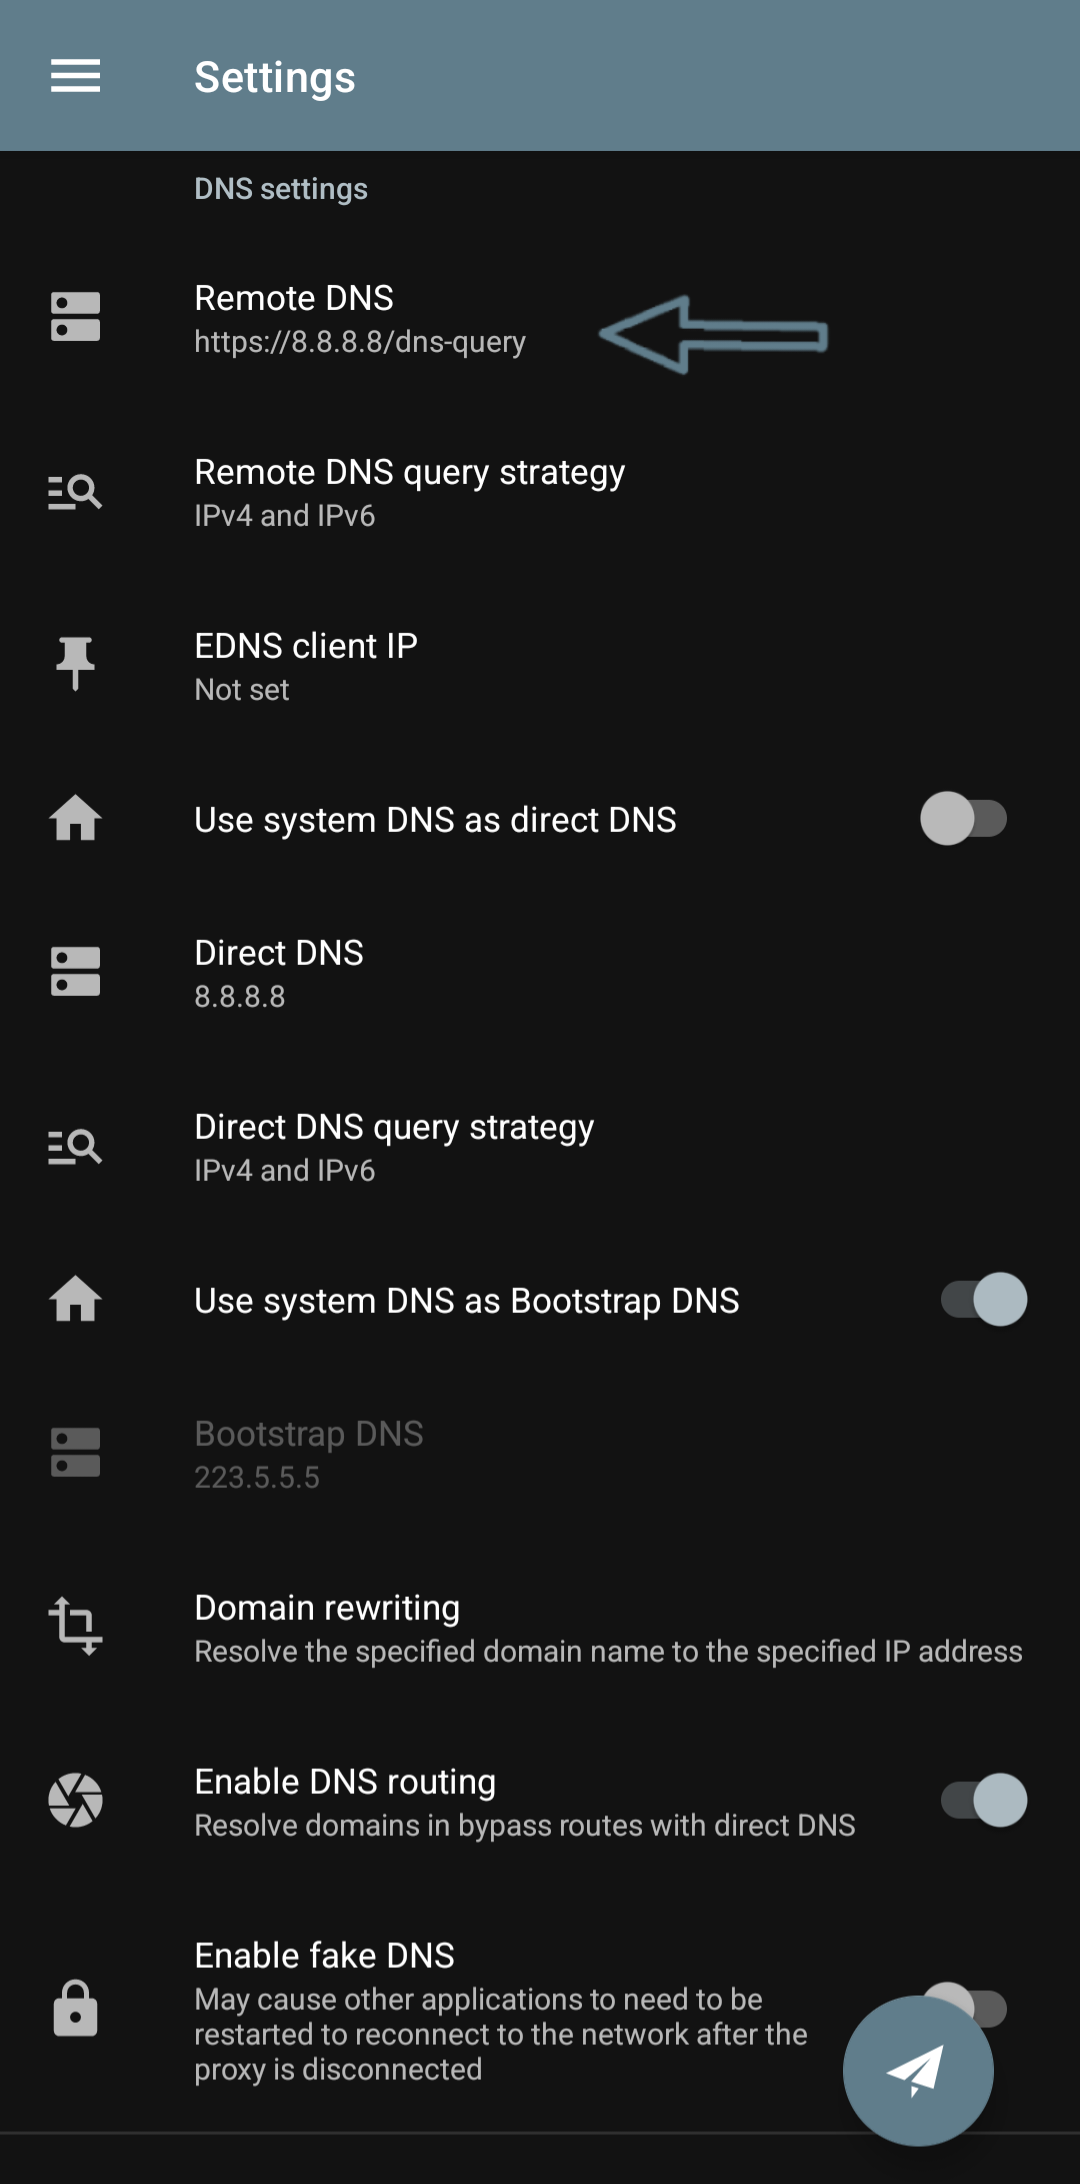
In the DNS settings of Nekobox and Exclave, there is an important option called Enable DNS routing. Having this option on means that it sends your DNS queries (requests to convert a domain to an IP) through the proxy (VPN tunnel) instead of going directly to the direct DNS and in some cases, your location being leaked. It passes through the proxy, which is more secure. In my backups, this option is always on by default.
How to enable it is similar in both clients. Go to this address:
Settings > Enable DNS Routing
and activate it with the button opposite it.
Advantages: Prevents DNS Leak, meaning your location will no longer be leaked. If it's off, the DNS goes directly and may be filtered.
Disadvantages: Your connection may be slightly slower (you won't notice it) because the DNS is also tunneled.
Recommendation: Always turn it on, unless you have a problem with speed.
Screenshot of the DNS settings section
Enable Fake DNS
In the client, there is another option called Fake DNS that we generally don't mess with and leave it off, but I will write a brief explanation about it. It's an anti-leak trick that resolves blocked domains to fake IPs like 198.18.0.0/15. Then, the client understands that this IP is fake and sends the traffic to the proxy. This way, even if the main DNS is filtered, the connection is established.
What does it do? When Strict Route is active, the client makes sure that not even a single DNS request goes outside the VPN tunnel. If it is inactive, some requests may go directly to the ISP and be filtered or your location may be leaked.
What's the problem with it? If the DNS server you have chosen (such as Remote DNS or Direct DNS) does not work properly or is not compatible with your config, your internet may be completely cut off, because no domain will be resolved anymore.
When to use it? When Strict Route is active (in Inbound options) and you have a DNS Leak.
We don't have this strict route option in nekobox and exclave, but it is in hiddify (Android and desktop) and the official sing-box client, as well as configs that we write in accordance with the sing-box core structure, and my main purpose for writing the fake dns explanation was for these few.
Note
If the internet is disconnected after activating Strict Route, turn on Fake DNS and check the routings (it may have a conflict).
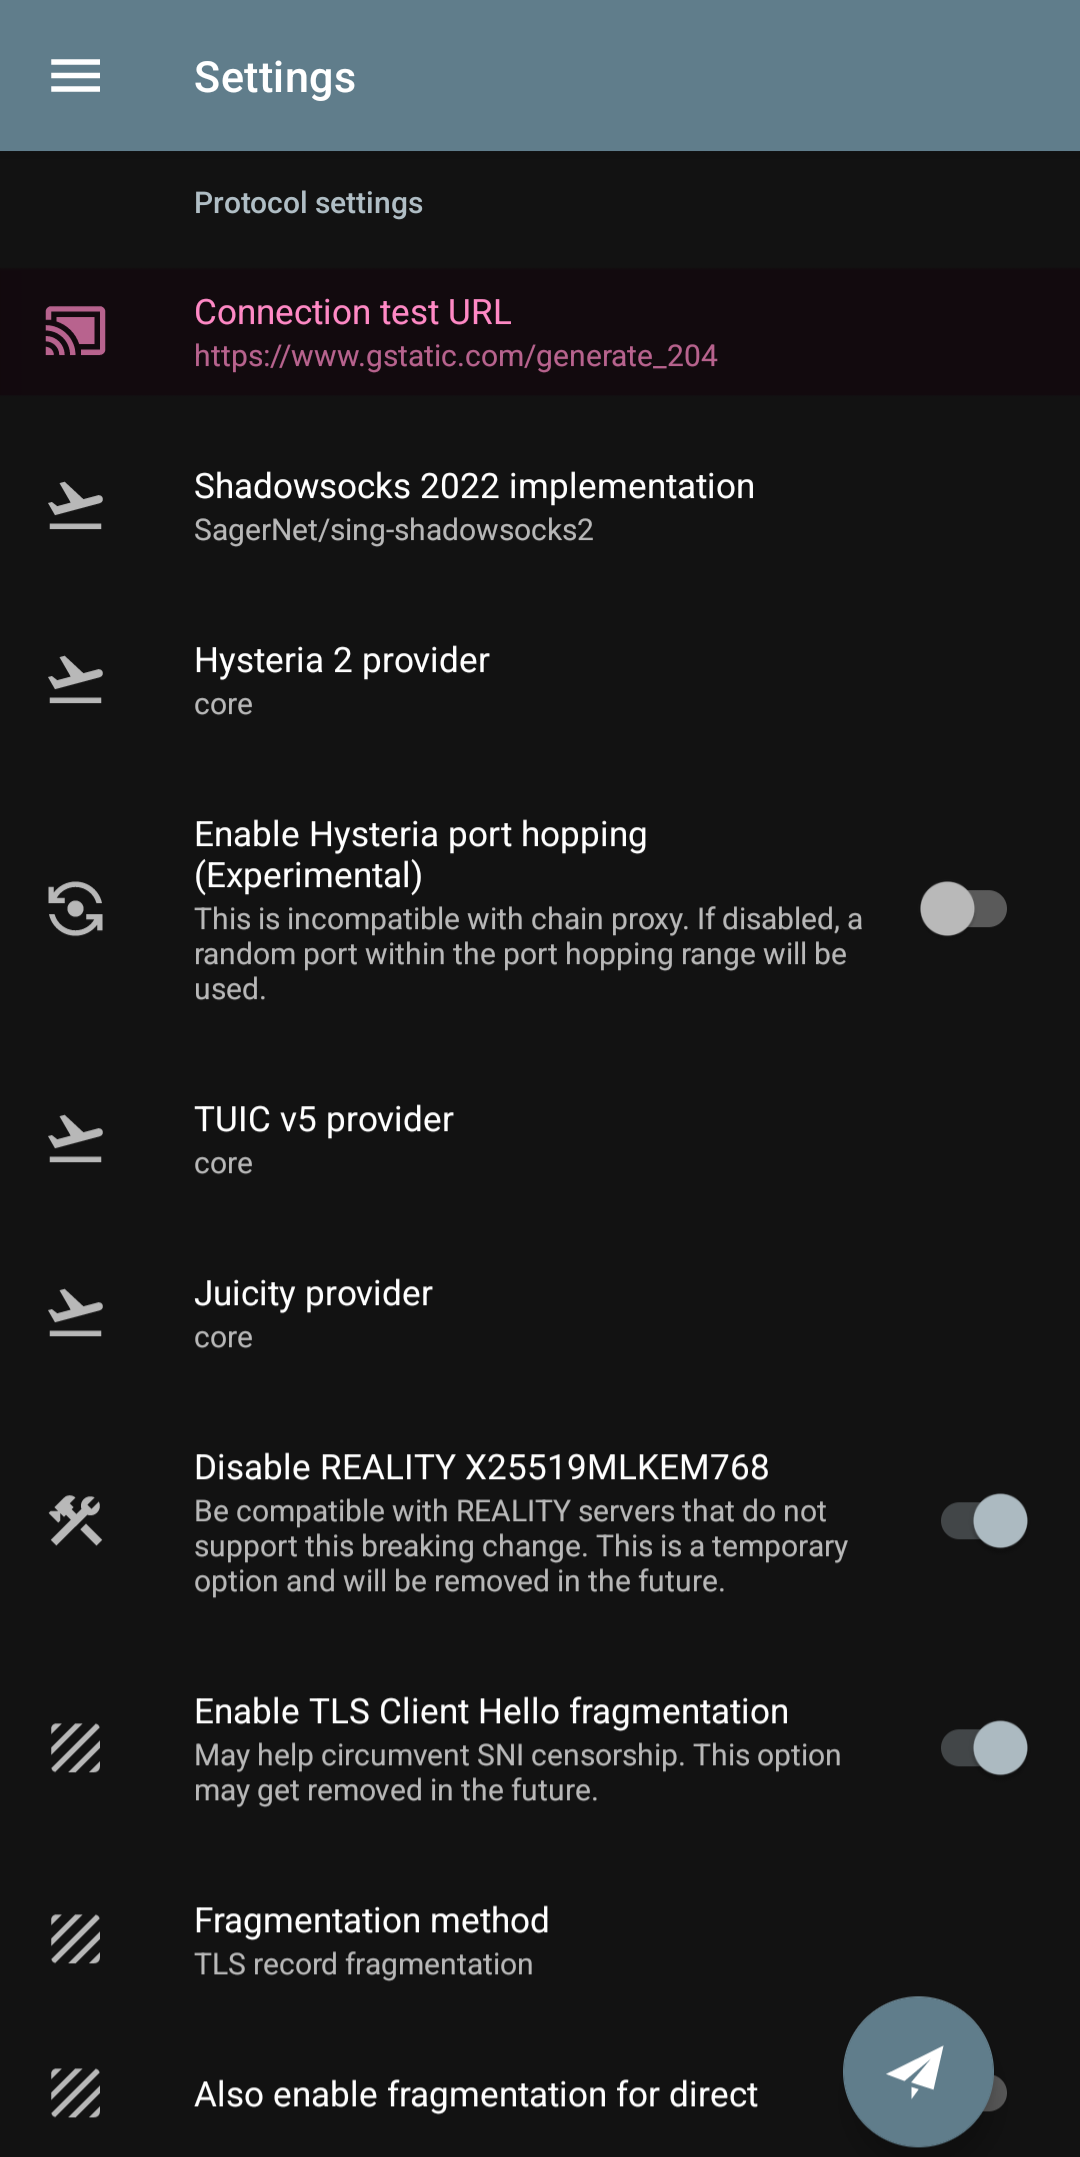
URL Connection Test
Inside Nekobox, Hiddify, and Exclave, this test server is more important than the remote DNS. I mean this part: connection test URL
which is by default on this one:
http://cp.cloudflare.comwhich should be changed at the first opportunity to:
http://www.google.com/generate_204or this one is not bad either:
https://clients3.google.com/generate_204View Screenshot
If this remains as its default and you don't correct it, when you take a test, it will either show all the configs as broken or give a false ping and just put a green number next to them, while no data is exchanged when connecting.
Here is a list of test servers for use inside clients
Click here to view the list
It is recommended to use only the first 5, the rest are just to fill the space
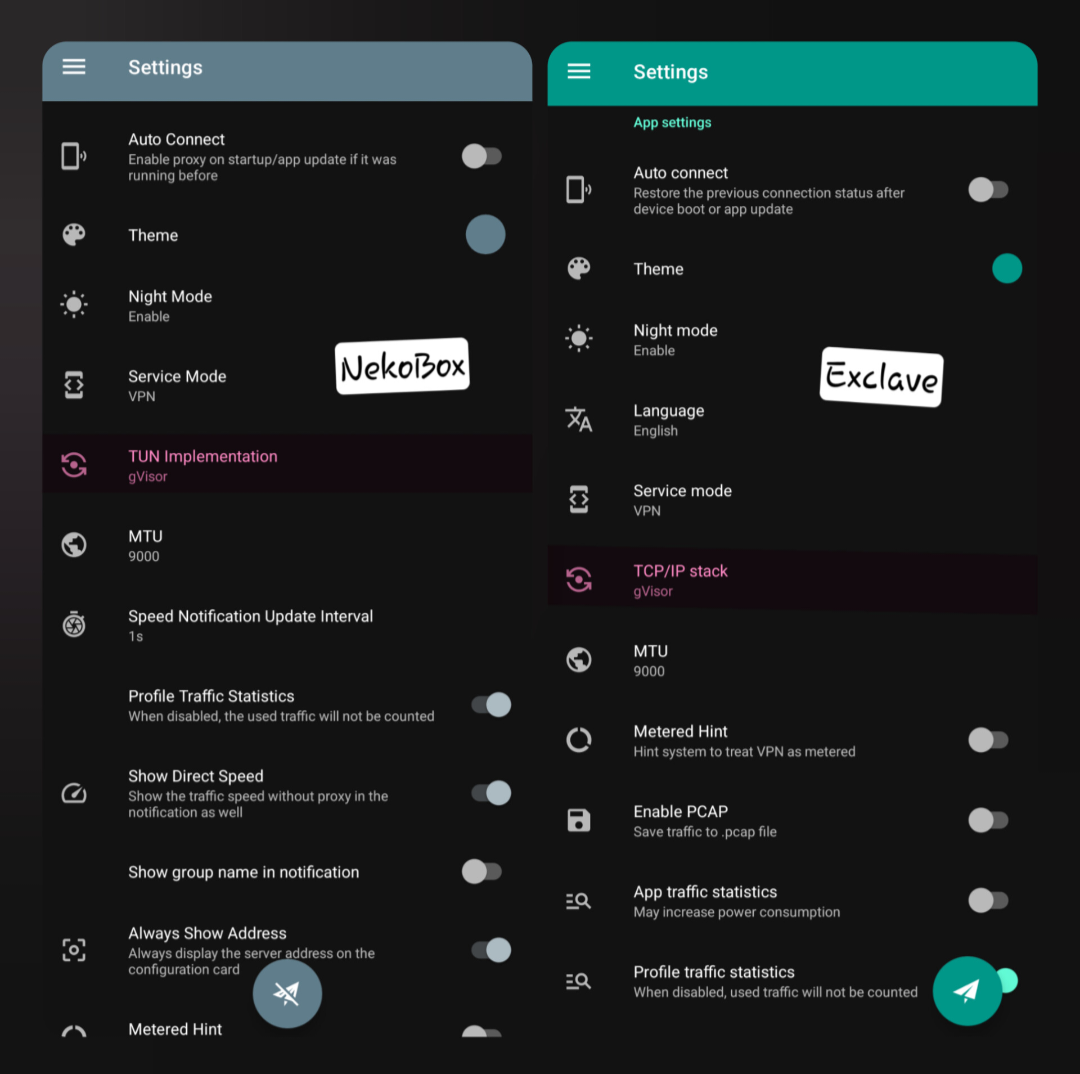
TUN Implementation / Stack
First of all, let's say what TUN is.
It is a method that VPN clients (like Nekobox, Exclave, Hiddify, Singbox, and many others) use to route your internet traffic through a VPN tunnel. To put it very simply, TUN creates a virtual layer so that it seems like all our phone's traffic passes through a secure path or tunnel. Now, this TUN Implementation (or in some clients, we know it as Stack) specifies how this tunnel should be implemented. Each of these three options (System, gVisor, Mixed) is a different method for managing this tunnel.
Where do you find it?
- In Nekobox, go to:
Settings > TUN Settings > TUN Implementation.
- In Exclave, it's in:
Settings > TUN Settings > Stack.
- In Hiddify, it's in:
Config options > inbound options > TUN implementation.
- Why is it important? Choosing the right option can make your connection faster, more stable, or more secure. The wrong choice can also cause the internet to be disconnected or slow down.
View Screenshot
TUN Types
1. System
This option uses the Android operating system (or the phone's internal TUN) to manage the VPN tunnel. This means that the client directly uses Android's own features to route traffic.
Advantages:
- High speed: Because it uses the operating system directly, it is usually the fastest option.
- Less battery consumption: It puts less pressure on the phone's CPU.
- Good compatibility: It works well with most devices and configs.
Disadvantages:
- Less security: Because it uses the operating system, it may be more vulnerable to DNS Leak or more advanced filtering.
- Less control: If your ISP or operating system manipulates the DNS, problems such as websites not loading may occur.
When to use it?
- If you are looking for speed and stability and security is not very critical for you (for example, for gaming or streaming), System is a good option.
- Also, if your device is old or has weak hardware, this option works better.
2. gVisor
gVisor is a technology created by Google to create an isolated and secure environment for running network code. In this mode, instead of using the operating system's TUN, it creates a separate virtual layer (like a lightweight virtual machine) that manages the traffic.
Advantages:
- High security: Because the traffic is processed in an isolated environment, the probability of DNS Leak or information leakage is very low.
- Support for complex settings: It works better for special configs (such as VLESS or Trojan with advanced settings).
- Resistance to filtering: In Iran, where DNS and protocol filtering is high, gVisor can perform better.
Disadvantages:
- Slower speed: Because it has an extra layer, it may be slightly slower than System.
- More battery consumption: Processing in the gVisor environment puts more pressure on the processor (CPU).
- Potential problems: On some old devices or those with low RAM, it may cause crashes or connection drops.
When to use it?
- If security is a priority for you (for example, to bypass strict filtering or prevent DNS Leak), gVisor is the best choice.
- Especially if you use complex configs or personal servers.
3. Mixed
This option is a hybrid mode that tries to combine the advantages of System and gVisor. In this mode, the client switches between System and gVisor depending on the type of traffic or settings.
Advantages:
- Balance between speed and security: It uses gVisor for sensitive traffic (such as filtered sites) and System for the rest.
- Flexibility: If you are not sure which option is better, Mixed is a middle choice.
Disadvantages:
- Complexity: Because it switches between two modes, it may be unstable in some cases or not recognize the settings correctly.
- Need for testing: You have to see if it works well with your configs and device or not.
When to use it?
- If you don't know which option is better or you have a variety of configs (for example, you have both simple vless and advanced reality or hysteria), Mixed can be a good starting point.
Which one should we choose?
For most users in Iran, I have these suggestions:
If you are a beginner or your device is old: Start with System. Its speed is good and it usually works without problems.
If security and bypassing filtering are important to you: Choose gVisor, especially if you use Strict Route and Fake DNS (which I explained in the previous section). Just make sure the Remote DNS is set correctly, like
https://8.8.8.8/dns-queryIf you don't know what's what: Choose Mixed and test it. If a problem occurs, switch to one of the other two options.
Important points for setting TUN Implementation
DNS Leak Test: After choosing any of these options, be sure to check with dnsleaktest.com or ipleak.net that your location is not leaked. gVisor is usually more secure, but System may give a DNS Leak. In the standard test with this site, all queries must be in harmony with the location of your config's IP and not a mix of several different countries. If one of the queries is Iran, the situation is a disaster.
Compatibility with Strict Route and Fake DNS: If you have enabled Strict Route, it is better to choose gVisor or Mixed, because System may be incompatible with Strict Route and cause a disconnection. Fake DNS also works better with gVisor.
Speed or disconnection problems: If your speed decreases with gVisor or Mixed or your connection is disconnected, first check the Remote DNS (for example, change it to Adguard DNS). If it is not fixed, go back to System.
Weak devices: If your phone is old or useless (like most Xiaomi phones) or has low RAM (for example, under 4 GB) or a weak CPU, gVisor may cause lag or crashes. In this case, System is better.
Final word
The choice between System, gVisor, and Mixed depends on your needs: speed, security, or something in between. My suggestion is to start with gVisor, because in Iran with heavy filtering, its security is useful. If a problem occurs, switch to Mixed or System. Always after changing the settings, with a simple test (like opening a filtered site or checking dnsleaktest.com), make sure everything is working correctly.
Summary of Recommendations
In NekoBox/Exclave
- Remote DNS →
https://8.8.8.8/dns-query - Direct DNS → Set it to system
- DNS Routing → Turn it on
- Fake DNS → Turn it off
- Use system DNS as Bootstrap DNS → Leave it on
- Enable Sniffing → Leave it on
- Hijack DNS → Leave it on
- TUN Implementation/Stack → Set it to gVisor unless the phone is old, then set it to system
- Connection Test URL → Be sure to change the default to the following address:
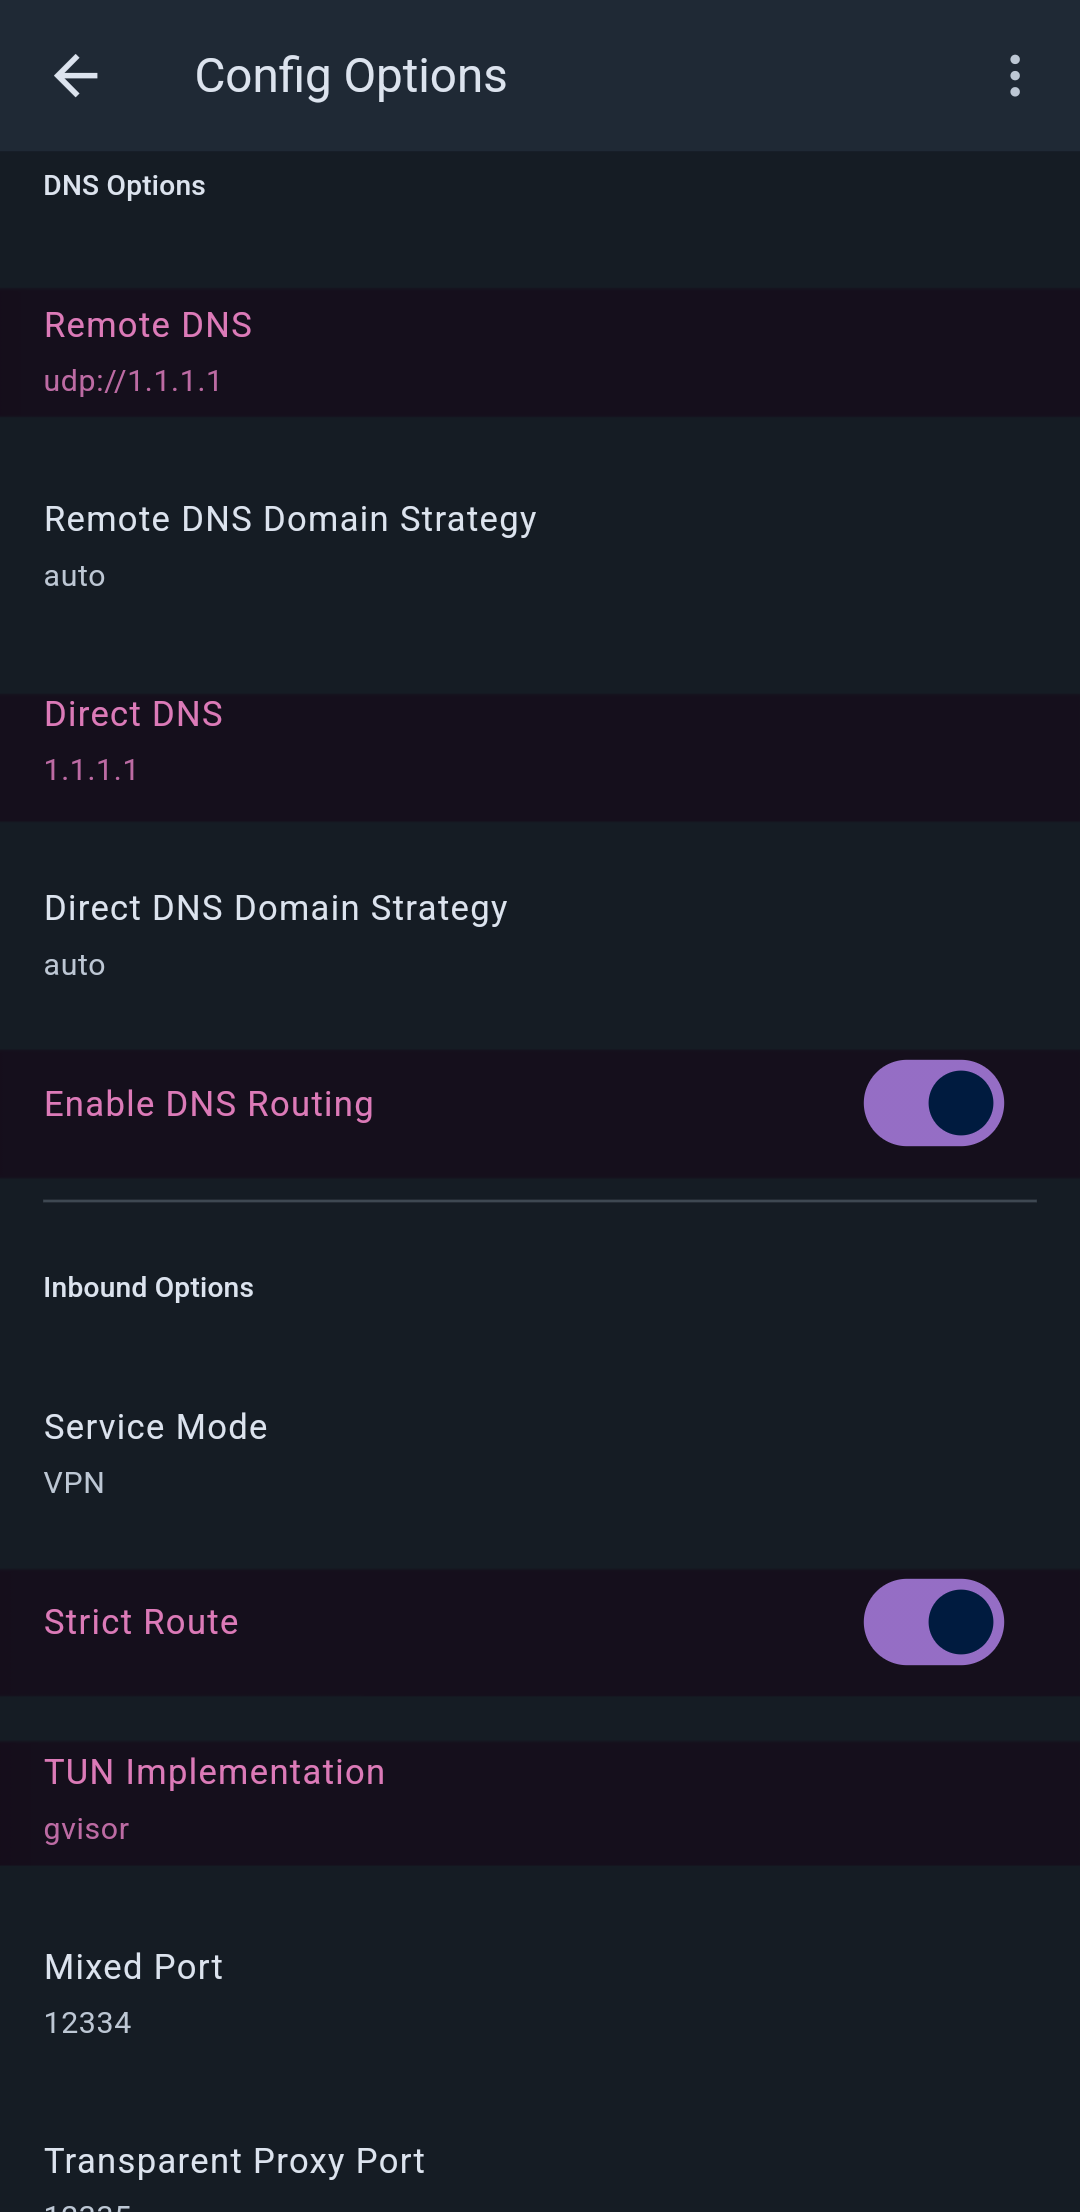
http://www.gstatic.com/generate_204In Hiddify
- Remote DNS → Default or
https://8.8.8.8/dns-query - Direct DNS → Default
1.1.1.1 - DNS Routing → Turn it on
- Strict Route → Turn it on
- TUN Implementation → Set it to gVisor
- Connection Test URL → Be sure to change the default to the following address:
http://www.gstatic.com/generate_204In V2rayNG and MahsaNG
- Sniffing → Leave it on for sure
- Local DNS → Turn it on
- Fake DNS → Turn it off
- Mux → Always off
- Fragment → Default off, we turn it on if the config domain is filtered.
- Length → 10-30
- Interval → 1-2
- Packets → tlshello
- Allow Insecure → Always on
- Remote DNS →
1.1.1.1or8.8.8.8 - Domestic DNS → Like remote
1.1.1.1 - Intelligent Selection Method → Least Ping
- Connection Test URL → Check that it is like the following address:
https://www.gstatic.com/generate_204This way, the clients have a principled, ideal, standard setting according to the structure and recommended instructions in the xray and singbox cores, and most importantly, a stable and secure connection 😎