Comprehensive Deployment & Setup Guide
Step-by-step guide to forking, configuring security secrets, running GitHub Actions, and obtaining VLESS subscription links
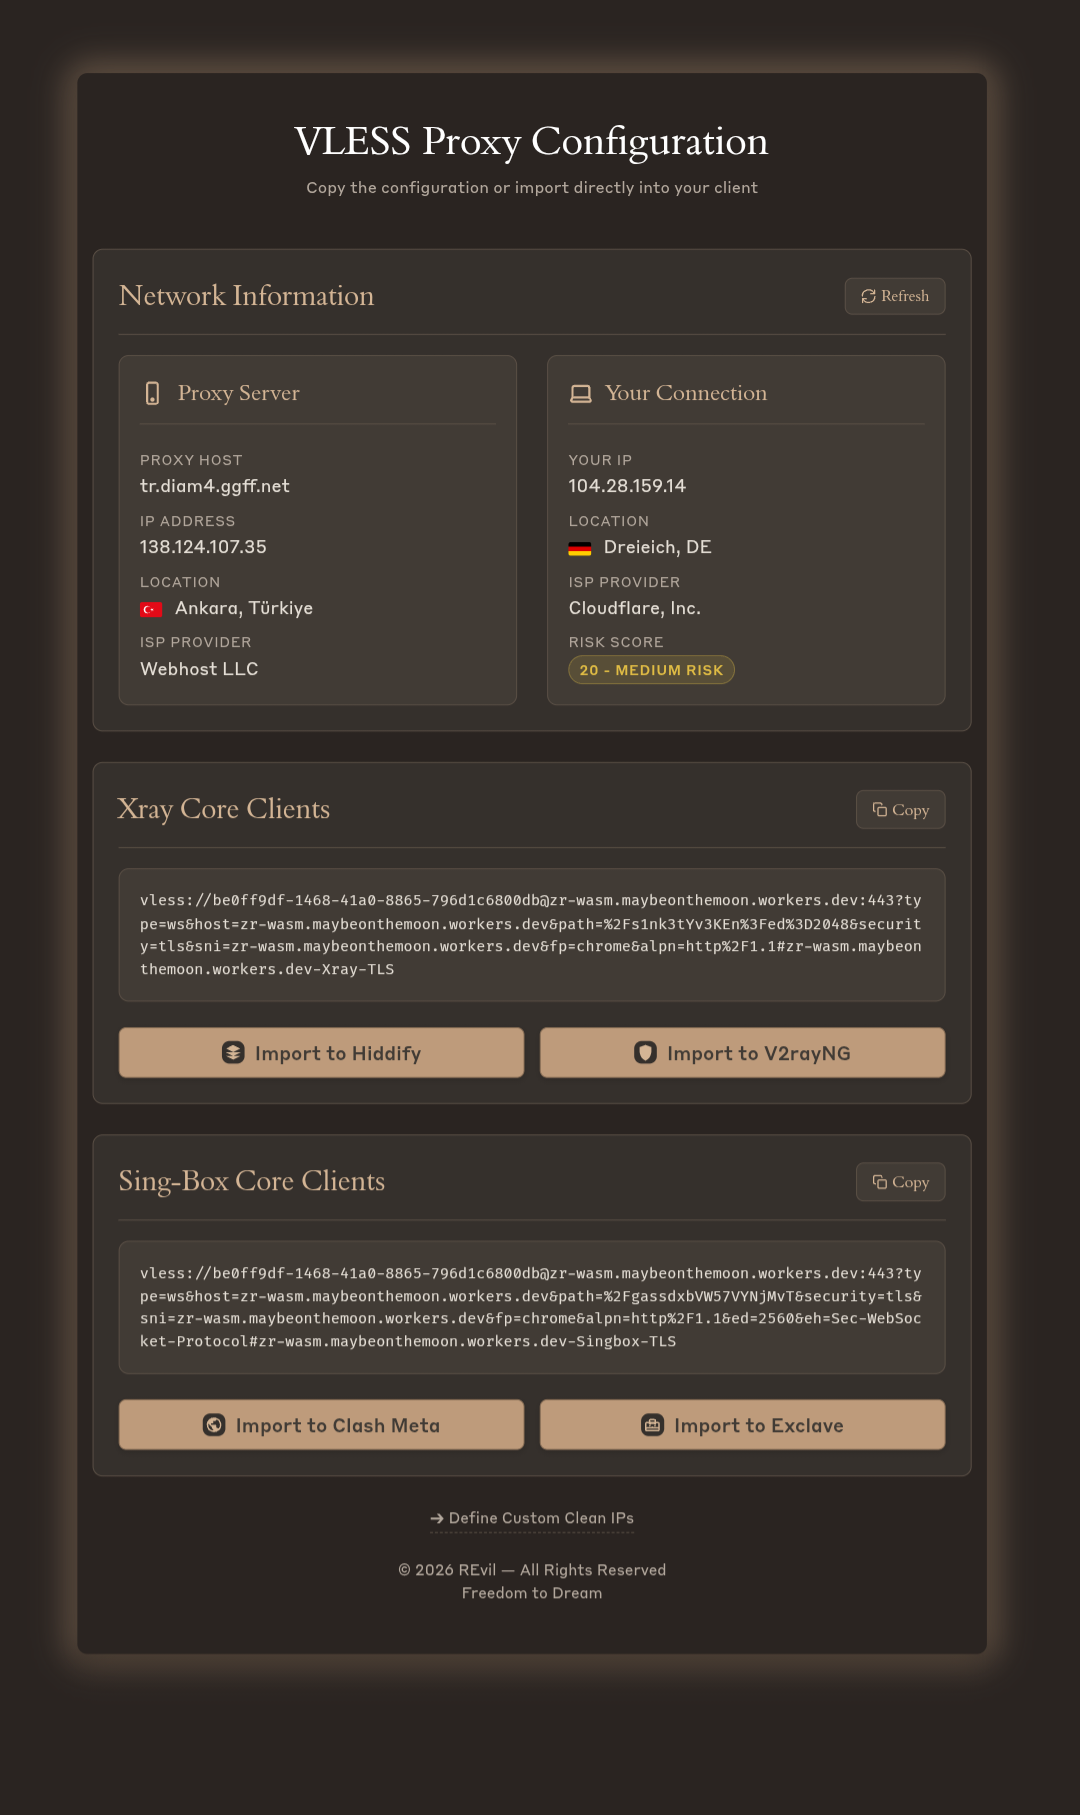
The zizifn project is a secure proxy configuration based on the VLESS-WS-TLS/TCP protocol. Specific core components are developed in Rust and compiled to WebAssembly (Wasm), running seamlessly on Cloudflare Workers using Wrangler. To deploy this project on your personal Cloudflare account, follow the step-by-step instructions below.
Cloudflare Errors 1101 and 1102
In this new architecture, there is no need for junk code inside JavaScript, heavy obfuscation, or function renaming!
The critical section that triggered these errors has been completely rewritten in Rust, compiled into Wasm, and deployed efficiently.
📚 Table of Contents
Step 1: Forking the Repository
First, you need to create a copy of this repository on your GitHub account.
Go to the project's main repository page (Link).
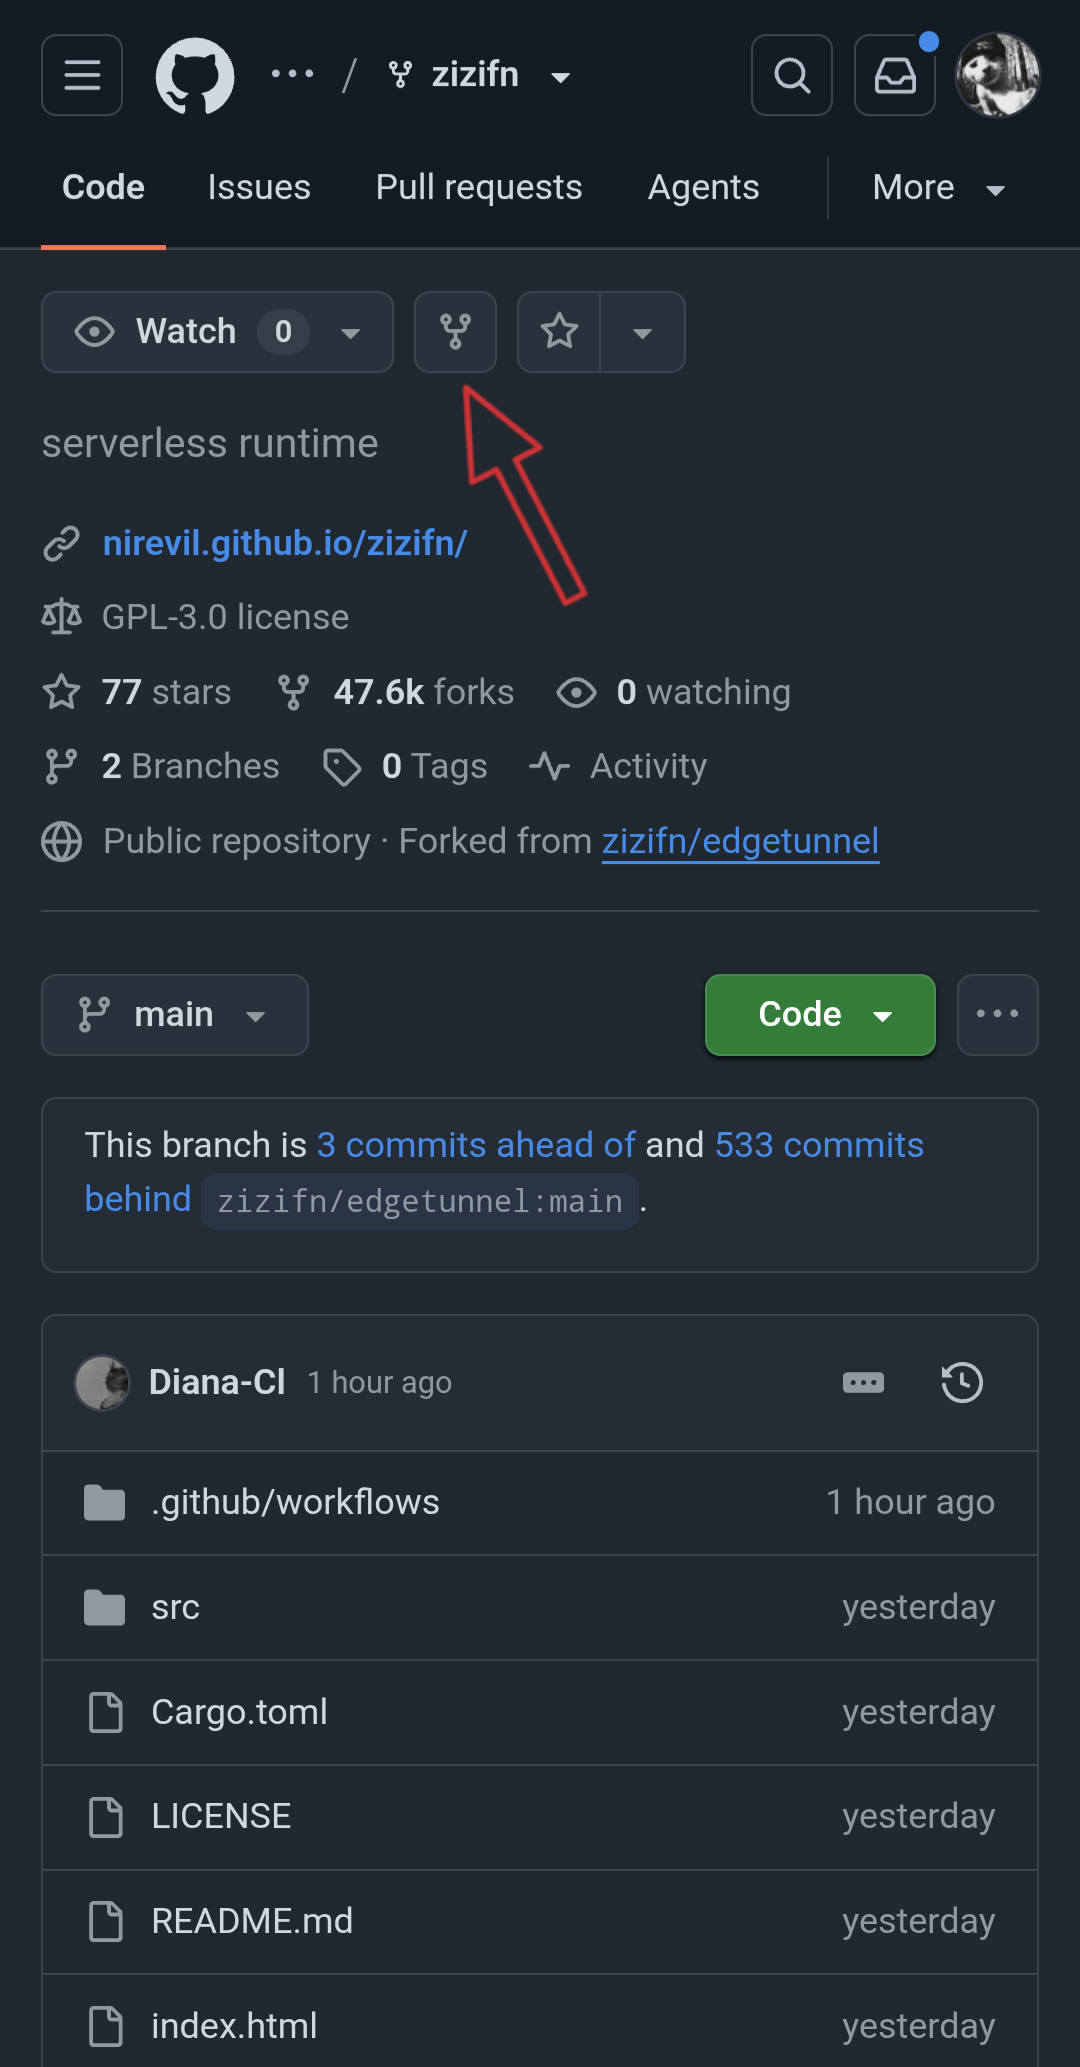
Click on the Fork button at the top right of the page (marked with a red arrow).
View Screenshot
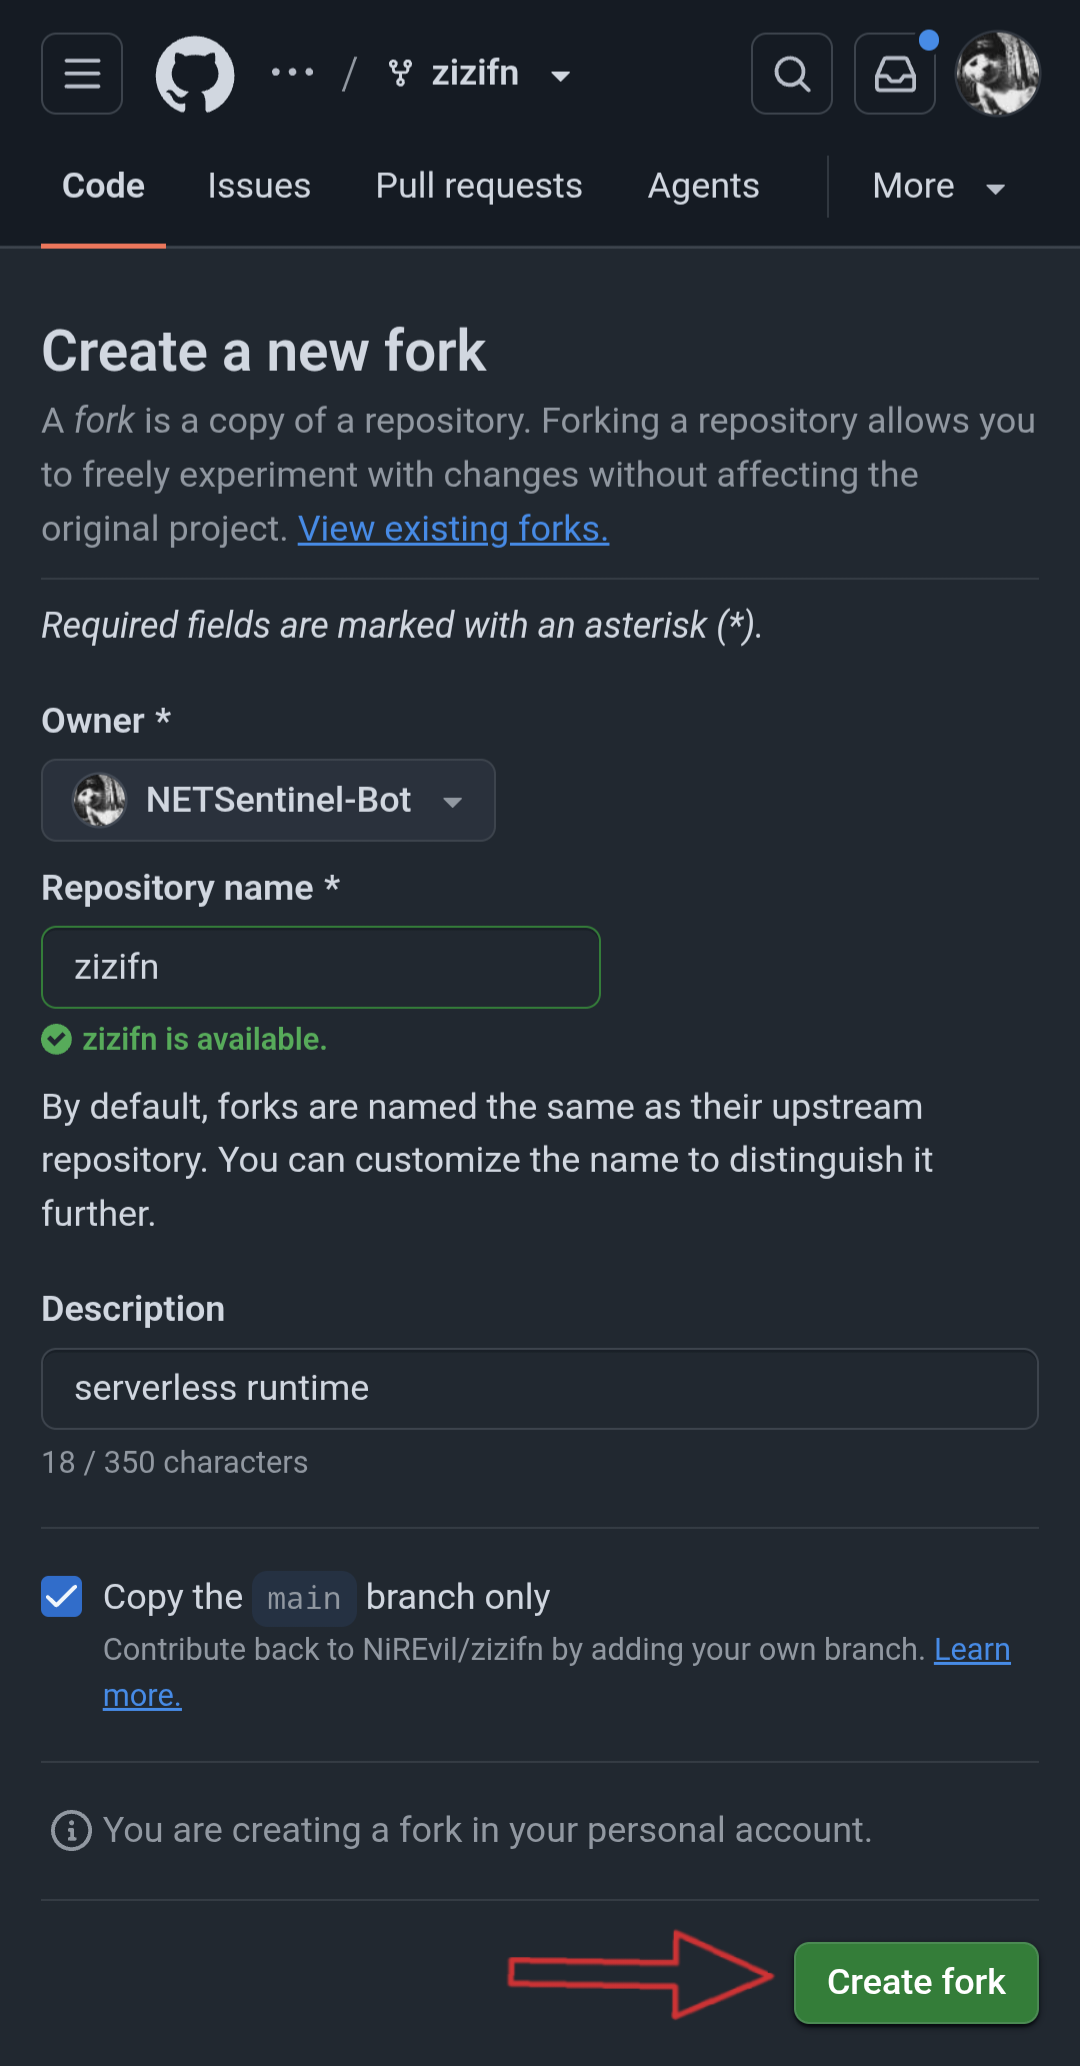
- On the next page, you can optionally rename your fork; otherwise, leave the default name and click Create fork to transfer the project to your account.
View Screenshot
Step 2: Retrieving API Token from Cloudflare
For automated deployment, GitHub Actions requires access to your Cloudflare account. We need two critical credentials:
Cloudflare Account ID
Cloudflare API Token
Previously, you had to navigate to the Workers & Pages dashboard and copy the Account ID from the bottom of the page. Now, it is displayed directly upon token creation, so we can copy it right from there.
Creating a Token with Worker Edit Permissions
- Log in to your Cloudflare dashboard.
- Open the navigation menu on the left, type api in the Quick search field, and select Account API Tokens from the search suggestions.
View Screenshot
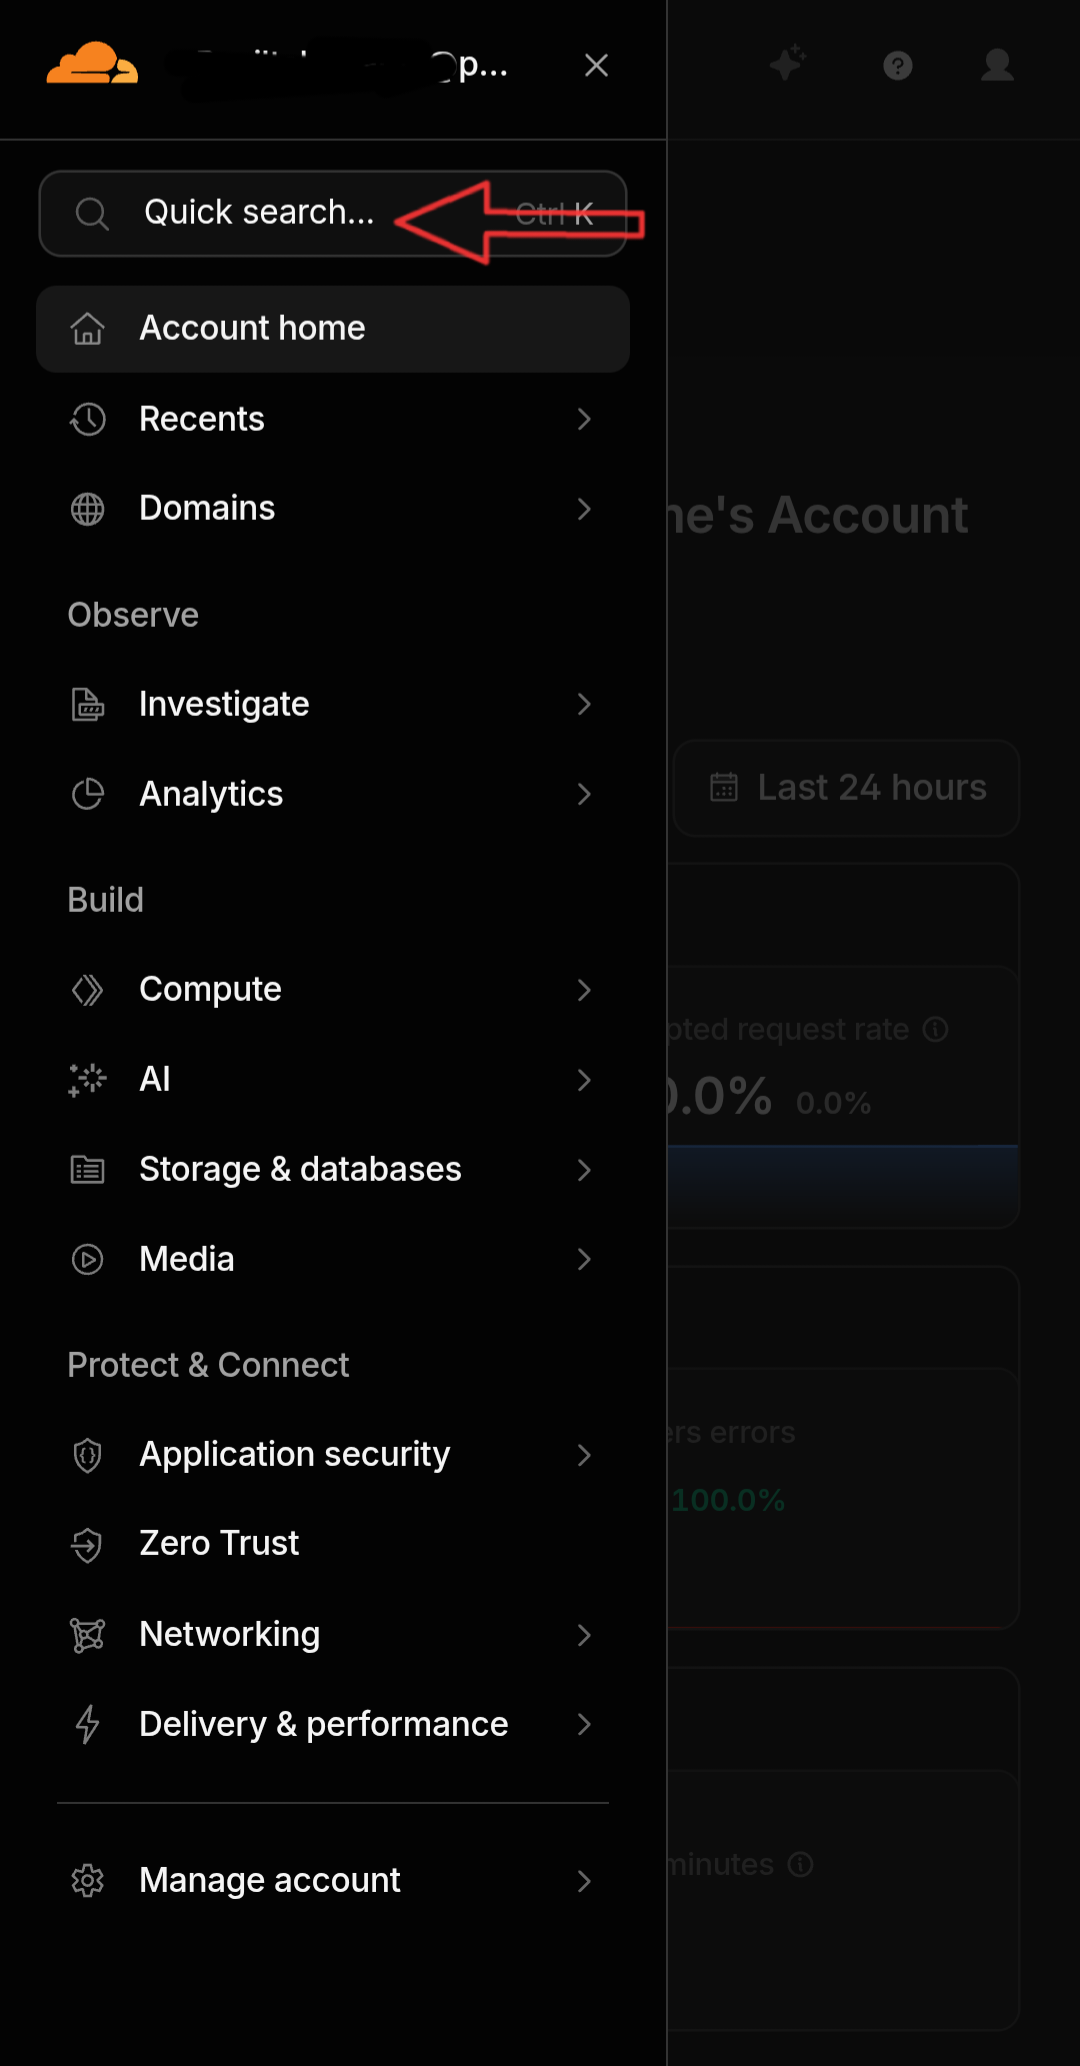
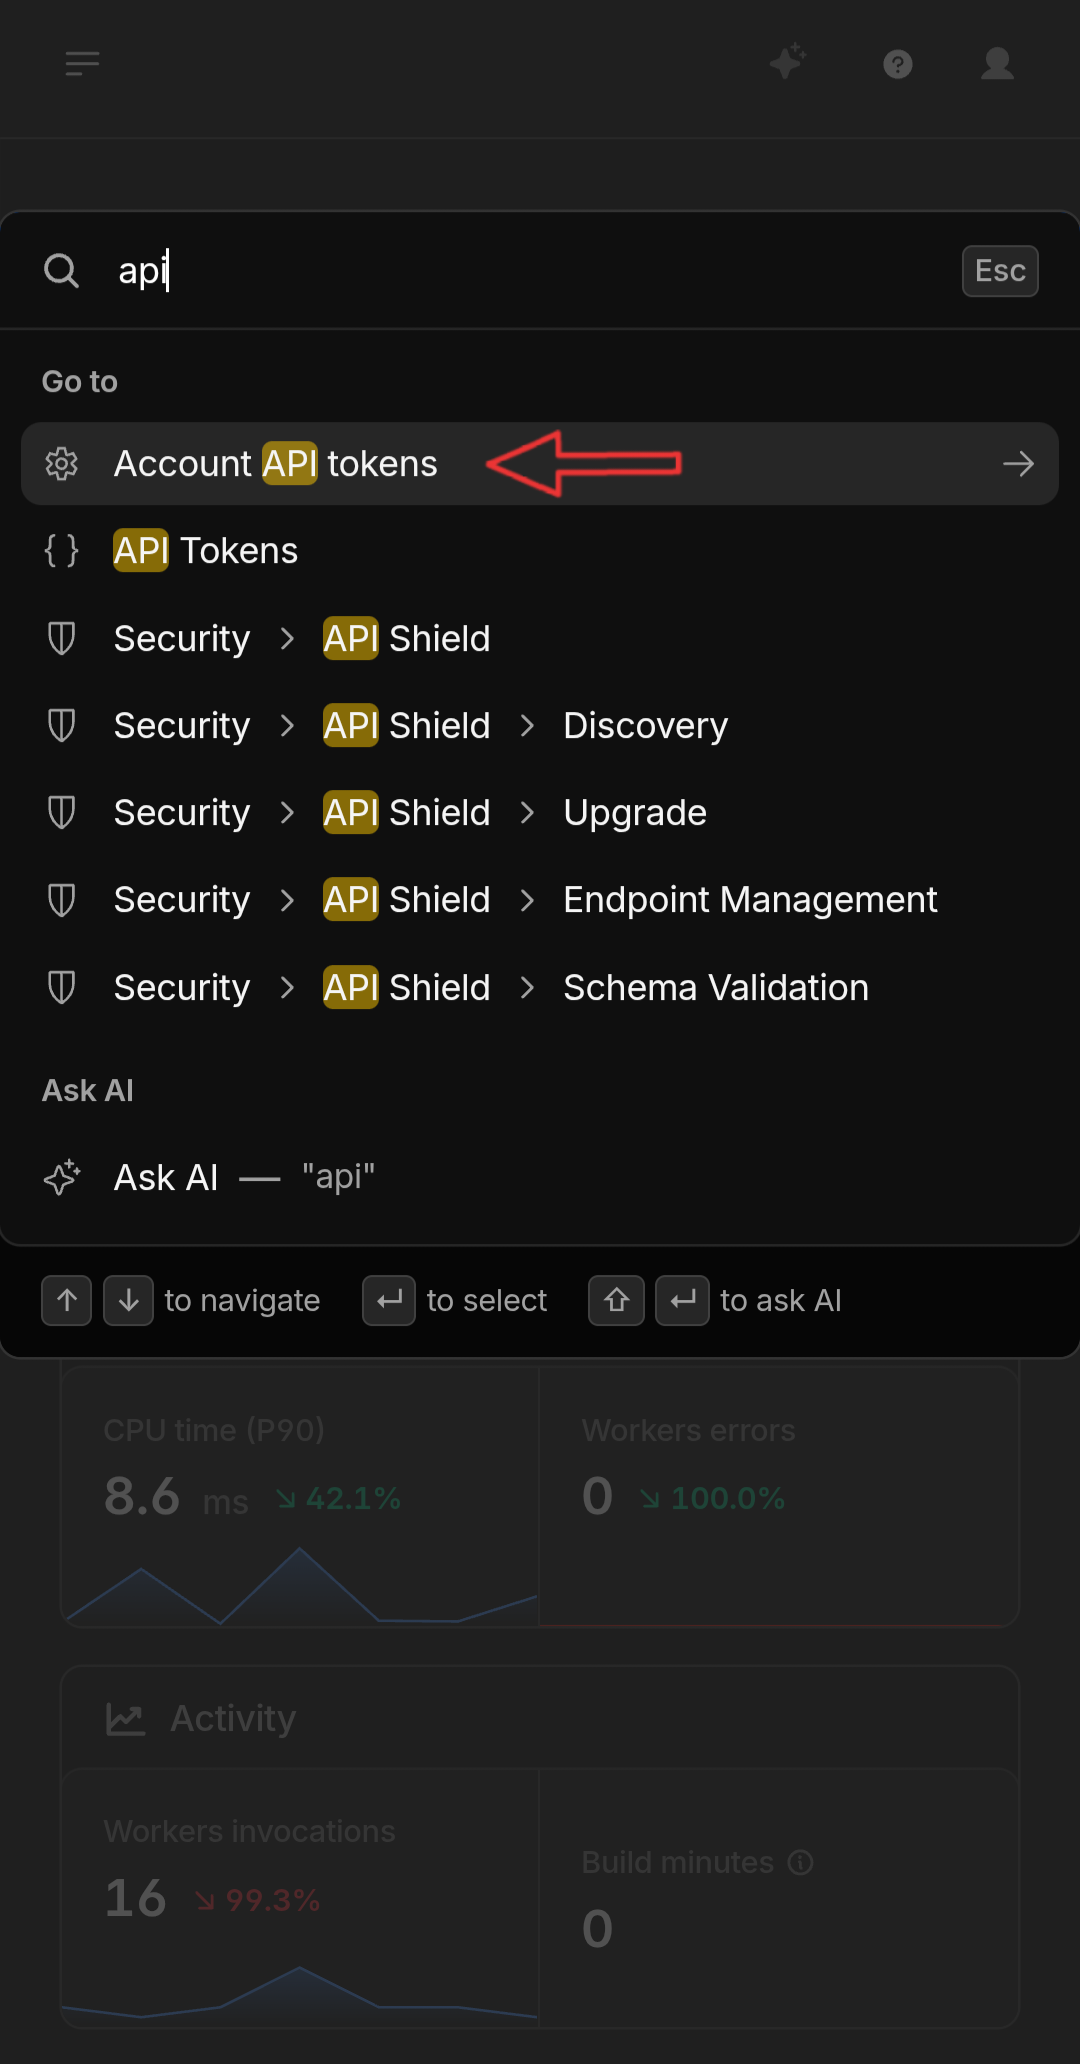
- Click on the Create Token button.
View Screenshot
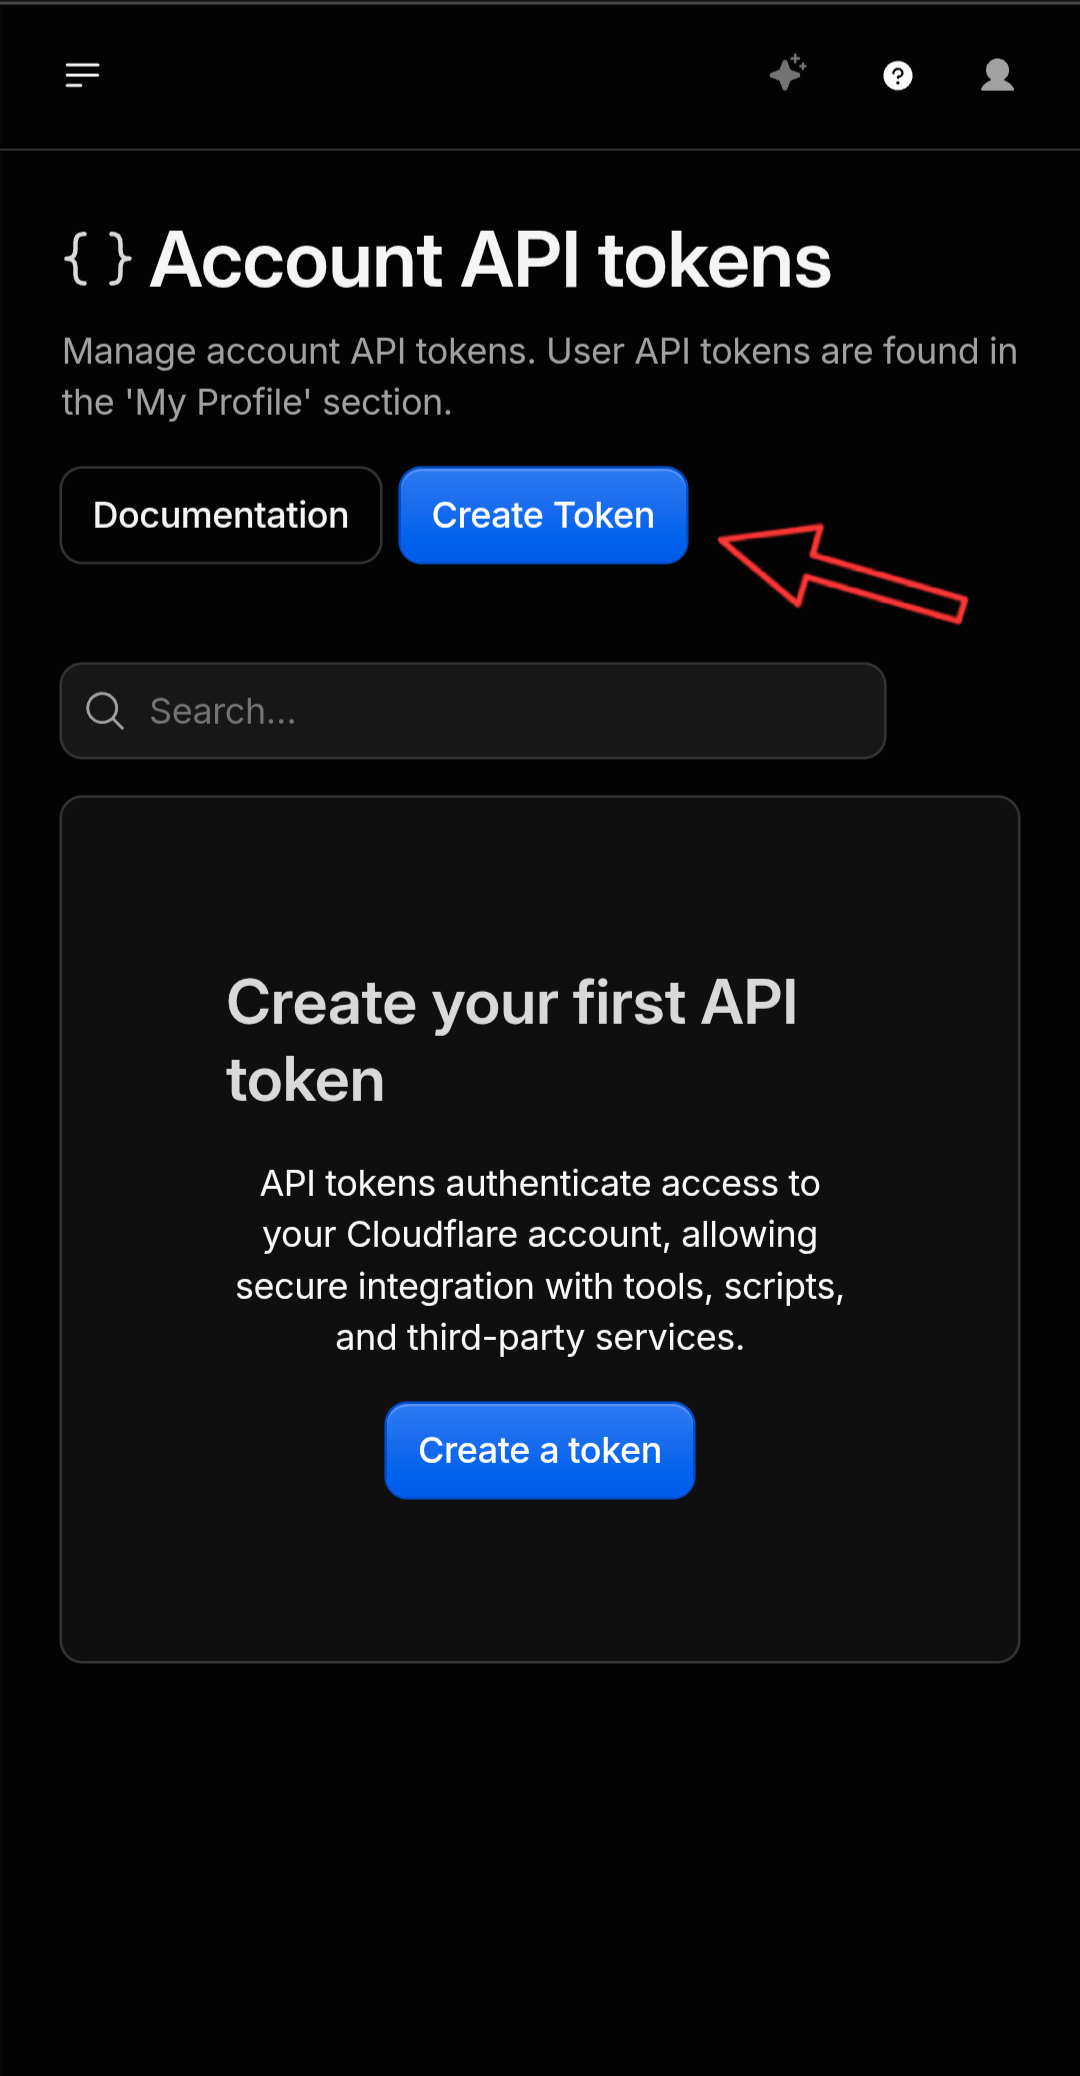
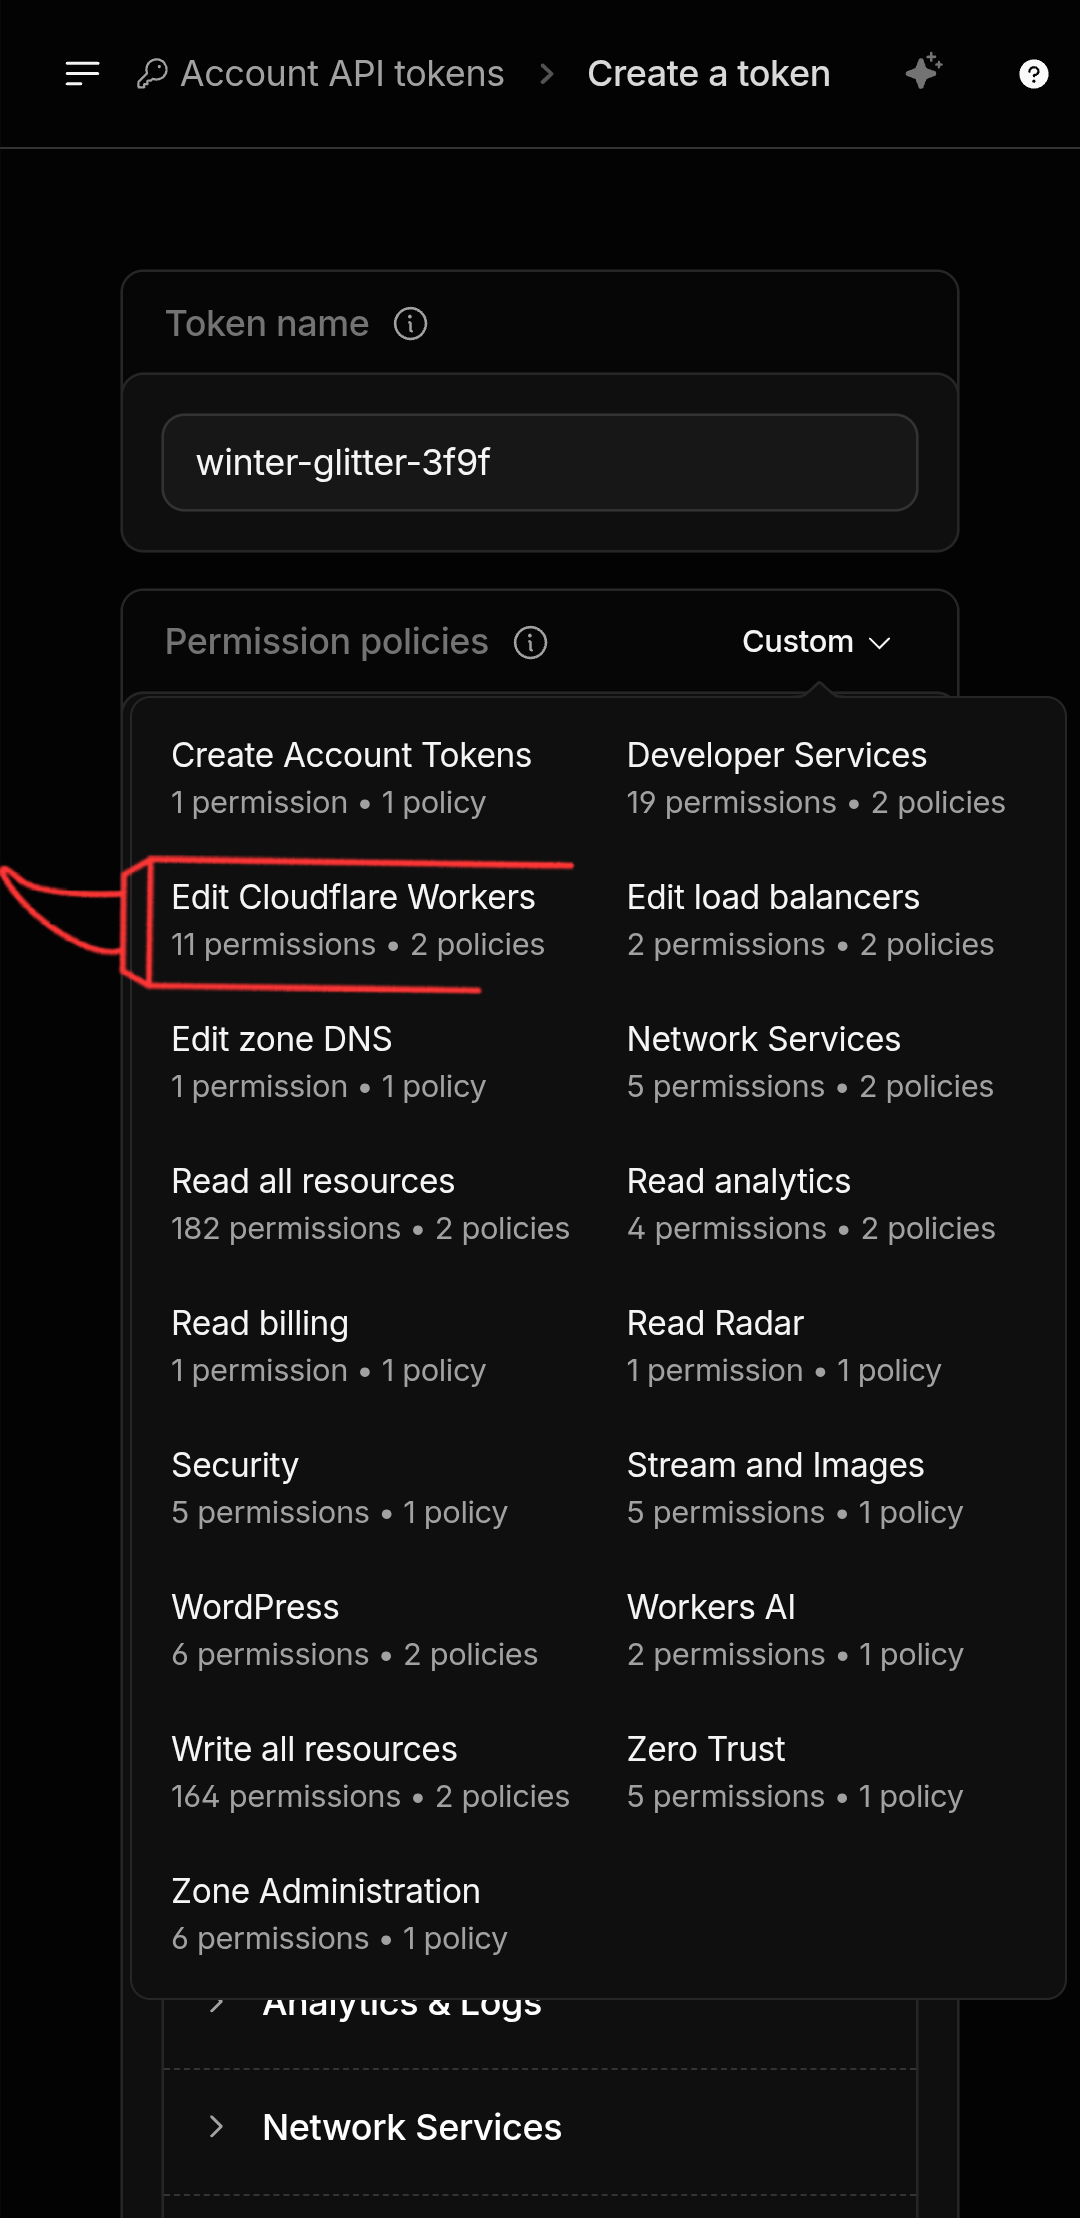
- Under the template section, find Edit Cloudflare Workers (marked with a red arrow) and click Use template.
View Screenshot
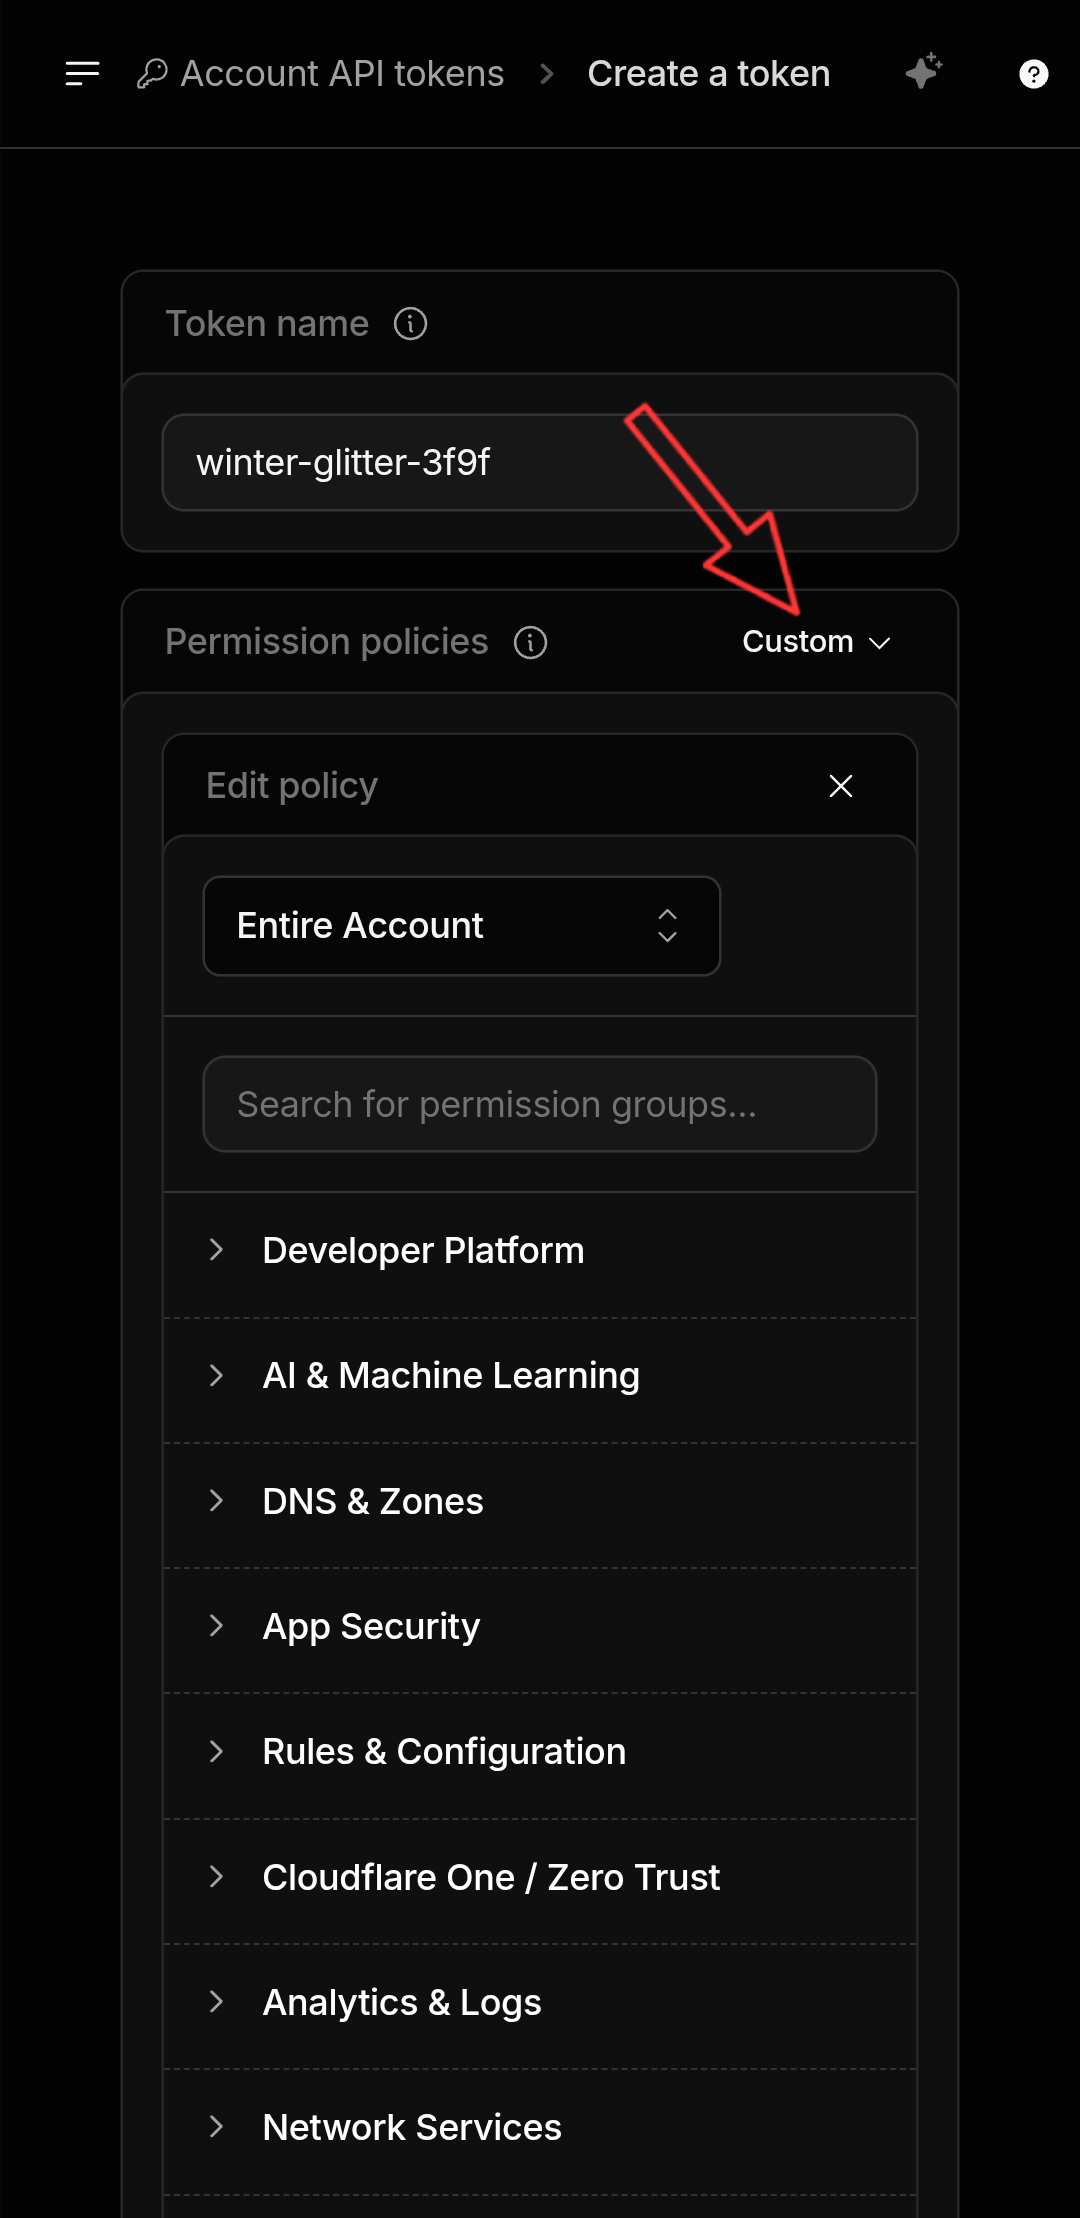
- Under Token Expiration, choose a preferred expiration period based on your requirements, then proceed to the summary and creation step.
View Screenshot
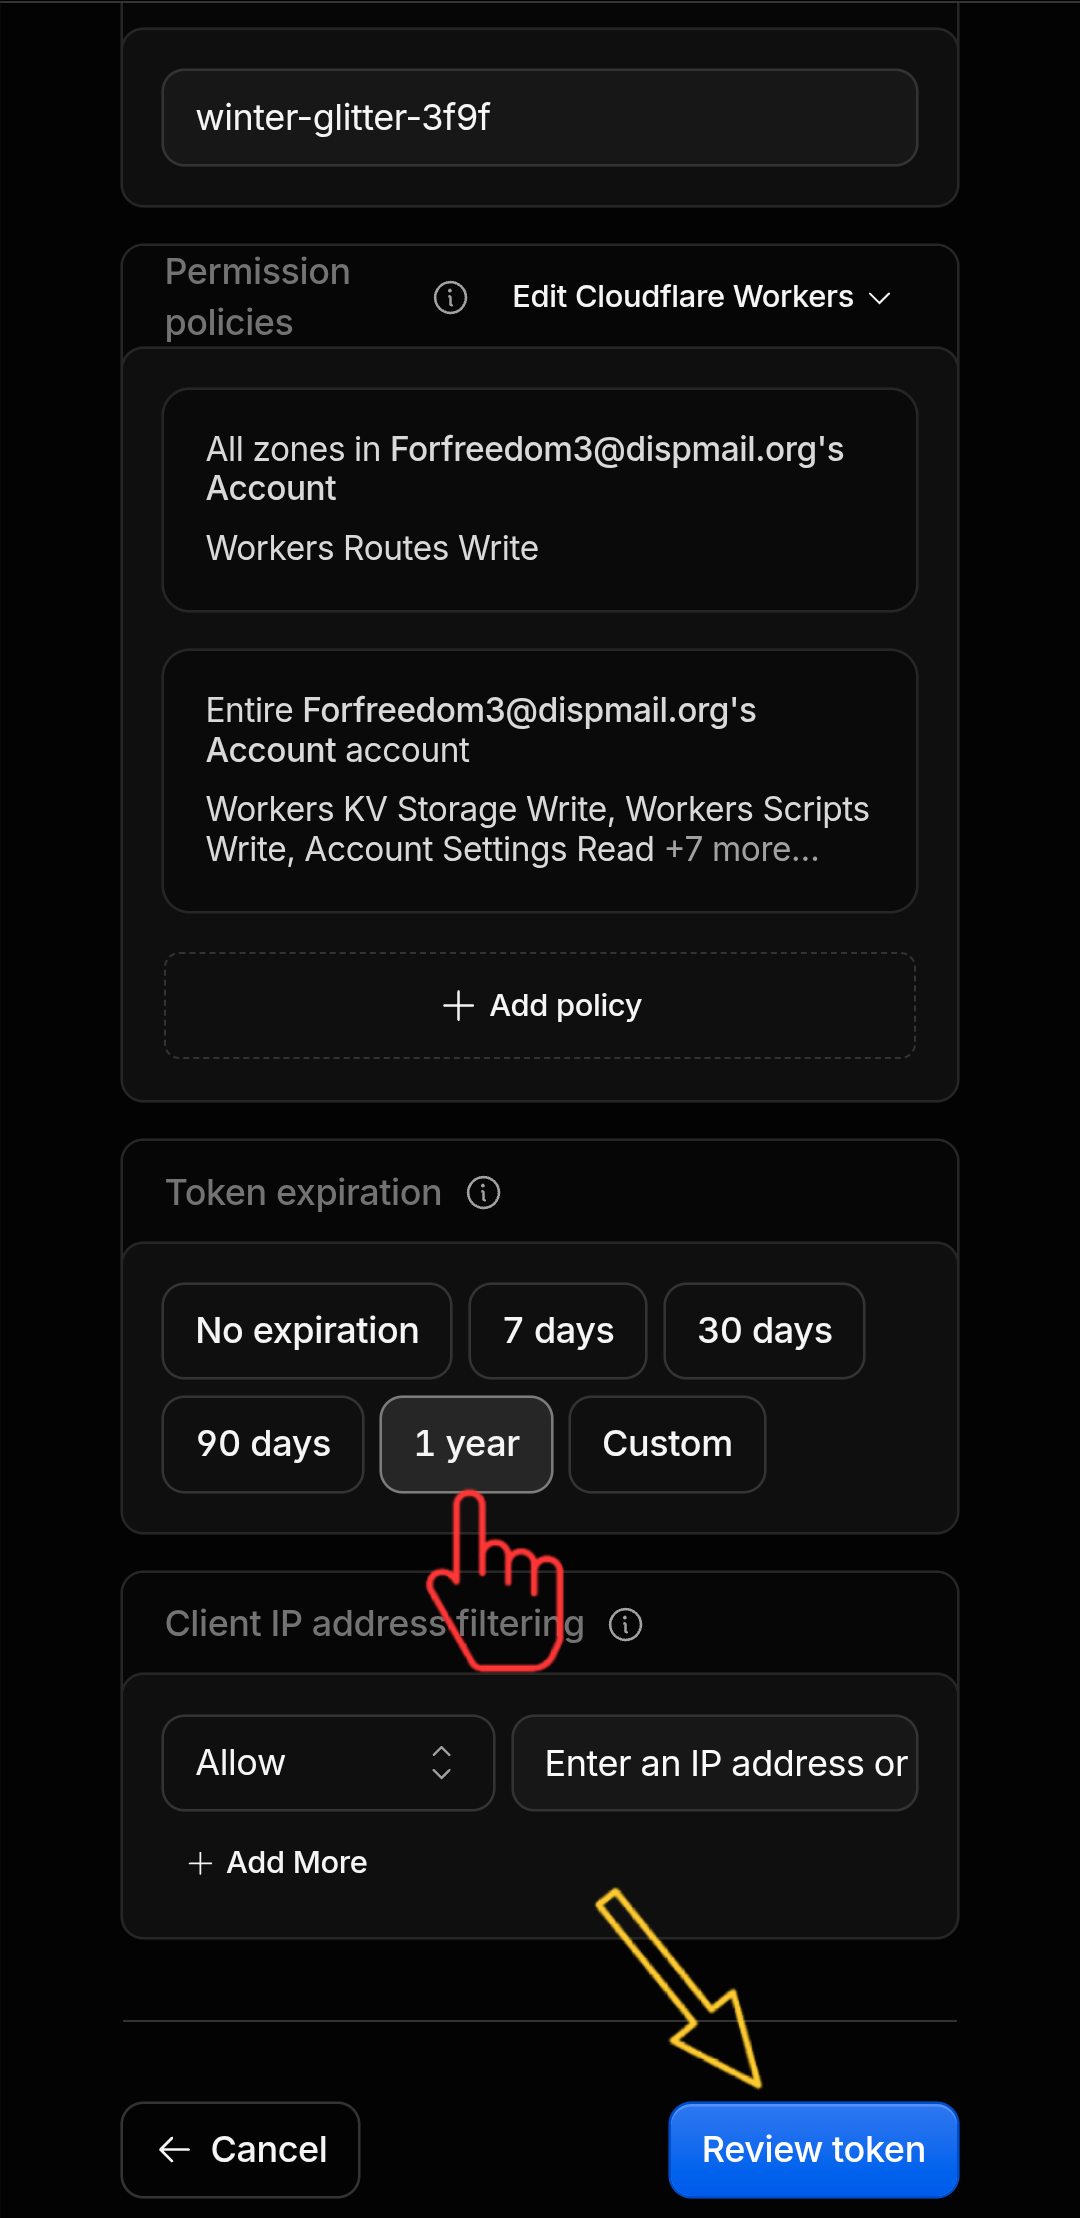
Note: When your token expires, your deployed Worker will NOT stop working. However, you will no longer be able to deploy updates via GitHub Actions until you generate a new token and update your repository secrets.
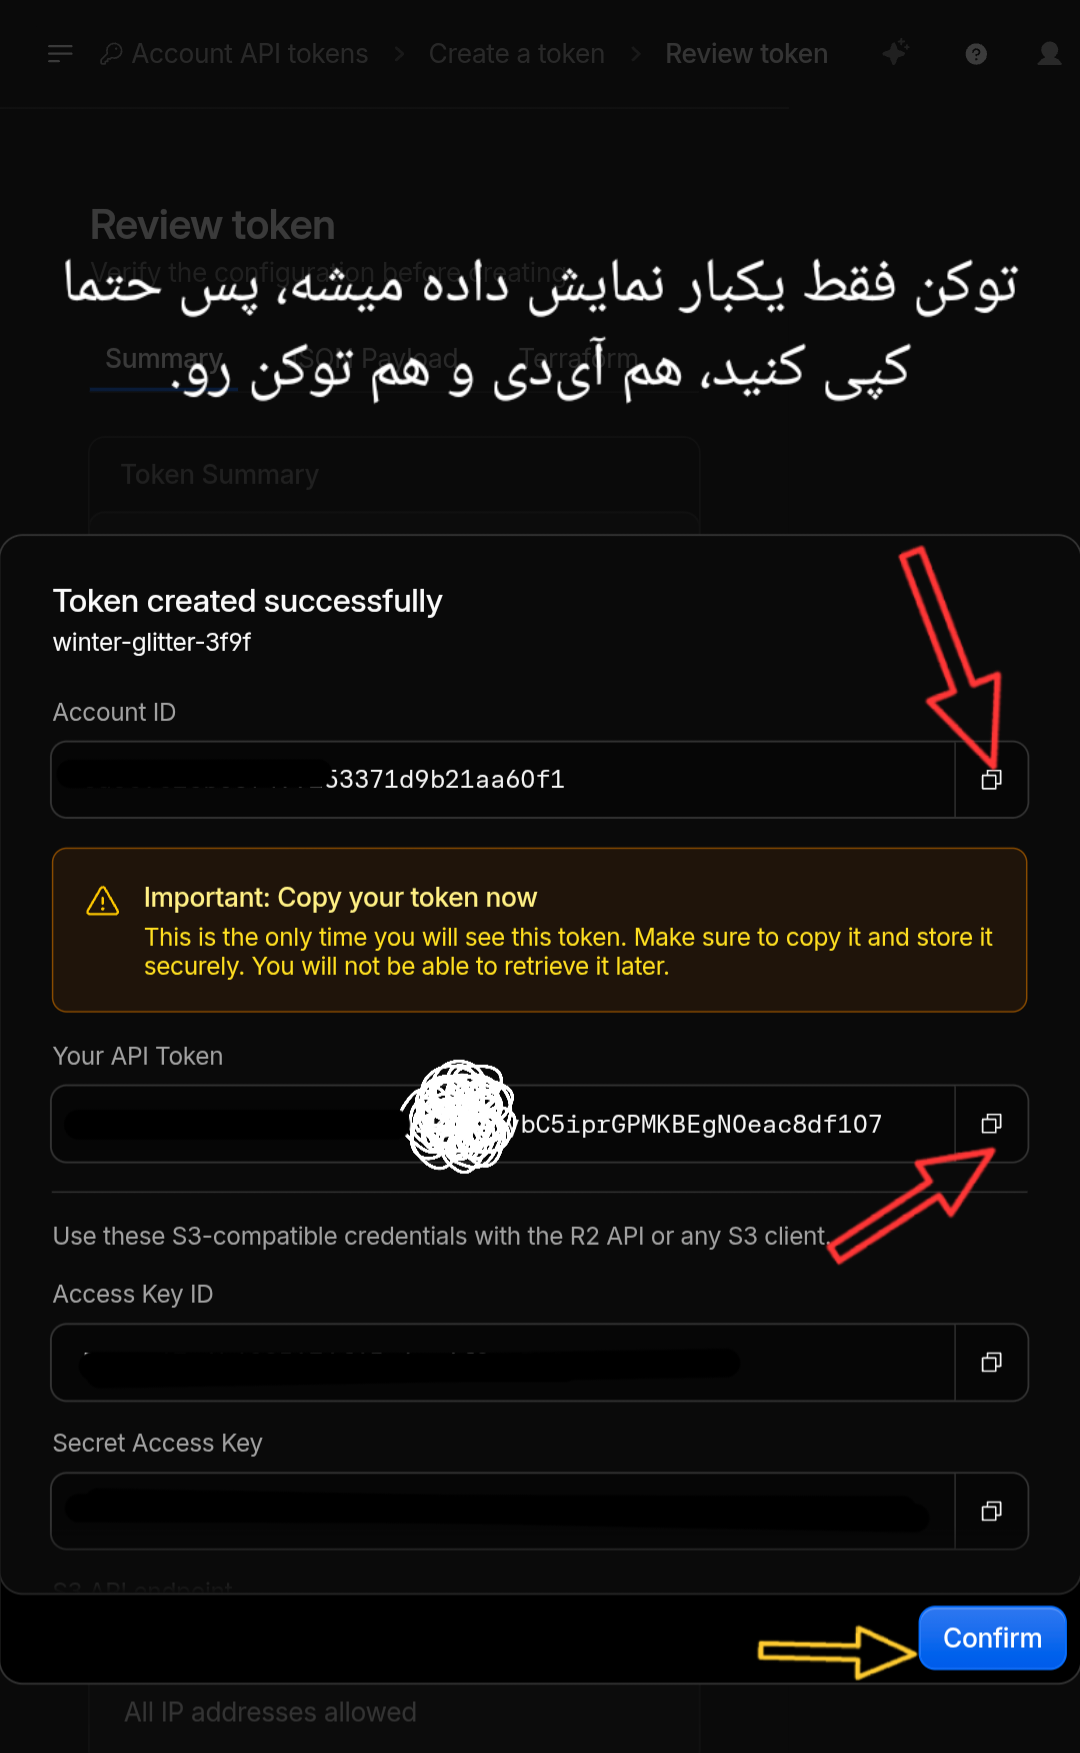
- Copy the generated API token. This token is displayed only once, so store it securely if you plan to use it elsewhere. Your Account ID is also displayed at the top of this page; make sure to copy it as well. Once both are saved, click Confirm to close the window.
View Screenshot
Step 3: Configuring GitHub Secrets
Now, introduce the retrieved credentials to your forked repository so that GitHub Actions can authenticate with your Cloudflare account.
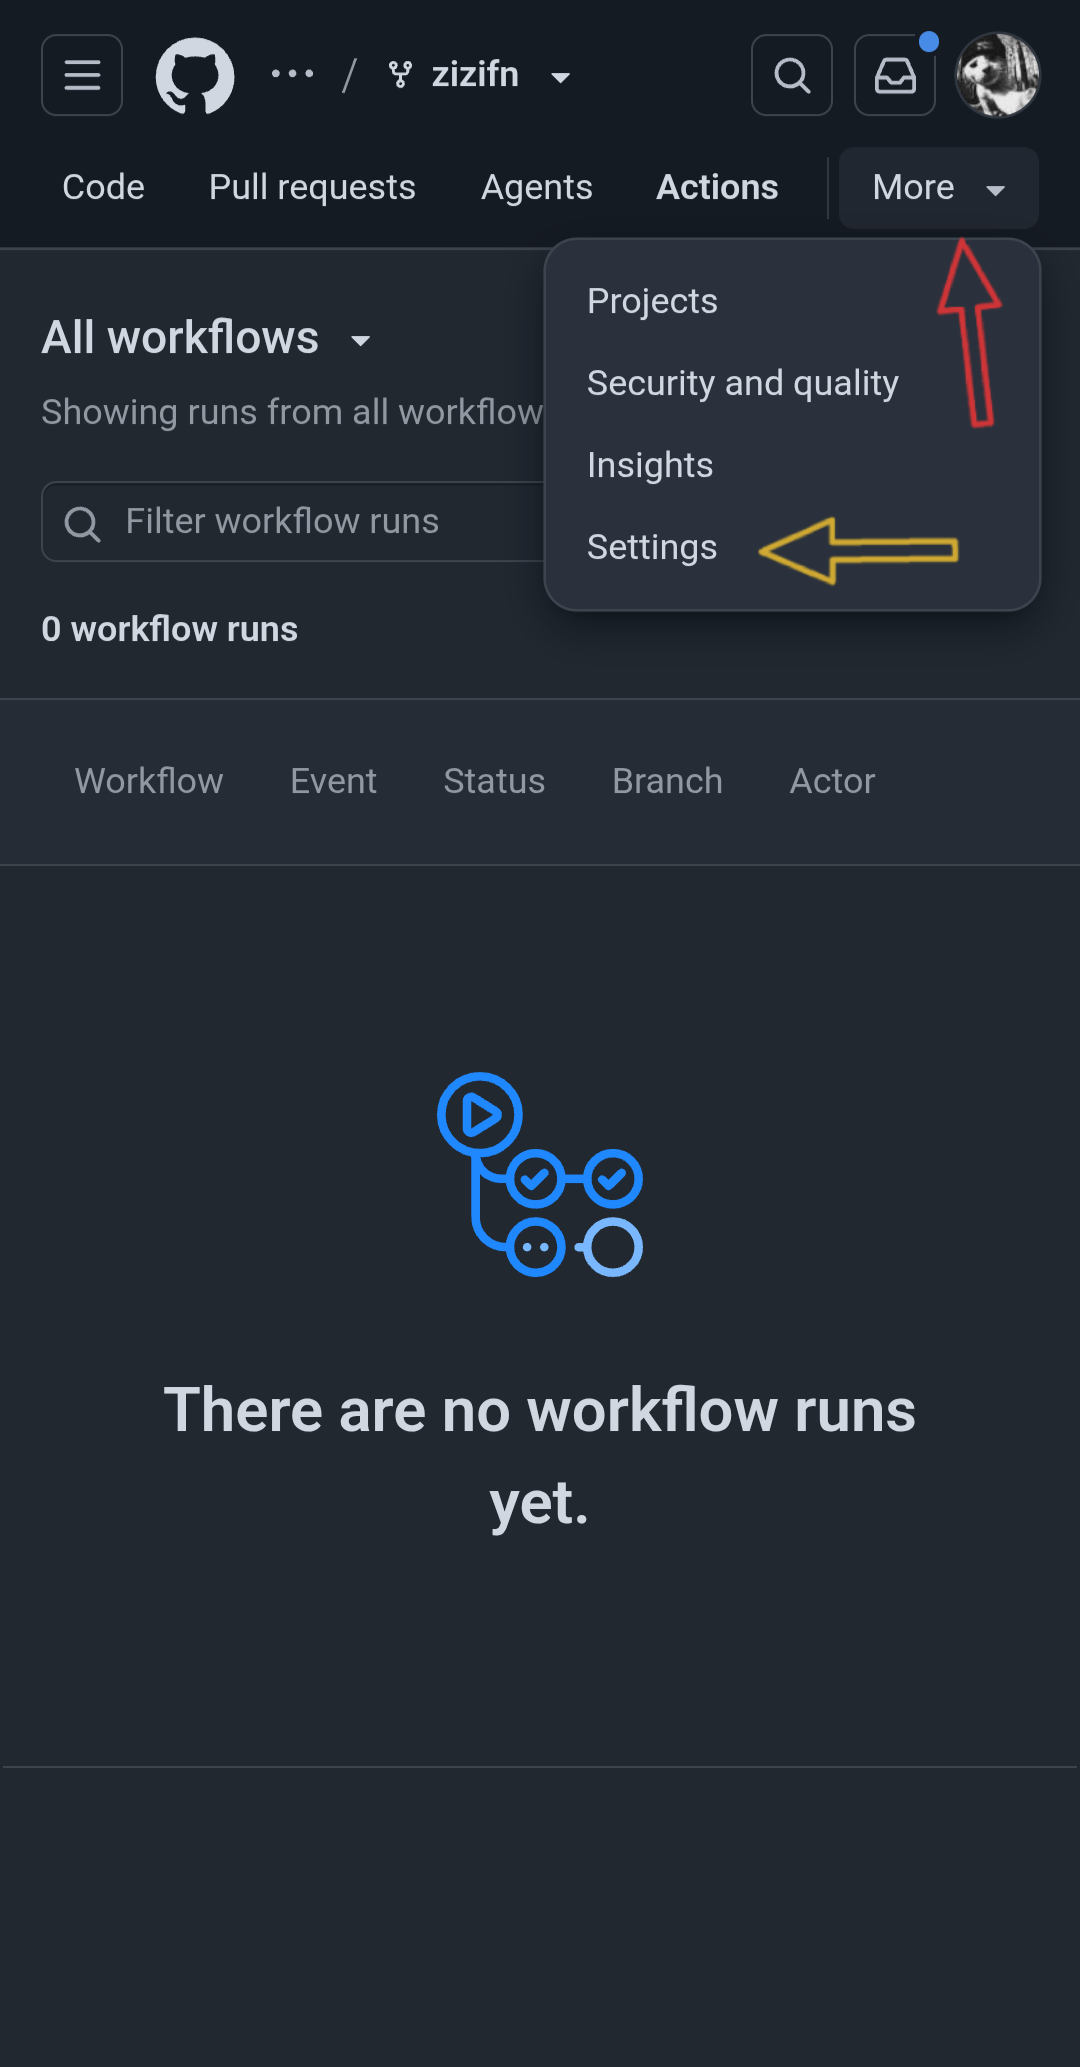
- In your forked repository, navigate to the Settings tab.
View Screenshot
- In the left sidebar, click on Secrets and variables, then select Actions.
View Screenshot
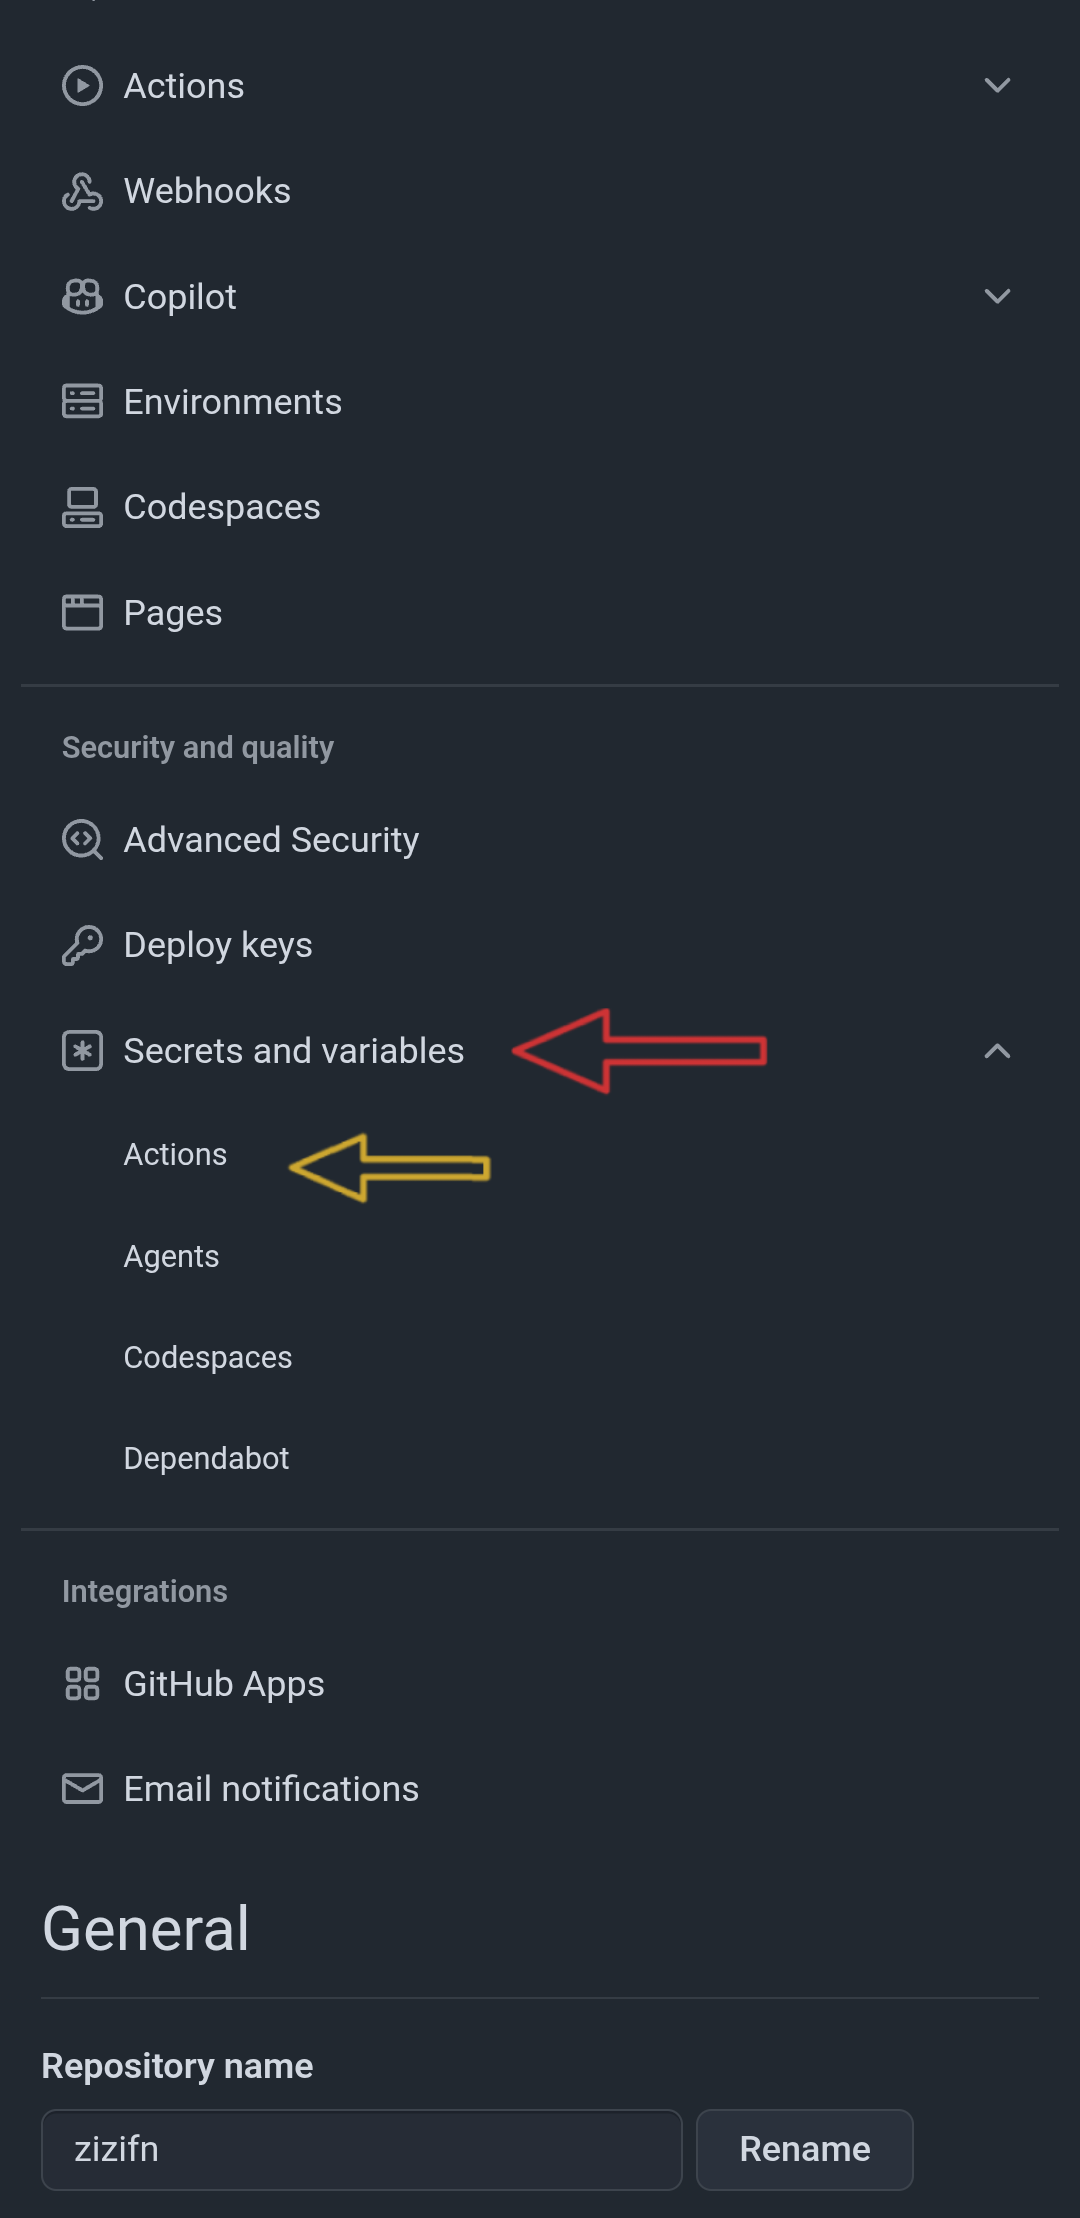
- Click New repository secret and define the secrets based on the table below:
| Secret Name | Status | Default Value | Description |
|---|---|---|---|
CLOUDFLARE_API_TOKEN | ✔️ Required | - | Your Cloudflare API Token with Worker edit permissions. |
CLOUDFLARE_ACCOUNT_ID | ✔️ Required | - | Your Cloudflare Account ID. |
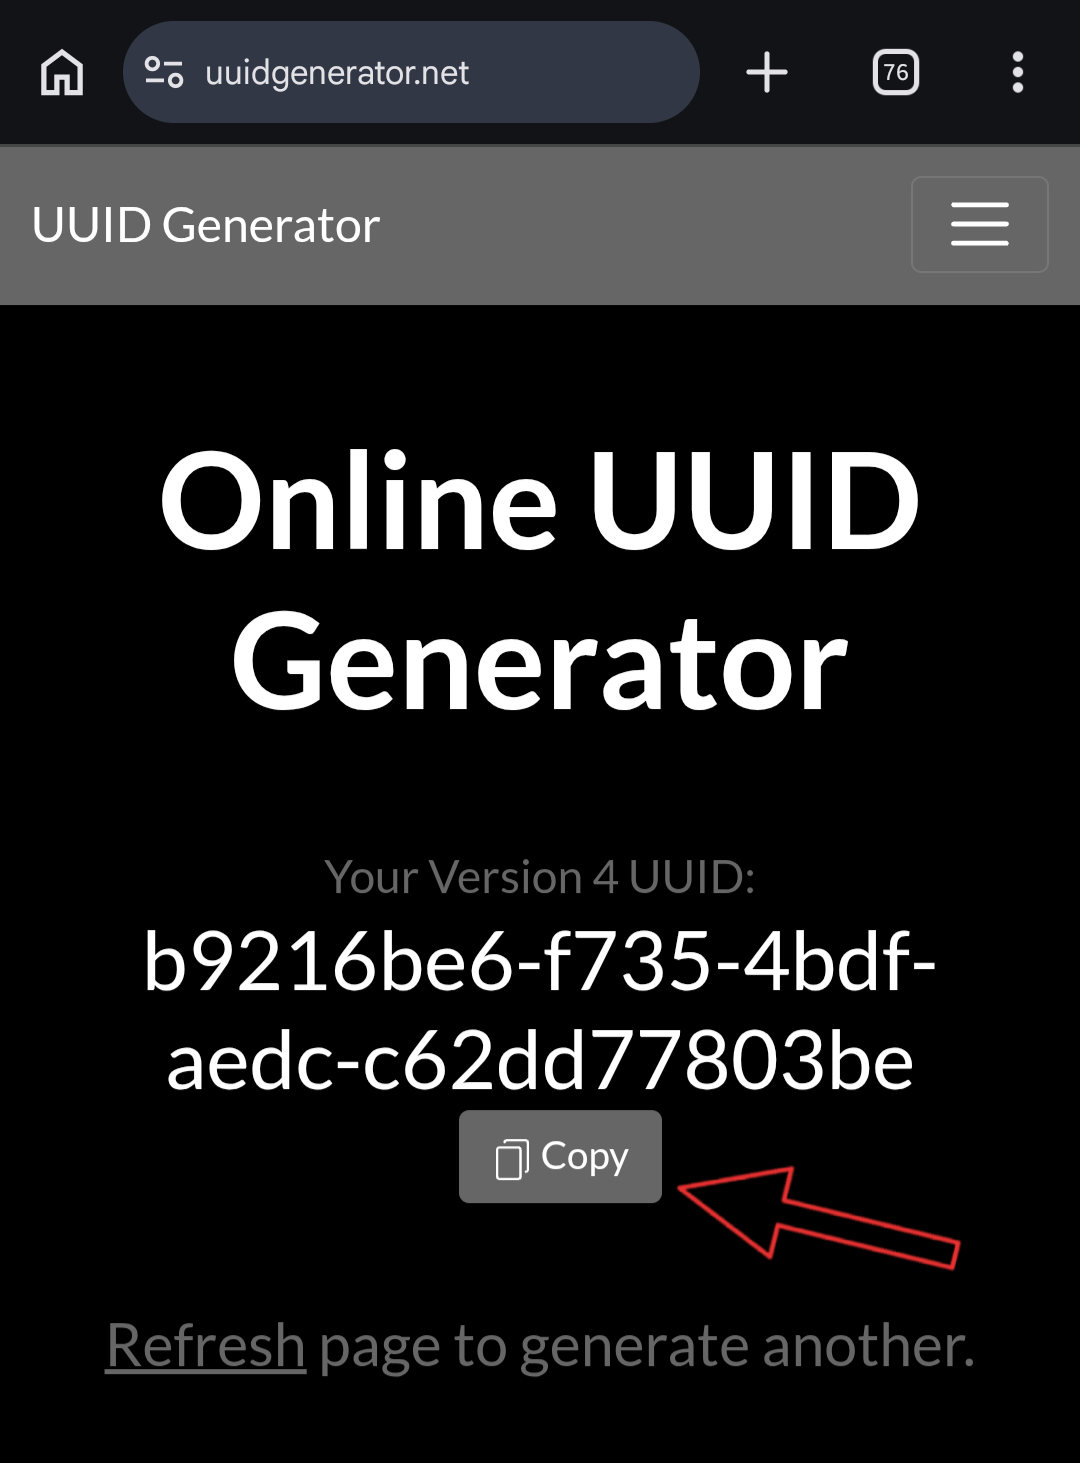
UUID | ⚙️ Optional | Auto-generated during workflow execution if left blank | Your custom UUID (Version 4). |
PROXYIP | ⚙️ Optional | di.nscl.ir | Proxy IP used for routing traffic through Cloudflare-backed services. |
View Screenshot
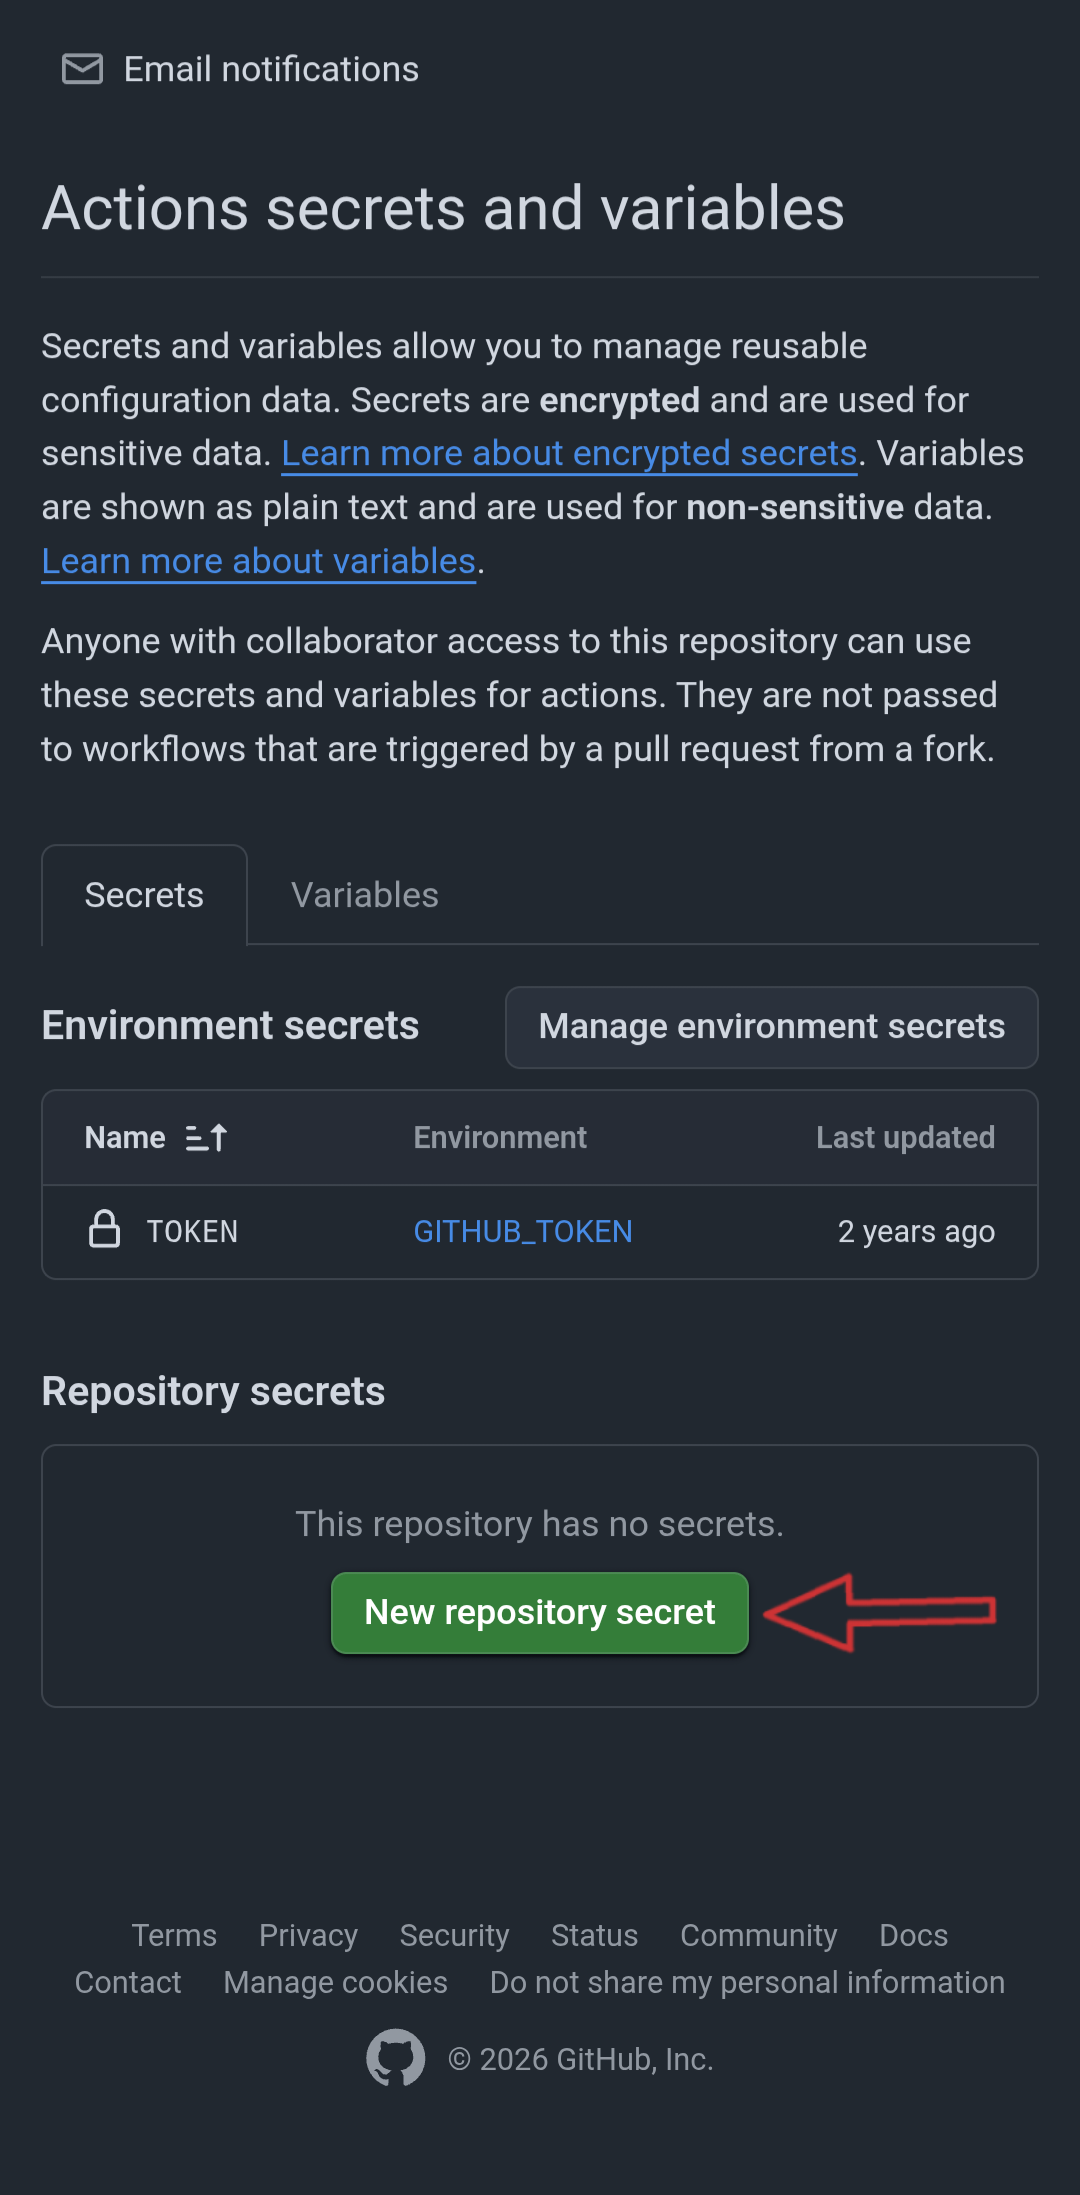
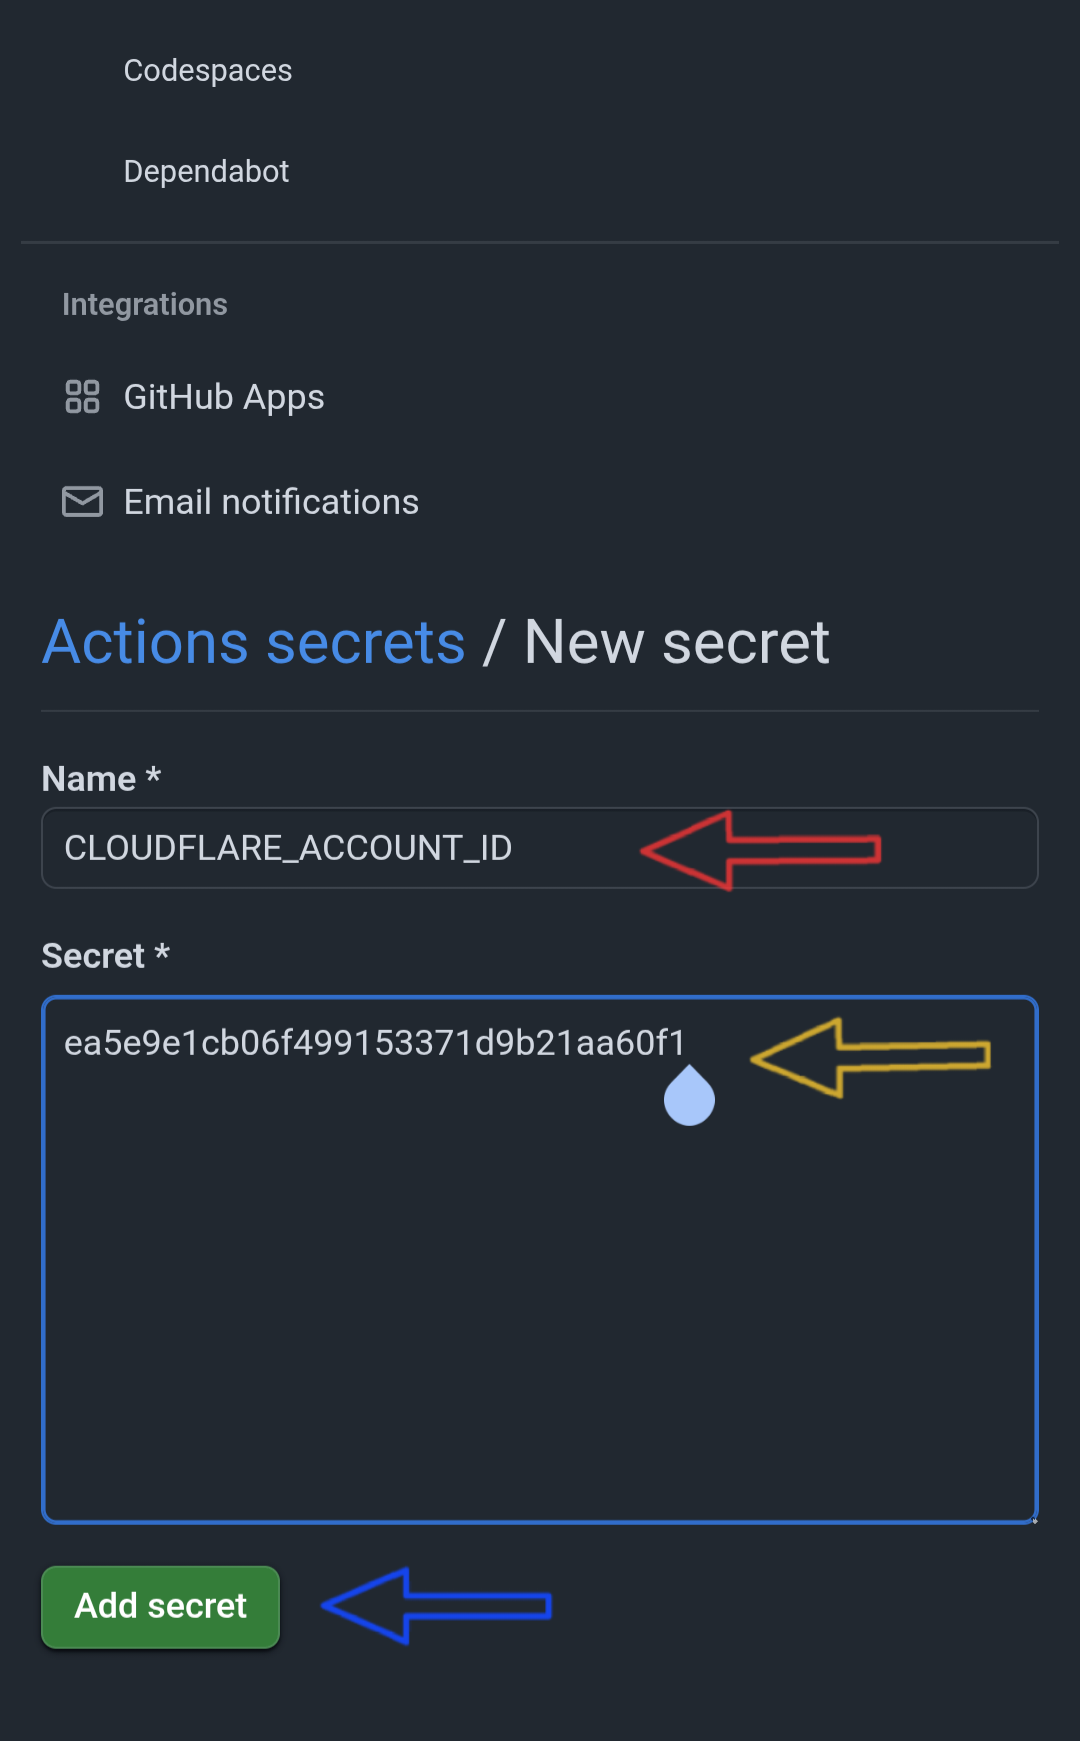
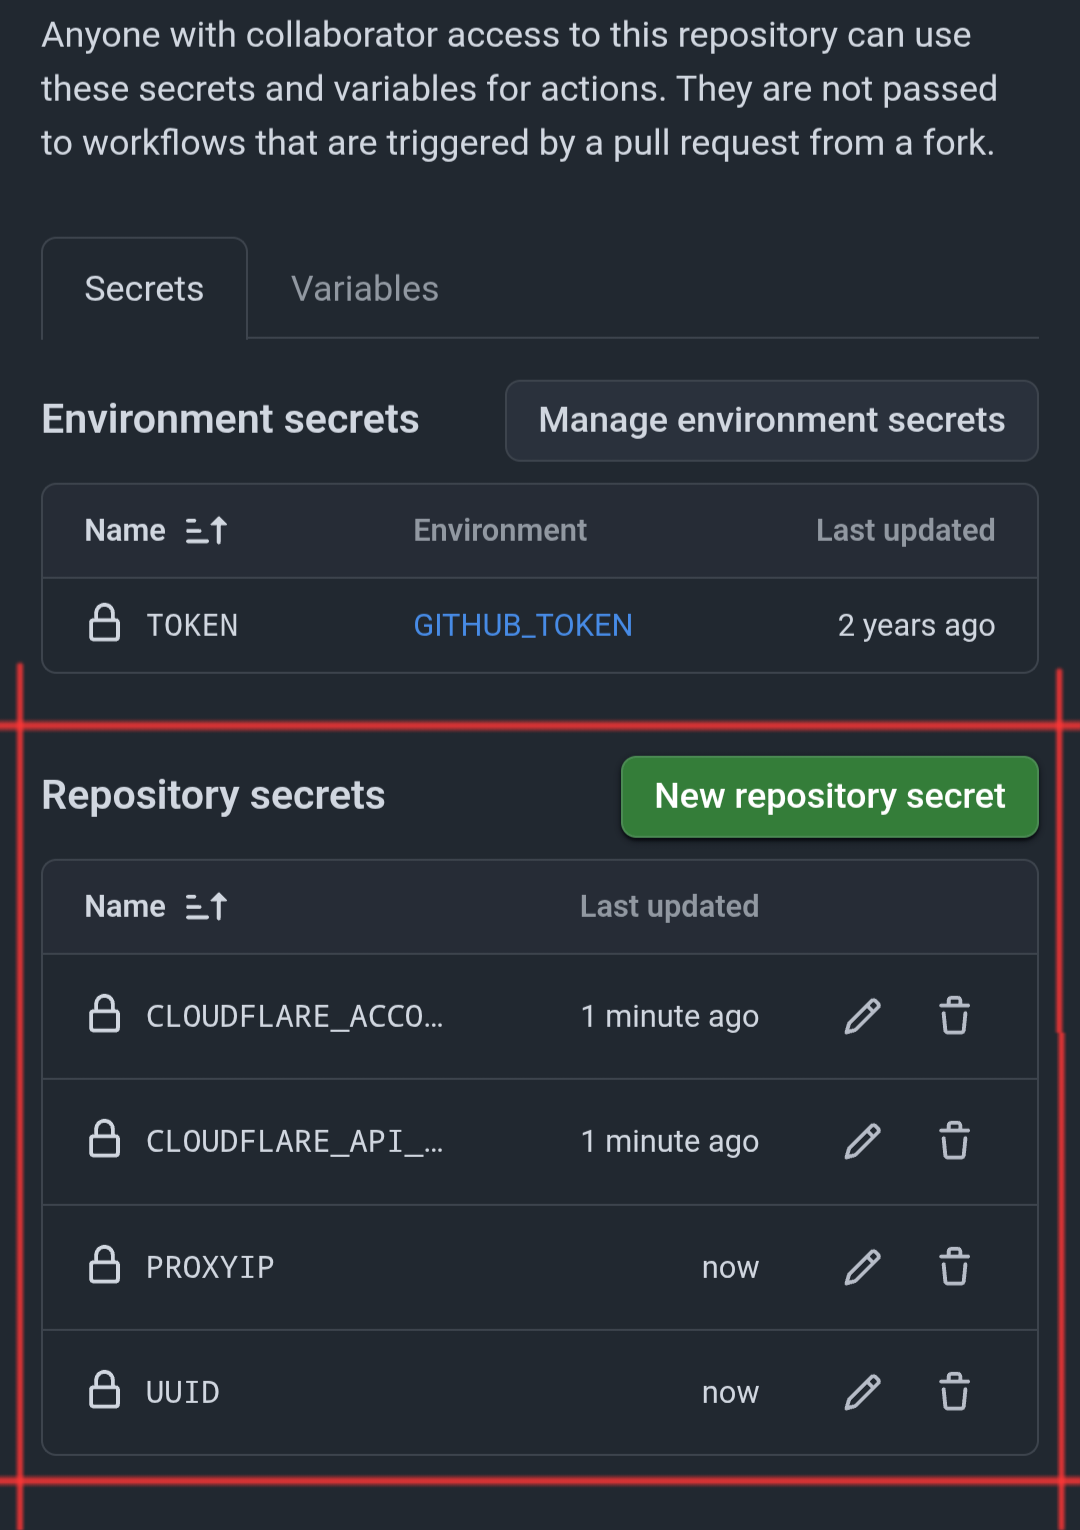
Important Note
Both CLOUDFLARE_ACCOUNT_ID and CLOUDFLARE_API_TOKEN are mandatory; the Worker cannot be deployed without them. The other two parameters (UUID and PROXYIP) are optional. If omitted, a default Proxy IP is embedded into the code, and GitHub Actions will automatically generate a random UUID for your Worker. To find the generated UUID, check your Cloudflare dashboard, navigate to the deployed Worker, and inspect its environment variables under the Settings tab.
Step 4: Enabling and Running GitHub Actions
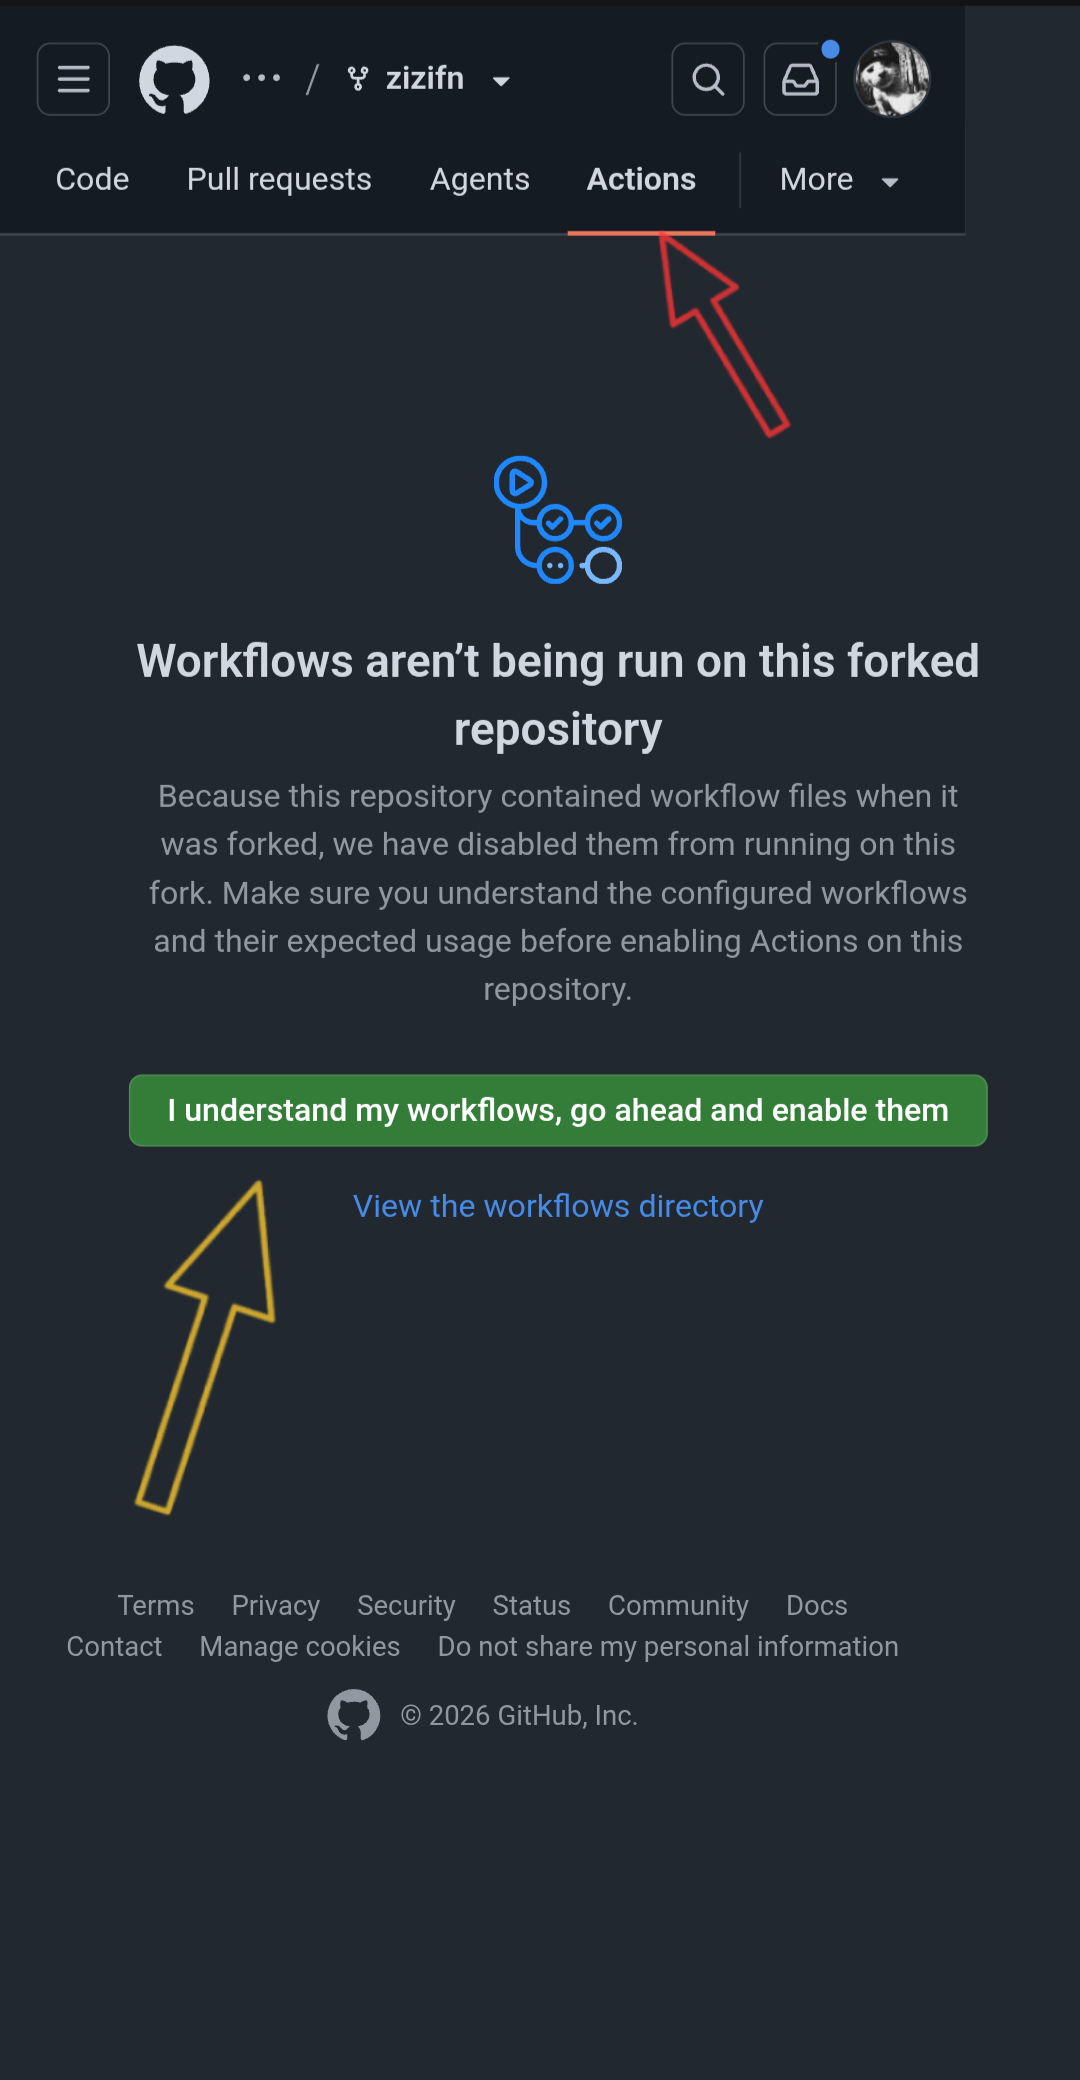
By default, GitHub disables Actions on forked repositories. You must manually enable and trigger the workflow once.
Go to the Actions tab at the top of your repository.
Click on the green button:
"I understand my workflows, go ahead and enable them"
to authorize workflow runs.
View Screenshot
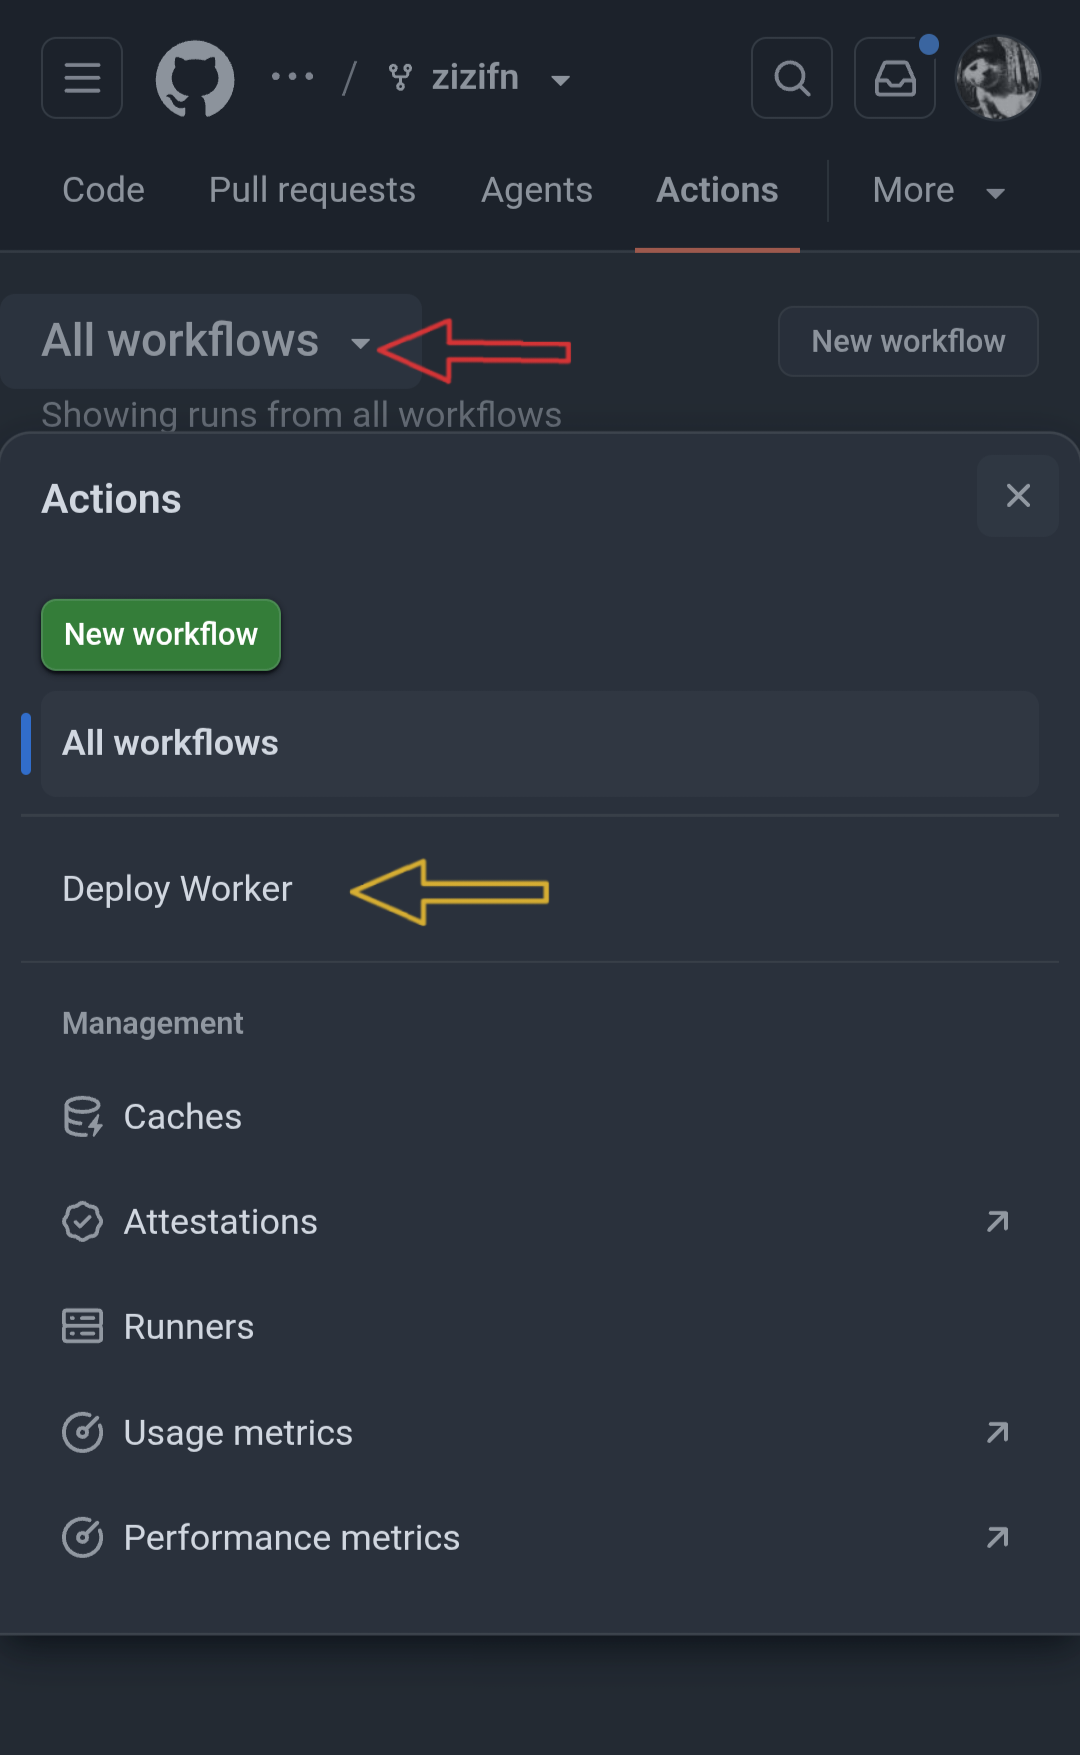
- From the left sidebar, click All workflows, then select the Deploy Worker workflow.
View Screenshot
On the right side of the screen, click the Run workflow dropdown button.
In the popup form, you can optionally override
Proxy IP,UUID, andWorker namefor this specific execution. (Leaving them empty will fall back to your repository secrets or default values).
View Screenshot
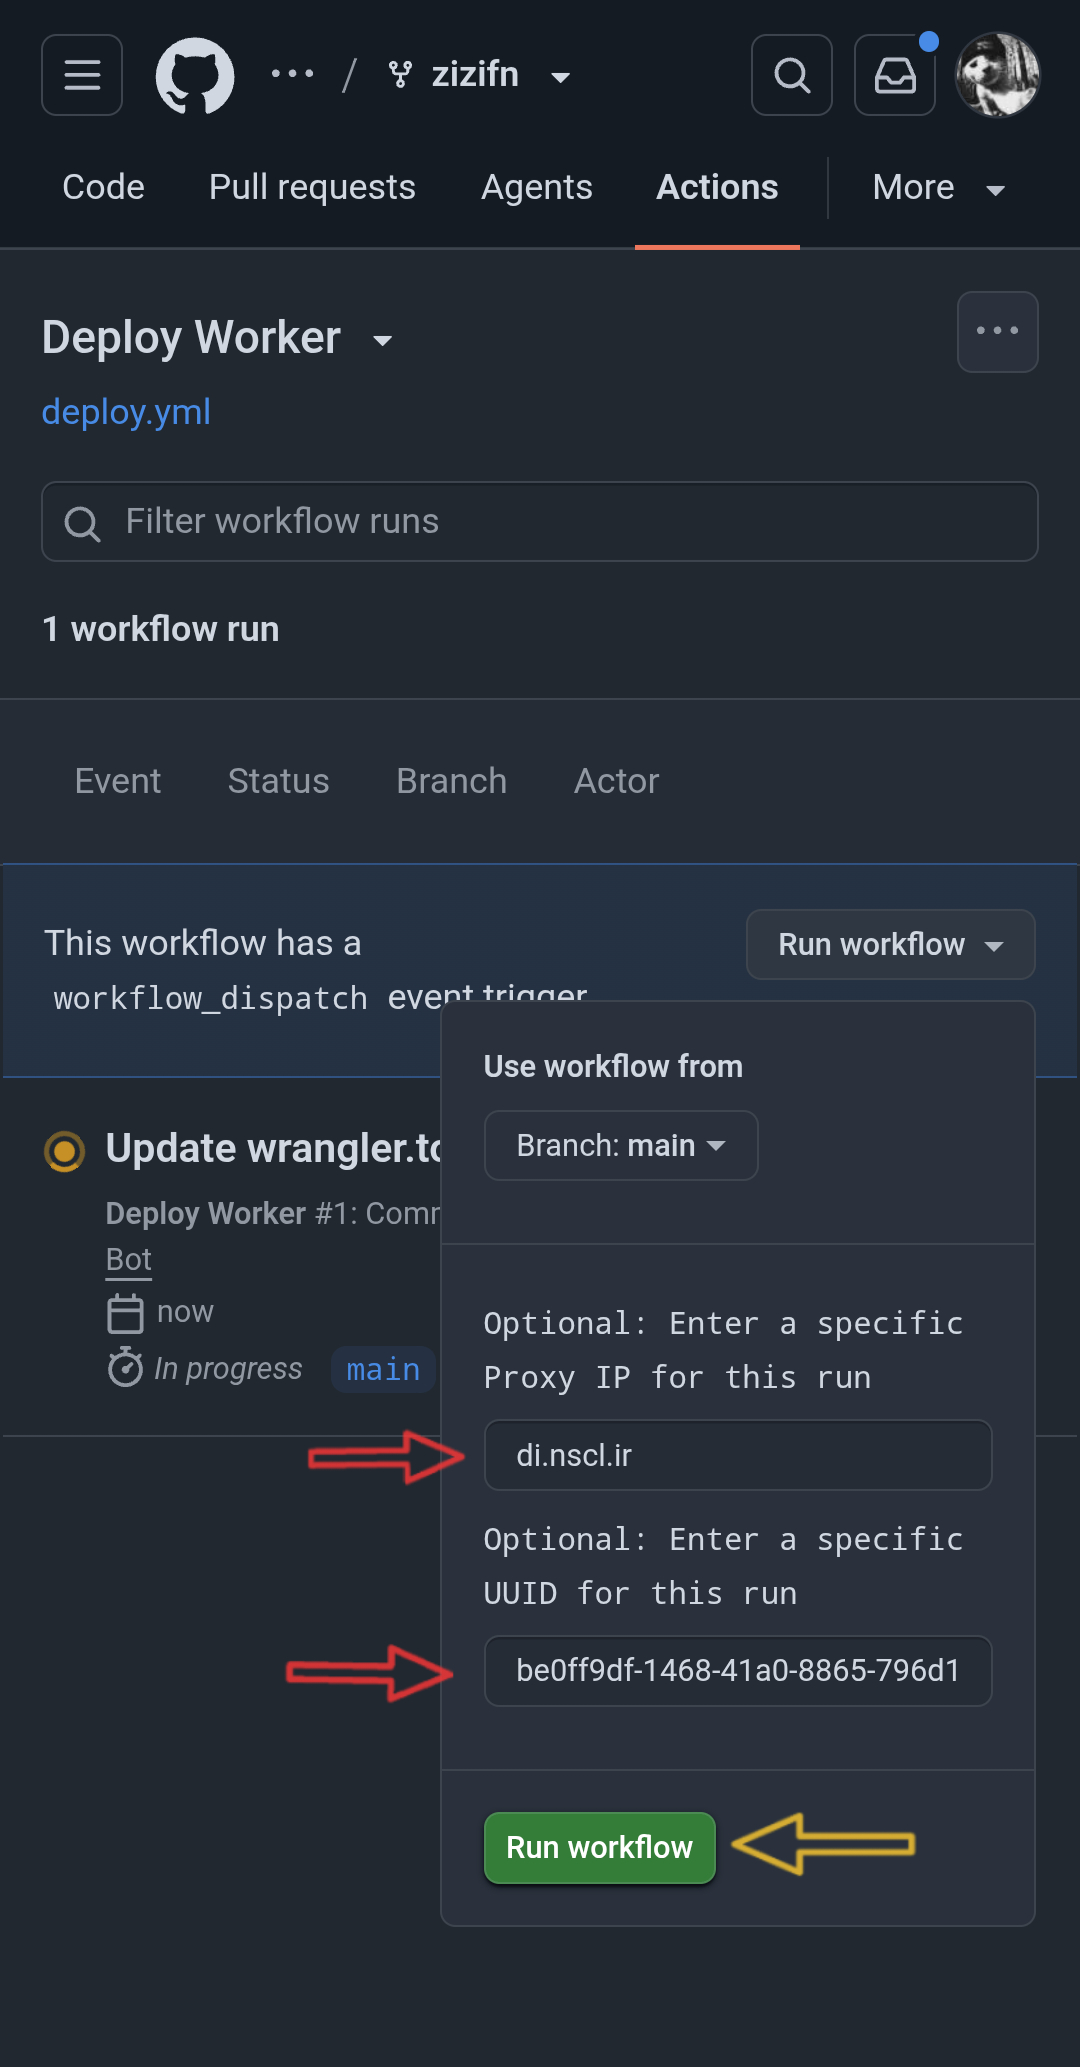
- Finally, click the green Run workflow button inside the popup.
After 30 to 60 seconds, a green checkmark will appear next to the run, indicating a successful deployment.
View Screenshot
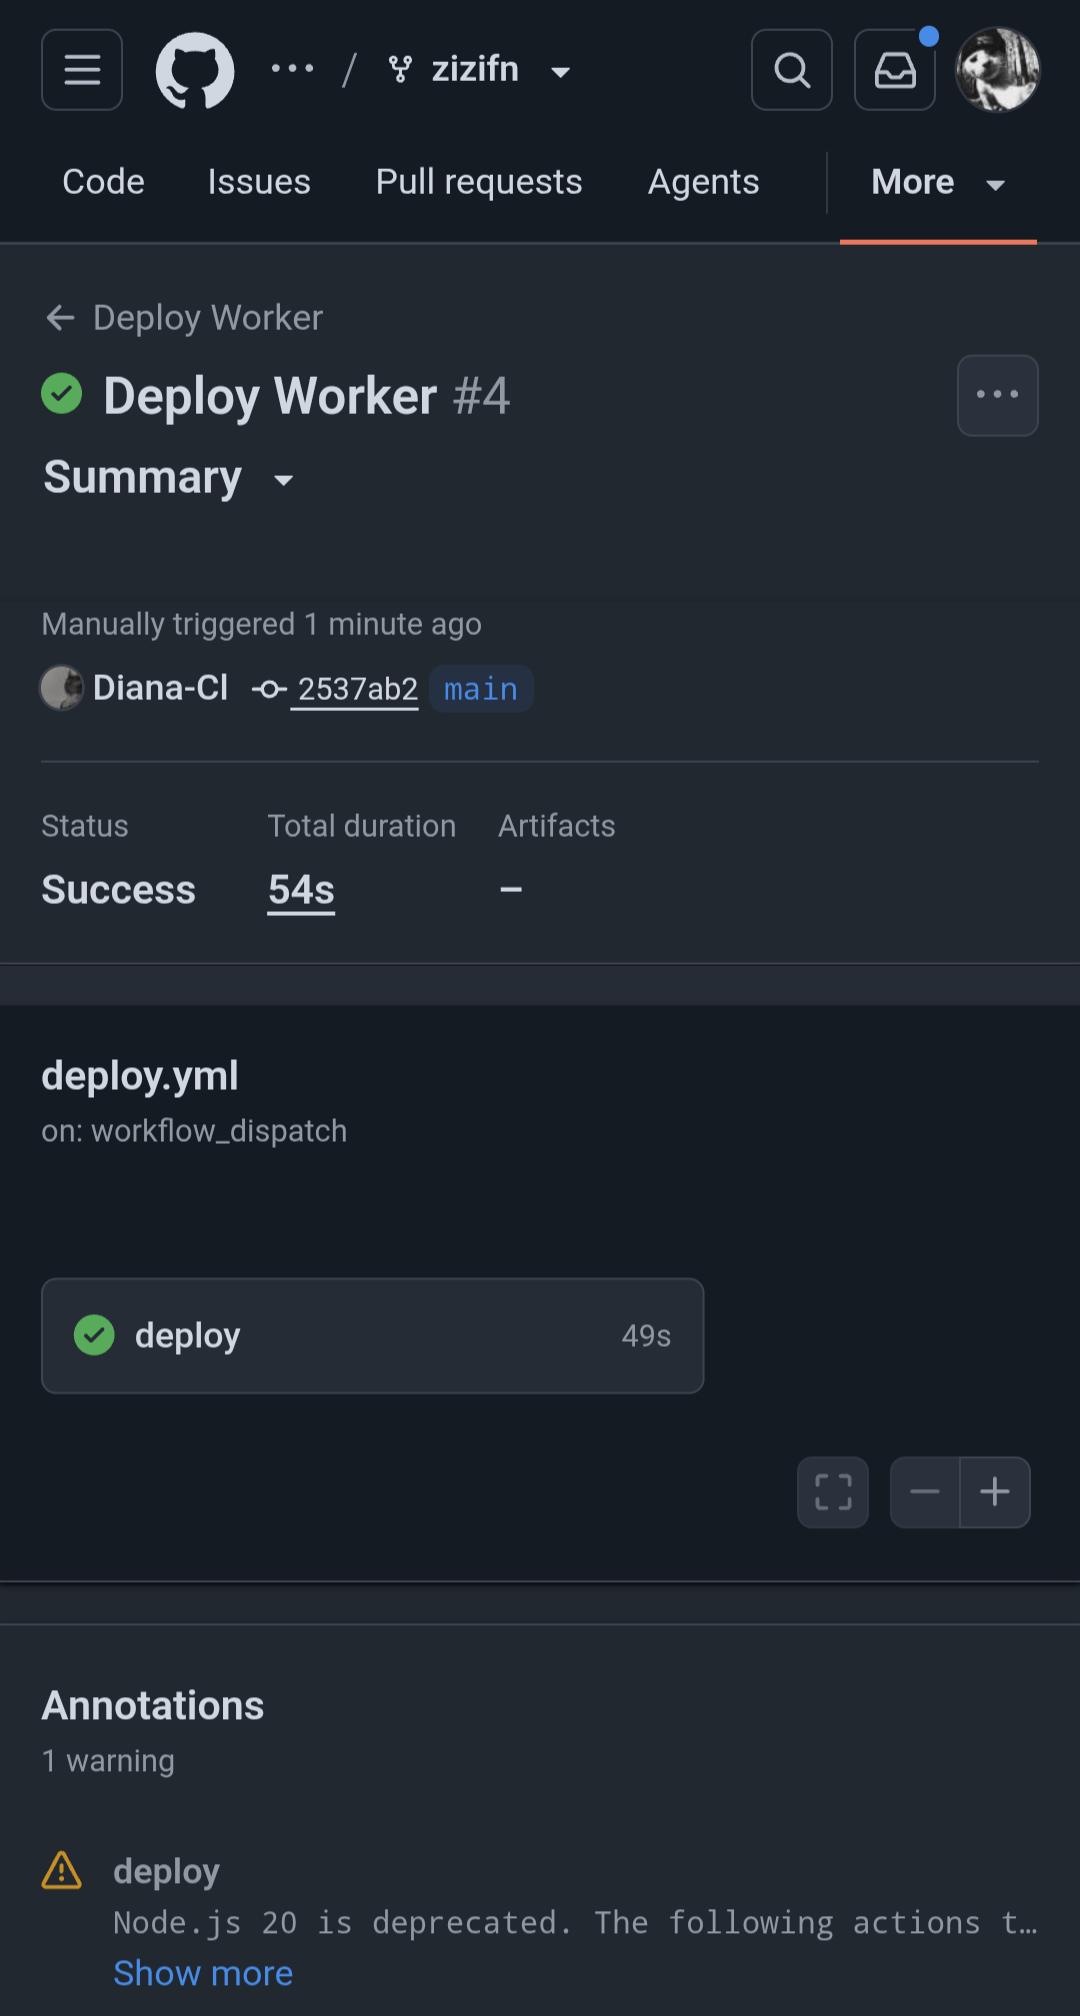
One-Time Execution Variables
Values entered directly into the Run workflow modal are disposable and will not be saved to your repository settings. This is useful for quickly testing different Proxy IPs or changing UUIDs on the fly.
Behind the Scenes
When you click Run workflow, a GitHub Actions runner initializes, downloads, and configures the Rustcargotoolchain andwasm-pack, compiling the codebase into WebAssembly. Shortly after compilation, a new Worker named0x00is deployed to your Cloudflare account (or using the custom name provided in the workflow input).If you wish to change the default Worker name permanently, edit the first line of wrangler.toml in the repository.
View Screenshot
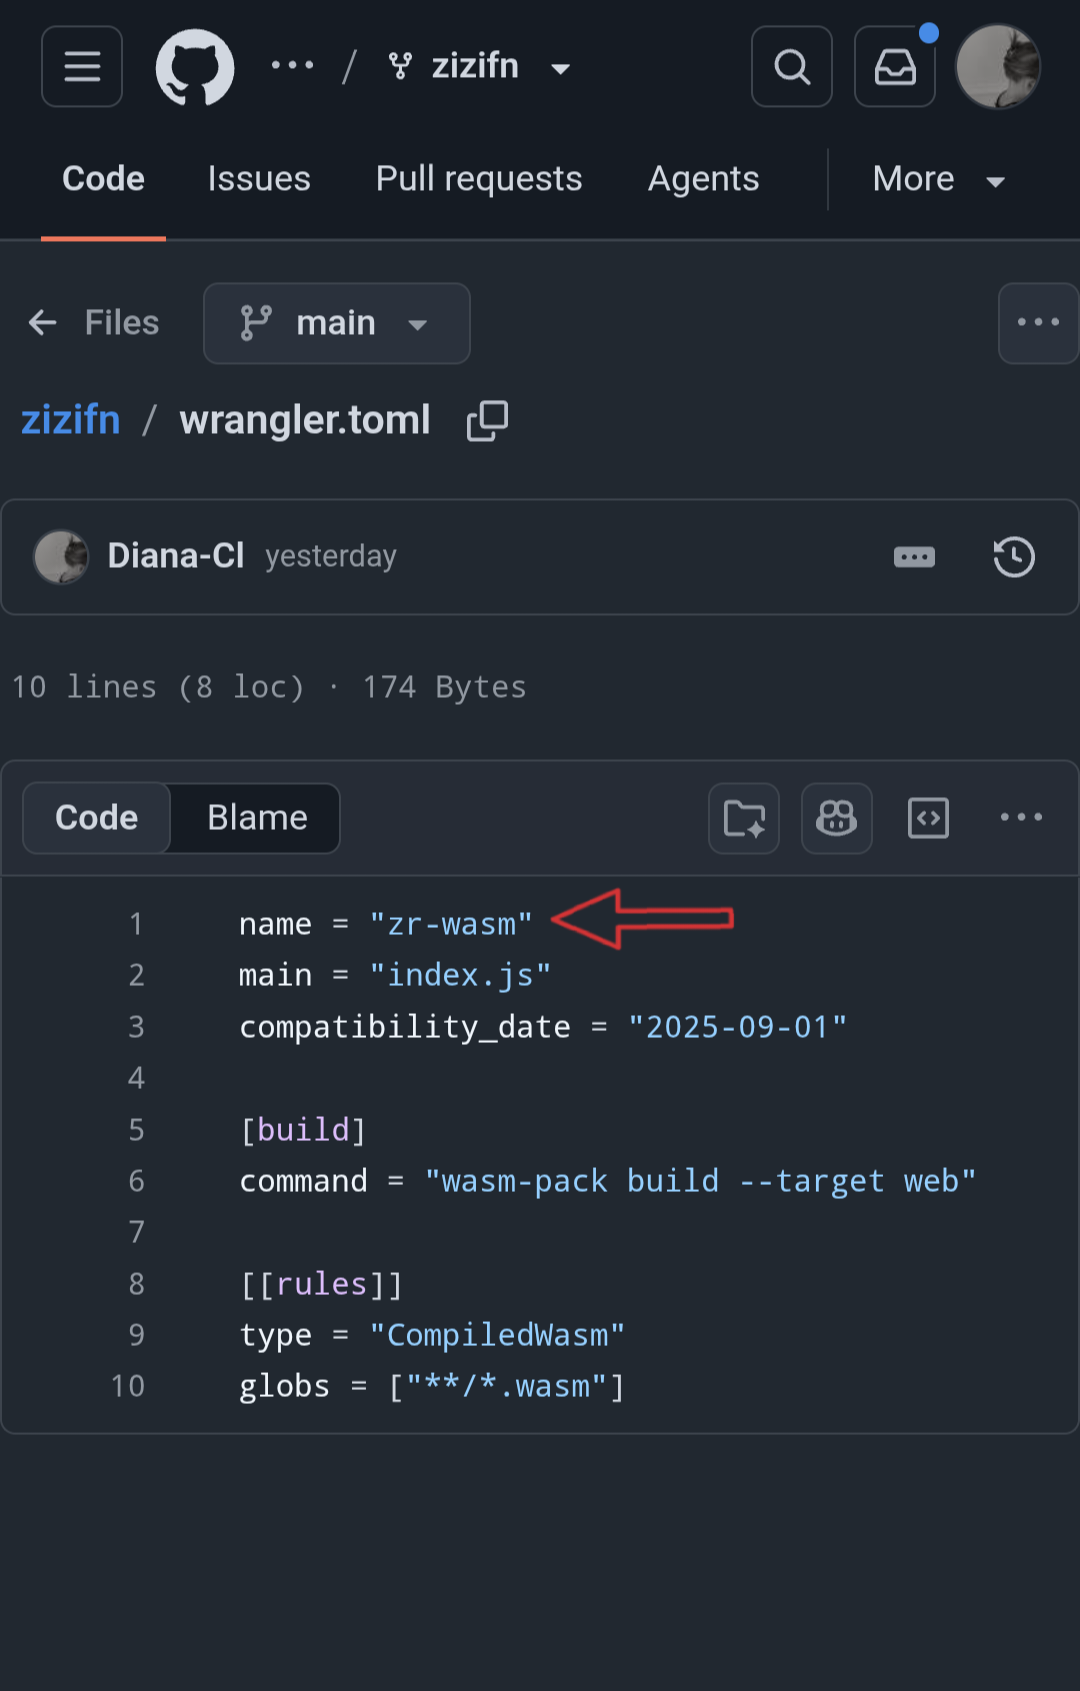
How to Use
Accessing the Management Panel
After deployment, append your UUID to your Worker domain:
https://Your-workers.dev-URL/<UUID>
For example:
https://0x00.workers.dev/be0ff9df-1468-41a0-8865-796d1c6800db
If you did not provide a UUID in the repository secrets or the manual workflow dispatch form, GitHub Actions generated a random UUID automatically. You can retrieve it by going to your Cloudflare dashboard > Worker > Settings tab under Secrets and Variables.
Retrieving Subscription Links
Your subscription link contains dozens of configurations pre-loaded with clean Cloudflare IPs. You can import them automatically using the buttons inside the panel.
Alternatively, if you need to copy the subscription link manually for other clients, press and hold (Long Touch) on any of the Import to ... buttons. Your browser will prompt for clipboard permission (only once). After allowing access, the specific subscription link for that client will be copied to your clipboard.
View Screenshot
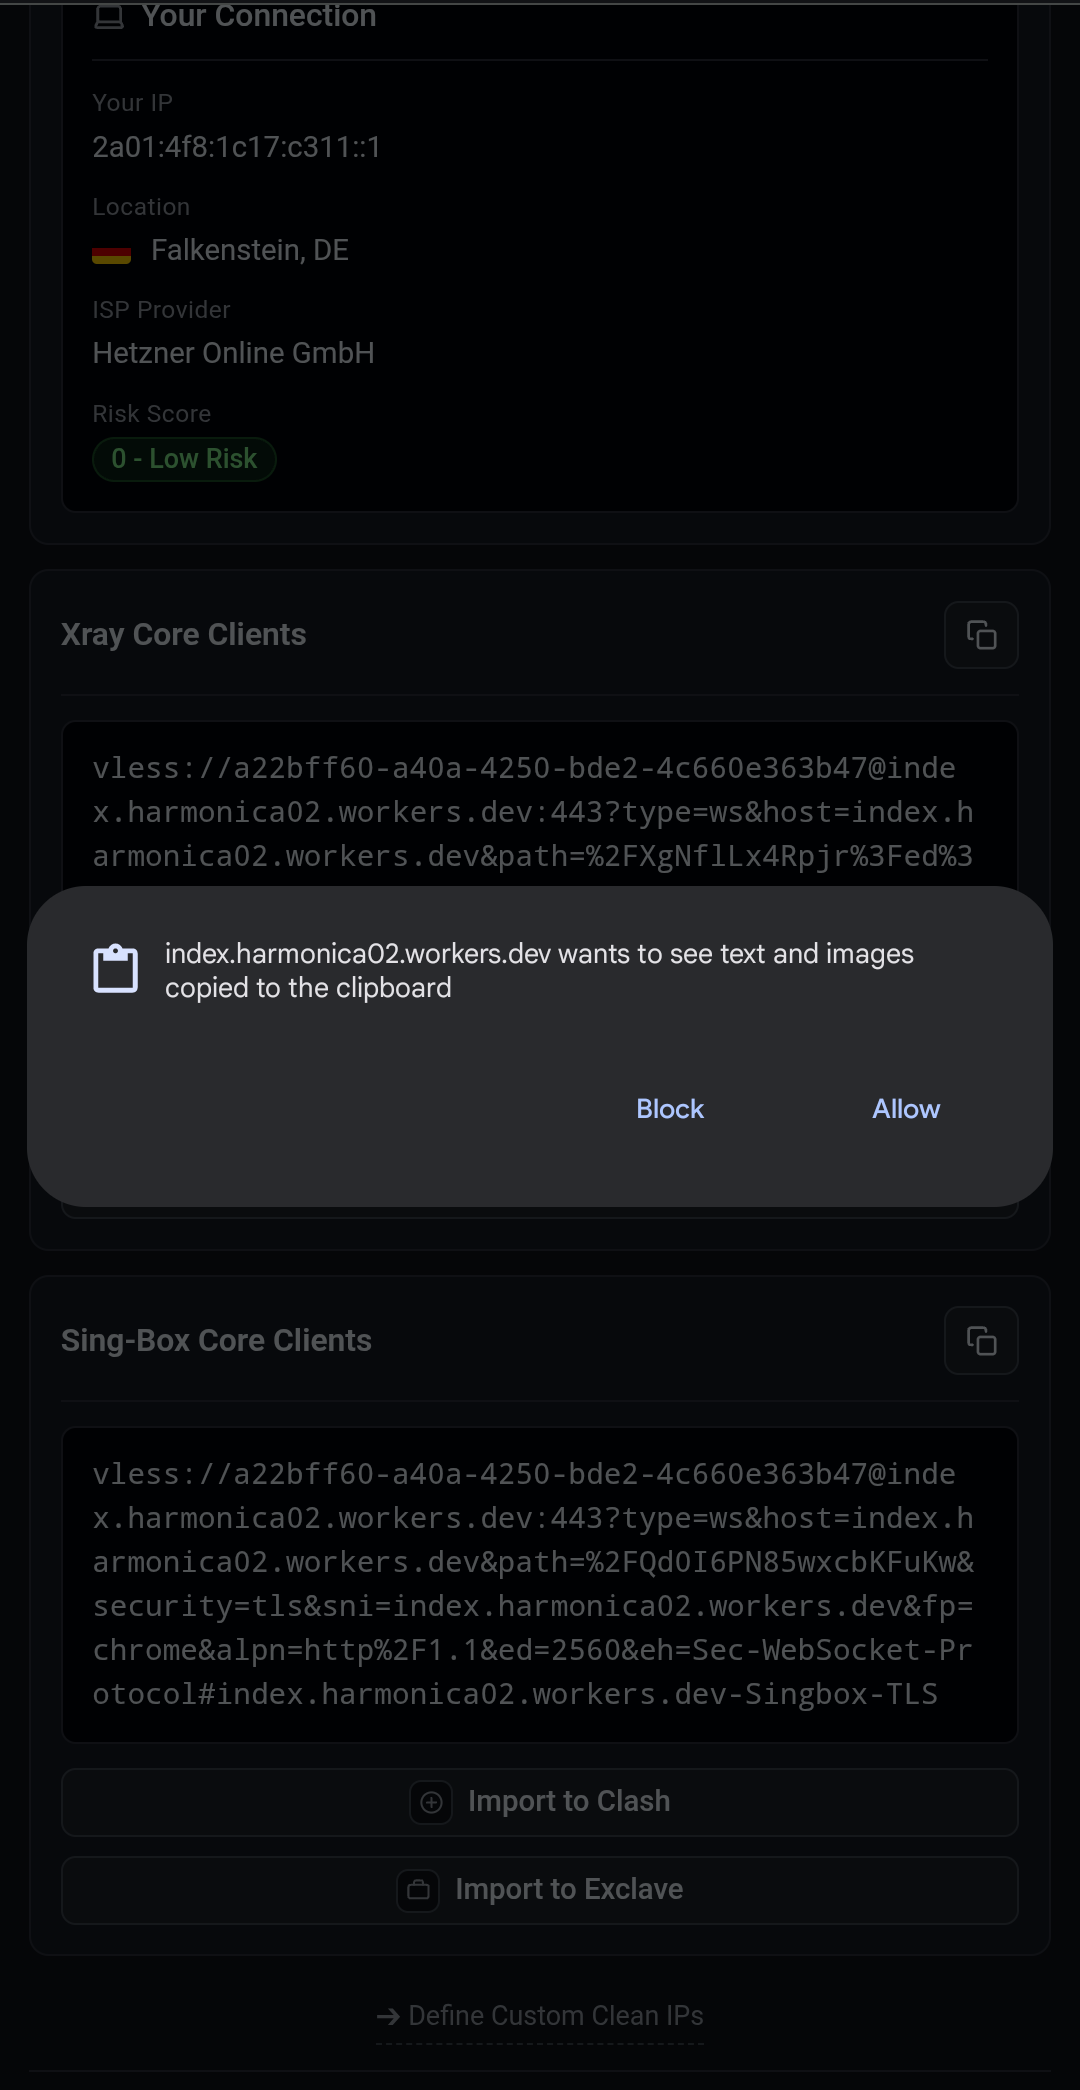
Subscription Link Examples
For Xray Core clients:
https://0x00.workers.dev/xray/be0ff9df-1468-41a0-8865-796d1c6800db
For Sing-box core clients:https://0x00.workers.dev/sb/be0ff9df-1468-41a0-8865-796d1c6800db
For PattNG Client:https://0x00.workers.dev/xray-enhanced/be0ff9df-1468-41a0-8865-796d1c6800db
Additional Details
Differences Between xray, xray-enhanced, and sb
The xray prefix
Optimized for clients powered by the Xray core, such as:
v2rayNG, MahsaNG, Hiddify, Nekoray, v2rayN, Streisand, Napsternet, NPVT, Happ, etc
The xray-enhanced prefix
Configurations that include Patterniha parameters by default—meaning they are configured with Final Mask, Cipher suites, and Undafe for fingerprinting.
Best suited for Xray-based clients that support these features, such as:
PattNG and v2rayNG
The sb prefix
Optimized for clients powered by the Sing-box core, such as:
Nekobox, Exclave, Sing-box, Husi, Karing, etc.
Clean Cloudflare IPs
The IP pool included in configurations is sourced from the NiREvil/vless repository. The IP list is refreshed automatically every 4 hours.
Optimized Configurations
Recently, Patterniha proposed adding two parameters to configurations built on Cloudflare Workers to combat severe internet disruptions, constant connection drops in Iran, and poor upload speeds:
- Final Mask
- Cipher suites
To maximize performance, they released a fork of v2rayNG named PattNG on GitHub. Alongside normal configurations for v2rayNG, an Enhanced subscription is provided so that configurations are pre-tuned with these parameters. First, download and install PattNG from Patterniha's GitHub releases, then open your panel, click Import to v2rayNG, and select Enhanced.
PattNG GitHub Repository
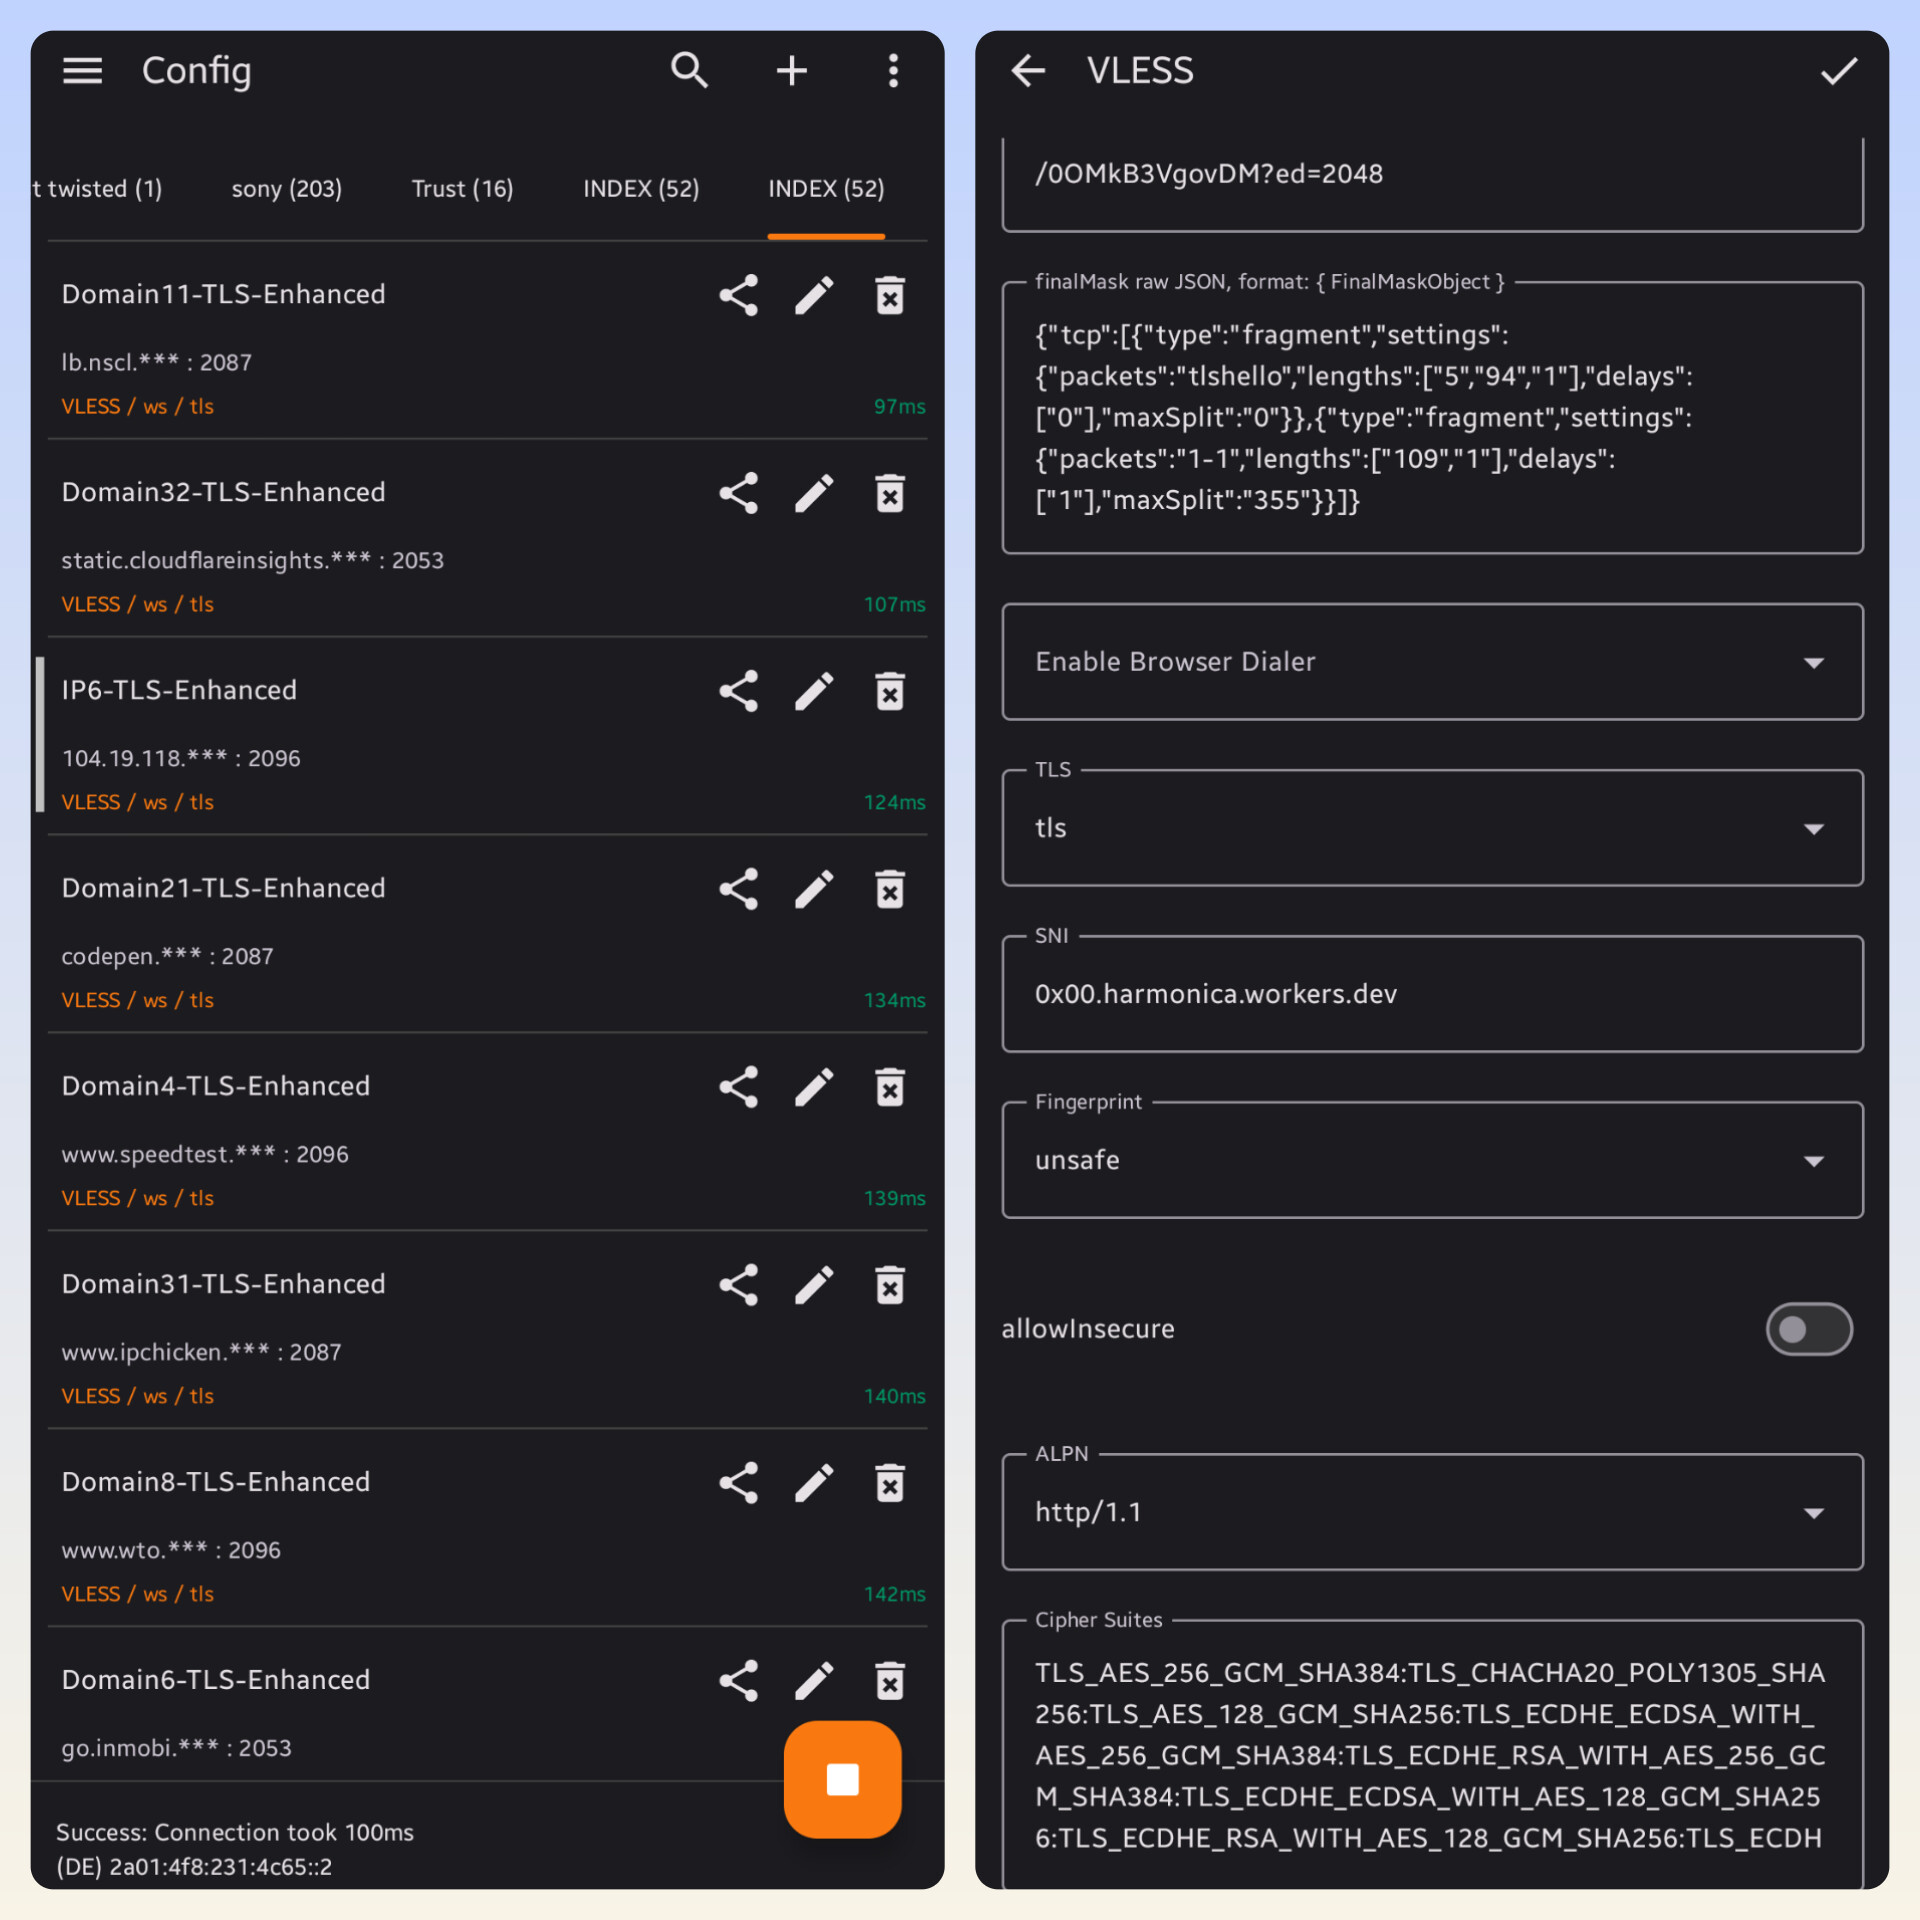
Resolving Google Service & Gemini Issues
Our dear friend Mehdi has published a comprehensive guide addressing regional blocking and connection errors with Google AI Studio and Gemini.
Click here to view the article.
● Deployment Engine
- GitHub Actions runner (Ubuntu-24.04 VM)
- Cloudflare Wrangler Action v4
- Rust wasm-pack v0.13.1
Security Warning
Click to expand
Never provide sensitive Cloudflare tokens inside manual workflow input text fields!
Values passed to manual run forms are stored in GitHub Actions workflow execution logs and become publicly visible if your repository is public. Sensitive Cloudflare credentials must always be stored via Step 3 (Repository Secrets) so GitHub can encrypt them securely.